What you need for bead embroidery. Bead embroidery lesson for beginners and master classes on various techniques. Follow the rules when embroidering with beads
Why do many needlewomen prefer bead embroidery to any other type of needlework? Most likely because beads add a wonderful texture to any product, decorating it and adding shine and dimension to the finished work. It is not surprising that more and more craftswomen want to learn bead embroidery. In addition, if you have already mastered thread embroidery and know many different techniques of this type of needlework, then learning how to decorate clothes and fabrics with bead embroidery will not be so difficult. But still, you shouldn’t start a new business without knowing the basics and without having the necessary materials and tools for this. In this article, we have collected the most useful tips for beginning craftswomen that will make it easier for you to prepare and learn this needlework. Let's find out what it takes to be able to use thread, needle and beads.
1. Materials and tools
The first thing you should do is stock up on everything you need for bead embroidery. Follow the tips in this section and check out this complete list of what every crafter should have in her closet.
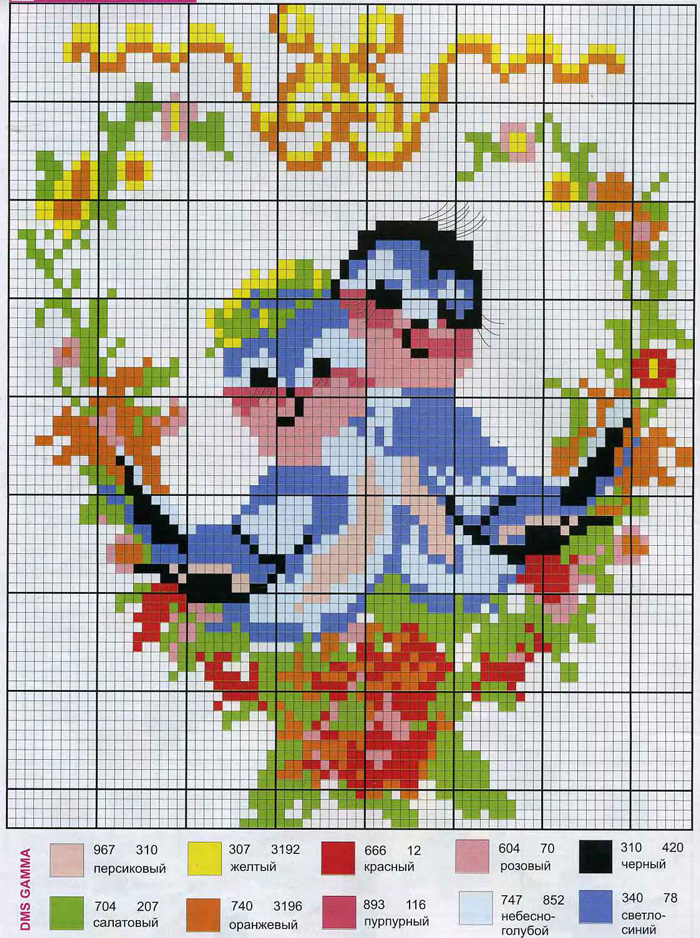
Scheme or drawing according to which to embroider with beads
If you have never held a needle and thread in your hand, then you definitely need to purchase a bead embroidery pattern. Usually ready-made kits already have diagrams, but if you are not satisfied with their design or something else, you can always buy a diagram separately or even find something suitable online. The diagram allows you to better navigate during operation and also has a color designation. That is, each cross or square on the diagram means a certain color. Such pictures also contain useful information about what shades of beads to purchase. To do this, each shade or color has its own number, which greatly simplifies the process of finding the right materials.

Beads of different colors
The very first difficulty when selecting material may be finding the right, high-quality beads of a certain size and color. The quality of the beads must be excellent. It’s better to save on something else, otherwise your product will quickly lose its beauty and respectable appearance.
There are three types of beads on the market - plastic, glass, ceramic. All three types have bright and rich colors, are durable, practical and retain their beautiful appearance for a long period of time. When choosing beads, consider the diameter of the beads. It should be related to the density of the fabric and the thickness of the threads. The denser the fabric and thicker the thread, the more massive the beads should be. A similar principle in choosing beads applies when searching for material for thin fabric.

Plastic beads

Ceramic beads

Glass beads
Best to buy Czech beads (made from colored glass), they are of very high quality and there are fewer defective beads.
Threads in color matching beads or base
Cotton or silk threads are suitable for this type of needlework. They do not stretch, do not fray, and are not afraid of the influence of moisture and ultraviolet radiation. Another option that is suitable for creating paintings and icons is polyester threads, as well as wax-impregnated products. Their advantage is that they do not twist and ensure a tight fit of the beads to the fabric. It is best to select threads to match the color of the beads.

If you rub the thread with wax, it will become less tangled during the embroidery process.
Canvas or piece of fabric
Canvas is a special fabric for embroidery made from linen fabric. When choosing it, pay attention to the size of the “squares” into which it is divided.
This fabric greatly simplifies the process of transferring the design onto the canvas. But if you want to simplify your task, purchase a canvas with a design you like already applied. Most often, thick linen or cotton fabric is used as the basis for bead embroidery, although you can also embroider on other materials, such as velvet, synthetics, etc. But this is a little more complicated, since you will have to apply the design pattern to the wrong side of the material to avoid unevenness of the pattern.

Bead embroidery on Aida canvas

Bead embroidery on canvas with a printed pattern
After you decide on the choice of canvas, you should starch the fabric so that it stretches better. This way your embroidery will be smooth and flawless.
Hoop
Thanks to this product you will significantly speed up the embroidery process. This occurs due to the fact that the section of fabric with embroidery will be perfectly flat and slightly stretched. You don't have to constantly straighten the fabric and make sure that the thread doesn't break or tangle.
Experienced craftswomen advise choosing hoops made of wood or plastic, since these materials are resistant to moisture, sudden changes in temperature and other factors that have a negative impact on the integrity of the product.
Bead needle

In stores, such needles are called “beaded”. Beading needles differ from regular ones in that they have the same thickness along their entire length. Needles from No. 10 to No. 16 are usually used, depending on the size of the beads themselves. For small beads - 15-16, but in general everything also depends on the embroidery method, so it’s easier to immediately purchase a set of needles. If the needle pierces the beads freely, then it is suitable.
Scissors
In this type of needlework, like embroidery, you need good, sharp scissors. And in bead embroidery, such scissors will be simply irreplaceable. You may not need to buy scissors at all - ordinary manicure scissors will also work for this type of needlework, which will be much more convenient than ordinary scissors with rounded tips.
Frame for finished work
If you are embroidering a picture or drawing that you are going to hang on the wall, then you need to take into account such an item as preparing a frame for an already embroidered picture. Of course, you can make it yourself, but we strongly recommend that you contact a framing shop and order the frame you need. Such workshops, as a rule, have everything you need to make a beautiful and impressive frame for your product.
First of all, you need to take care of the material and color of the frame. For example, you should not choose a frame that does not match the color of your product. It is also better to give preference to wooden frames - they look much more colorful than their plastic counterparts. In addition, the wooden color will be perfect for any image. When ordering a specific frame, make sure that the craftsman does not use glue or staples when stretching the canvas onto the frame. This may damage the product.


1. Step by step tutorial for bead embroidery
Now you are ready to get started. Follow our recommendations and excellent results will not keep you waiting. Here's what you need for this:
Preparation
Before you start working, you need to choose a pattern or ornament that you will embroider, and also prepare everything you need for this (the necessary beads and all the materials for the work). Once you have found the design and pattern you want, cut as much canvas as you need and sort the beads according to the colors you want.
For a beginner, as is the case with cross stitch, ready-made kits with diagrams and all the necessary materials are best suited.
Processing the edges of the canvas
To ensure that the edges of the canvas do not crumble and look neat, it must be processed. There are several ways to process canvas. Some needlewomen prefer to finish the edges of the fabric manually using an overcast stitch. But there is a simpler and faster method - processing the edge of the canvas using PVA glue, an adhesive stick or transparent nail polish.
To avoid pulling the fabric, we use a hoop
They come in plastic and wood. If you want to buy a wooden hoop, make sure that the wood is properly processed. Any minor roughness and surface deformation can lead to damage to the fabric and possibly the embroidery itself. For larger projects, it is better to buy rectangular tapestry hoops.
Video: preparing a workplace and accessories for bead embroidery:
Choosing a bead embroidery technique:
Embroidery with horizontal stitches, also called "monastery stitch". It is used for embroidering paintings, icons, small images on handkerchiefs and clothes. It will not be difficult to implement even for beginners: you should start from the upper left corner, where you thread a thread and a needle, then string a bead and secure it, “sending” the needle to the lower left corner. Do the next stitch in exactly the same way. If you implement this technique correctly, all your stitches will be placed diagonally. The monastic stitch is similar in principle to the half-cross embroidery technique, with the only difference being that you also use beads.
In case you need to skip a row or go to an adjacent one, pass the thread through the upper right corner of the right side and then go to the opposite corner at the bottom of that square.

The monastery stitch is the best way to start learning to embroider with beads.
Video: how to embroider with beads (monastery stitch):
Line stitch: fix the bead horizontally. You need to thread the needle and thread in the middle of the “cage” on the right, then fasten the bead and “send” it to the left. This technique is an exact copy of the “back needle” variation, which we know from labor lessons. Using this stitch, you can determine the distance between the beads yourself.

Embroidery with a lower stitch (back stitch)
If the beads are not well secured to the fabric, simply create another line using a backstitch.
Stem seam: it is used to securely fix the beads to the canvas. This type of technique is implemented on the same principle as the line stitch, but with minimal differences. The needle is threaded from the left, a bead is threaded, then the needle is threaded through the opposite corner. After this, return the needle to its original position and thread the thread through the eye of the bead again.

Embroidery with stem stitch
With this stitch you will achieve a denser pattern, since the punctures are made as close as possible to the previous bead.
3. We frame the finished work
Congratulations! You have already completed all stages except the last one. Designing your finished product is also an important task. You need to be extremely careful so as not to spoil all the work done. Under no circumstances should you glue the canvas to the cardboard. Just place it on it and tuck away the excess fabric. Make sure that the fabric tension is tight enough, but not too tight, so as not to break the threads. Now you can frame the product.
Using the filter, in the Tsvetnoye store you can choose a baguette frame for almost any size of embroidery:
If you are afraid of making a mistake at this final stage, then you can always take the work to a framing workshop, where it will be quickly and beautifully decorated.
This is how you can quickly and easily decorate your home with beautiful paintings embroidered with beads. Over time, you will be able to embroider more and more complex patterns and pictures, independently and accurately selecting the right material. With ready-made kits you will definitely learn this type of needlework faster, which is what we recommend.
Bead embroidery looks magical and beautiful, captivating with its sparkle and tints. It is so reminiscent of cross stitch, but it looks more formal. It seems that embroidering with beads is the domain of the most experienced craftswomen, but one should not rush to draw conclusions. Beginning embroiderers will also be able to master this technology, they just need to choose the right tools and materials, and learn little tricks that will help them work faster.
Bead embroidery technique
The pattern for bead embroidery is divided into colored squares in the same way as for cross stitch. But since we are not tied to the color of the thread, we have every right to embroider the pattern in rows, changing the color of the beads where necessary. Differences in bead embroidery techniques lie in the characteristics of the seams, as well as the fabrics used as a basis.
Known monastic, lowercase And stem the seams that attach each row of beads to the fabric. The type of use of the canvas may also vary. If embroidery is done on clothing, then a lined temporary canvas is placed under it. When you need to get a simple embroidered picture, the canvas itself is the basis. Such bases come either with a pattern applied to them, or smooth, to which a separate diagram is attached. In the second case, counting and embroidering is more difficult. But even here you can use a trick: cross out each embroidered row from the pattern with a marker so as not to get lost.

How to embroider with beads - lessons for beginners
The success of bead embroidery largely depends on the correct choice of material and tools. You must first understand which beads to use for a given purpose, which canvas is suitable for the job, and why a regular sewing needle is not the best option for this type of embroidery. Only a temporary canvas can be thin, subject to evaporation, because the base is made up of another material.
Then it’s worth studying the stitch patterns: beads love neat craftswomen. The finished work will be the best gratitude for your meticulous approach to the matter. The meticulousness of the needlewoman is checked by the reverse side of the work. If the painting is made with a monastery stitch, then from the inside we will see rows of vertical stitches.
How to choose a canvas
It should be understood that beads, especially glass and ceramic, are heavier than threads, which means the canvas must be thick. Not all types of canvas suitable for cross stitch are capable of holding thousands of small beads well. It is more convenient to embroider with beads when there are holes in the canvas, as for cross stitch. This is a condition for the rows and columns of beads to be perfectly even.
If you have already purchased beads, then you need to choose a canvas with such a pitch that each bead fits perfectly into each cell. Usually, when embroidering, beads lie diagonally, this should be taken into account.

What technique to use
It will be much more convenient for a beginner to embroider with beads if he chooses the monastery stitch. It is good to switch to it after cross stitching.
The monastic seam is performed like this:
The thread is fixed in the lower right corner of the outer square of the selected row (if desired, the work can be filled both from the top and from the bottom).
A bead of the desired shade is threaded onto a needle.
The needle is inserted from the front side into the upper left corner of the canvas square.
From the wrong side, the thread is pulled to the lower left corner and brought out to sew on the second bead.
The technique of bead embroidery is not as complicated as it seems. The main thing is not to overtighten the thread so that the outline does not fit around the bead, but remains even. Not tightening the thread is also bad, because the beads will hang unsightly, the rows will not be even, and over time the embroidery may crumble. For the first time, it is more convenient to take a canvas with a ready-made pattern. Because of the paint, it turns out harder, so there is practically no risk of over-tightening the thread.
Which beads are better
Accurate bead embroidery will be achieved when the beads are strictly the same size. The surface of each bead must be smooth and shiny. Ceramic beads have a beautiful matte shine, glass beads shine brightly. Plastic beads do not look the best; they are good only for children's pictures, but are not suitable for artistic work. A child can practice with plastic beads, which are inexpensive and easy to lose. It is better for an adult craftswoman to choose initially high-quality beads. Japan and the Czech Republic are considered the best producing countries of this material. Domestic beads are also relatively good, but they have a little more defects in terms of the “walking” sizes of the beads. You shouldn’t throw away the waste: it can be useful for weaving bracelets and beads, and decorating fabric appliqués.


If you want to test beads for quality, then select several beads and divide them into three groups. Keep one in the sun for several days, the other in water, and the third in normal conditions. If after a given period all groups are of the same shade, then you have bought excellent beads.
If a certain color from the set turns out to be of poor quality, it is better to replace it with products from a well-known manufacturer, but then the resulting painting will delight viewers for many years.
What needles and threads are needed for beads
Beading needles are distinguished by the fact that they do not expand towards the eye. The almost cylindrical shape makes it easy to thread through a narrow hole in the bead. The needles are divided by numbers from 10 to 12. You need to choose needles depending on the holes in the beads. The beads should not get stuck on the needle, even where the thread is inserted into the eye.

You will need transparent thread for bead embroidery. This is especially important when the painting uses beads that have transparency. Also, the thread must have high strength and elasticity. Nylon threads, which can be sold under the brand name “beaded”, best meet these requirements.

Bead embroidery patterns (examples)
After you have learned how to embroider with beads on canvas with a pattern, it is good to start embroidering on canvas with regular square markings, using a pattern printed on paper. In principle, it is possible to take bead embroidery patterns from the Internet and even look at them on a monitor, but it will be difficult to determine by eye which line you have already embroidered and which not. It is better to prepare a printout and cross out on it what you have already embroidered.
If you don’t have a color printer at home, you can attach a transparent film to the monitor and cross out lines on it, but you need to strictly ensure that the bead embroidery pattern does not shift on the monitor itself. Since sites for handicrafts often have animated advertisements, the images of the main content may shift because of them. Therefore, it is better to make a copy of the screen with bead embroidery and raise it in any graphic editor. Then you will exclusively manage the movements of the circuit.
 1
1
 2
2
 3
3
 4
4
 5
5
 6
6
 7
7
 8
8
How to embroider a picture with beads step by step
It is easy to embroider with beads when the front of the work is prepared in advance. It is worth spending time on preparation, because it will be gained during the embroidery process.
Step by step process:
- We select beads of the desired colors and scatter them into boxes or organizer cells.
- We mark the outline if there are no markings on it.
- Thread the canvas into the hoop.
- We place the drawing in front of us on the stand, next to it we place a marker and a saucer for individual beads.
- We thread the needle.
- We insert the needle from the inside into the canvas at the level of the first row to be embroidered.
- We string the first bead onto it and sew it on like a button, with 3-4 turns to secure the thread.
- Using a needle, we collect several beads of the colors that are included in the current row, and pour them into piles on a saucer.
- We embroider with beads using the “monastery stitch” technique discussed above.
- If a row is completed and the thread remains, it is advisable to go the next row in the opposite direction so as not to break the thread. For some, it is more convenient to turn the work upside down, while others can do it without turning it over, demonstrating miracles of dexterity in handling a needle.
- When the thread runs out, it should be secured. Firstly, it is convenient to pass it through one bead several times. Secondly, it’s a good idea to arm yourself with a thread threader and pull the tail of the thread through several already sewn beads. Since the tail of the thread will lie in a zigzag, it will not have a tendency to jump back.
If a beaded pattern is embroidered on clothing, then the sequence will be as follows:
- we do the preparatory steps described above, with the exception of stretching the canvas;
- We attach a removable canvas to the clothes;
- We put the garment with canvas into the hoop and begin work;
- At the end of the embroidery, the canvas is evaporated along individual threads.

A removable canvas appeared, soluble in water. Since only waterproof beads are used for clothing, the product must be washed and the canvas will disappear.
Registration of work
Beadwork is rarely used for pillows because they are uncomfortable to sleep on. Sofa cushions with beads will be constantly exposed to stress, which is why the embroidery will quickly begin to crumble. The same goes for bags. It is better to embroider with beads a cosmetic bag and a wallet, which are located inside the bag. On clothes, it is better to embroider with beads in specific places that are guaranteed not to rub and are unlikely to get caught on passing objects.
Most beadwork becomes paintings that are framed and hung on the wall. To secure beaded embroidery in a baguette, you will have to stretch it onto a sheet of hardboard or plywood. The edges of the canvas free from beads must be wrapped behind a prepared plywood or hardboard base. They should be glued with double-sided tape, but to be sure, it is better to tighten them with thread, making stitches that overlap from one side to the other. Some of them are done between the sides, some - between the top and bottom.

A frame for bead embroidery should look rich, because the work itself is quite decorative. If you don’t want your work to gather dust, then the frame must have glass, preferably anti-reflective glass. It is this that will give the viewer the opportunity to see all the nuances of a work of art.
If it is not possible to purchase such glass, then it is better not to install simple glass. It is recommended to spray the painting with a protective varnish. Sometimes there are recommendations for designing bead embroidery - not to use glass at all, because the beads are made of glass. In reality and under glass they look fine. Unless the work becomes like a museum exhibit. Whether this is good or bad, judge for yourself. The presence of glass is a matter of taste of the craftswoman.
Video
If you want to see how craftsmen do bead embroidery, watch the video sequences, which show detailed lessons for beginners. Video tutorials are a great addition to our stories about bead embroidery.
Bead embroidery has been and remains very popular all over the world, especially among our needlewomen. To this day, richly beaded priestly clothing and religious objects made by ancient craftswomen are found in the archives of monasteries.
Hand embroidery added solemnity to products and was highly valued at all times. Icons embroidered with beads still decorate not only church churches, but many needlewomen also have homes.
Embroidering icons helps you take your mind off the bustle of the modern world, put your thoughts in order and think about the eternal. Embroidering an icon with your own hands is not difficult even for beginners; the main thing in this matter is attitude and creativity!
Today, beads are used to embroider not only icons, but also paintings, panels, and decorate clothes, handbags, and wallets. Belts and jewelry embroidered with beads also turn out to be very original.
Bead embroidery has become fashionable not only because of its wide availability and a variety of colors, but also because the result of the work is very impressive, and things embroidered with your own hands are exclusive and one of a kind. Handmade is a type of creativity that will never go out of fashion.

Bead embroidery rules
So, let's start describing basic rules of bead embroidery :
The beads are sewn evenly, tightly to each other, at the same angle;
The base for embroidery (canvas, canvas, fabric) must be tightly tightened in a hoop or a special tapestry frame;
For embroidery, it is better to choose synthetic threads or fishing line, because... cotton ones easily rub against the sharp edges of beads;
The color of the threads must match the color of the base (fabric);
Mostly they embroider in rows; when moving to the next row, you need to monitor the direction of the tilt - in the finished work, the beads should lie tilted in one direction;
There is also embroidery in the circle, then beads are embroidered from the center, in circular rows;
Beads need to be selected the same size; it is better to use calibrated beads;
How to embroider with beads?
Now let's look at the most famous BEAD EMBROIDERY TECHNIQUES:
1. The most common bead embroidery technique is "half-cross". This embroidery technique is one of the most ancient, also called “Monastic” because of its widespread use in church embroidery. On the front side, the bead is sewn diagonally and the thread is brought out to the wrong side. A vertical stitch is made from the wrong side and the thread is brought to the front side.

During the embroidery process, do not tighten the thread too much, otherwise the fabric will begin to deform. We start embroidering with the top left bead, the first row must be done from left to right, the next row - from right to left.
The direction of the needle when embroidering the first row (and then all odd rows) is from the lower left corner to the upper right. In the second row (and all even rows), the needle moves from the upper right to the lower left corner.
2. Technique "lower stitch" - beads are sewn not at an angle, but horizontally, and after completing the stitch, you need to return the needle to the bead again, then the beads will lie more evenly.

3. Stem seam used when embroidery needs to be given additional rigidity. Cast on 2 beads, bring the needle to the wrong side near the second bead and return it to the front side between the first and second beads, return through the second bead and string the third. Do the same “back needle” stitch; the beads will lie evenly and very tightly. In the same way, you can embroider more freely - fasten the beads not through one, but through 3-4. This method is called arched or "back the needle."

4. Seam "stuck" - the beads are first strung on one thread, then sewn to the base between the beads using short stitches. For a denser pattern, the beads are fixed through one, for a loose pattern - one stitch through several beads.

5. Overcast seam - each bead is sewn to the fabric using regular stitches.

6. Double-sided embroidery technique beading is interesting because the beads are strung on both sides of the fabric in the following ways:
The purl stitch is made longer and beads are strung on it

The double-sided stem-line stitch is used when it is necessary to achieve dense embroidery on both sides

The seam is “attached double-sided” - the beads are strung on one thread, with the second thread, at each stitch between the beads, another bead is sewn from the wrong side, then all the beads of the wrong row are connected with a thread. Or the beads are strung on two threads, each of them is located on both sides of the fabric, then both threads are connected with stitches at intervals.

Below are examples of handbags embroidered with beads:


It is easier to try the bead embroidery technique on ready-made Bead embroidery kits , where in the kit you will find a base with a schematic pattern applied, beads arranged by color and a needle for embroidery.
Get inspired and create amazing works with your own hands!
Bead embroidery has recently entered our lives and gained great popularity. Professional embroiderers or bead lovers will tell you that the embroidery process is extremely labor-intensive, requiring patience and perseverance. Optimal conditions for organizing a bead embroiderer's workplace affect not only the quality and speed of the work , but also on the state of her health. Embroidery, like any other small, monotonous and lengthy work, has a number of disadvantages in terms of health and comfort.
Workplace organization
How and where to store beads
Storing beading needles
Workplace organization
Need I say that if the workplace is properly organized, it is not just a guarantee of convenience, but also concern for your health? When working with beads, not only the eyes, but also the back, neck, and joints experience a lot of stress. An improperly organized workplace will cause you to get tired quickly, pain in the spine will appear, and subsequently your vision will deteriorate.
To avoid these troubles, you must first of all find a place for your work table where there is good daylight. Also, buy a good desk lamp with a fluorescent lamp and place it on the left (if you are right-handed). In stores you can find special table lamps with a magnifying glass - this is an excellent solution for those who cannot boast of 100% vision.

The height of the table and chair also play an important role. Ideally, when you sit at a table, it should be just above elbow level. This is not only convenient, but also reduces the load on the spine and vision. It's good if the chair has armrests, this will help keep your back straight and not slouch.
It would be good to store all accessories in one container for beads, or a special organizer. This way, time will not be wasted on everyone looking for the necessary materials and tools for working with beads.
It is not always convenient to remove beads directly from the container. For your comfort, manufacturers of beading materials have come up with a velvet mat for working with beads. The velvety structure of the mat allows the beads to remain on the surface and not roll off while working. This rug is convenient to take with you - light and pleasant to the touch.
 Take care of the order in your place - next to the work table you can place a small container for garbage and trimmings of threads, fishing line, wire, defective beads, etc. will not interfere with the creative process.
Good lighting of the workplace, first of all: it should be a bright light directed from the head of the craftswoman to the embroidery, preferably white and daylight. The chair for sitting should be comfortable and soft - you will have to sit for a long time, you can use a chair with a straight vertical back, or a slight inclination. Armrests have a good impact on work productivity. The hand lying on the armrest of the chair is relaxed at the elbow joint and the embroiderer will not strain.
You cannot leave tools and everything needed for bead embroidery after work; all this must be removed and stored separately. For example, you accidentally spill an abandoned box of beads. If you step on a group of scattered beads with your foot in a slipper, you will slip, fall on the floor, and it’s good that your head is not on the awl with which you were picking holes in the beads. Therefore, prepare a large box or casket in which after work you will put both the work itself and the embroidery tools. In the box you can put everything into separate compartments, and in the box you can make partitions so that you can always and immediately find the right thing or tool. Cover the work table on which you will embroider with white soft cloth, which will prevent the beads from rolling off the table if you accidentally spill them.
How to preserve your eyesight when embroidering with beads
 There are different recommendations regarding how long you can sit without a break while working. Some say no more than 30 minutes, but for a passionate creator half an hour is not the time. The most acceptable schedule is when you work for an hour and give your eyes a rest for 15-20 minutes. And you don’t just take a break from work, but do some gymnastics. To begin with, you can simply warm your eyes by placing your palms on them and sitting there for about a minute. Then, without opening your eyes, move your pupils up and down, in a circle, left and right. So five times. Next, open your eyes and blink. Now you can stretch out one hand in front of you, concentrate your gaze on your index finger and follow it only with your eyes, without moving your head, and move your hand left and right and so on five times. Then touch your nose with this finger, while your eyes continuously follow it. Do this 10 times. These exercises will take no more than three minutes. Now you can get up and just warm up, thereby improving your overall blood circulation. Concentrating for a long time in a frozen position is bad not only for your eyesight, but also for your spine, so give it a little rest too.
How and where to store beads?
At first, when creative reserves are measured in grams, the issue of storage is resolved quickly. As the hobby develops, the sets increase, and the volume of the handicraft “piggy bank” grows. For your convenience and safety of materials, you need to take care in advance about the method and place of storing beads. Today we will talk about how modern needlewomen store their shiny treasures and what subtleties there are in this matter.

Embroiderers who buy ready-made sets with beads receive beads already packaged in bags. When embroidering patterns, needlewomen stock up on various colors of beads in order to independently complete their embroidery with materials. It is at this stage that the question of bead storage arises. Let us highlight the main characteristics that are important for the safety of beads:
- Compactness - bulky boxes, large boxes - this is beautiful, but not practical. Beads in large quantities are heavy and require a lot of space. The needlewoman’s task is to place it so that the maximum amount of material fits into the minimum volumes. Handicrafts should not only be pleasant and fun, but also aesthetically pleasing.
- Availability at the right time - placing a container with beads on the lid of a cabinet is not wise. Essential materials should always be at hand.
- Safety - some colors of beads tend to fade and change color when in contact with direct sunlight. Optimal storage conditions would be separate containers or plastic bags. It is recommended to keep all beads in a clean, dry place away from direct sunlight.
- Appearance - any craftswoman wants beautiful and cute things in her arsenal. Black, gloomy containers that look more like a set of tools are far from feminine taste. Therefore, needlewomen are happy to purchase neat containers for storing beads.
For embroidery with beads, it is recommended to use high-quality beads made in Czech and Japanese production. Each bag has a special factory marking, including a unique number. It is a symbol of color. It is extremely important to save these numbers, label your containers, bags, and keep strict inventory records. Then completing the circuit will be a quick, pleasant and effective process.

Popular among embroiderers special containers for beads with a large number of branches. This allows you to place several colors in one container at once without mixing the contents.
They turned out to be convenient and economical for many fishing tackle boxes. They are transparent, compact and roomy (100 g of Japanese beads fit into one cell of such a box). Other craftswomen chose containers for products as containers for storing beads: transparent, plastic trays, but they must be square (round ones will take up a lot of space). There is another option - this spice containers or from under a photographic film. They can be signed and compactly placed in a box. The only negative is that they are not transparent and, due to their shape, can easily fall to one side with the slightest push, so they must stand strictly in the box.

Each master determines for himself the meaning of the word “comfort”. By surrounding ourselves with objects that are dear to the heart and eye, we stimulate the creative process and enhance the pleasure of work. In fact, it doesn’t matter what color the container is or what shape it is, if handicraft lives inside you, when your very breath is saturated with creativity. Take care of your craft materials and enjoy the process! And accessories specially created for this purpose will take care of the safety of materials. “Businka” will be happy to help you choose the best option for storing not only beads, but also all your creative treasures!
Storing beading needles
Most manufacturers complete the set with needles for embroidery with beads or threads, but each embroiderer has a certain supply of bead needles for different purposes and diameters. They are long, sharp and very, very thin. So thin that they will fit into the smallest hole in the bead. Be careful: it is very easy to get hurt with such a needle while working, so it is better not to rush during the embroidery process.

Skin secretions interact with the material of the needle; over time, it loses its shine and begins to creak when used. To ensure that this moment comes as late as possible, wash your hands more often; at the same time, the fabric will not get dirty quickly. Now on sale you can find embroidery needles coated with inert materials - gold and platinum. It is believed that such needles serve their owners much longer and pass through fabric more easily.
It is better if the needlewoman has several needles in her arsenal, so they can periodically “rest”.
Make sure there are no small nicks in the eye of the needle. This is a defect and the needle can be thrown away immediately, because a needle with such a defect spoils the thread, fluffs it up and tears it.
 Usually, a needlewoman has needles for various purposes and different diameters in her arsenal, which means there is a need to store them. There are different types of needle organizers for this purpose. From simple plastic organizers divided into several cells and magnetic boxes.
Get a beautiful pincushion for your little helpers, fortunately they are now produced in a variety of shapes and sizes - from cute little pillows to armchairs and apples the size of a boxer’s fist. Better yet, make a pincushion yourself and decorate it with embroidery. This way it is much more convenient to store needles, and your loved ones do not risk discovering from their own sad experience that you have chosen the armrests of sofas and armchairs to store needles.
However, the issue of carefully storing needles also arises while working on embroidery, and in order not to lose a needle, they use various needle cases, both mass-produced and those made with one’s own hands.
 Organizers that allow you to store the needle and thread without forgetting what color goes into the eye deserve special attention. Often, when working with a multi-color bead pattern, it becomes necessary to embroider single beads and it is not rational to thread the needle each time. Special organizers can make work easier, and Pako has been particularly successful in producing them.
In the cells you can write the thread number or a symbol that corresponds to a specific color in the diagram. This organizer can accommodate 50 colors at a time, which is quite enough to work with most schemes.
 When starting a new embroidery project, simply replace the paper strip in the organizer and it is ready for use again.
However, such organizers may seem too expensive for needlewomen, especially if they are just starting to create their first masterpieces. In this case, simple paper organizers for floss, organizers with a magnetic strip for needles, and various plastic organizers can come to the rescue.
Tips for bead embroidery or how to make the work easier with your own hands

- For the convenience of the bead embroidery process, the best option would be to apply the design on the fabric, using carbon paper, or mark each step in the diagram. Which of these tips to use is up to you;
- It will be easier to embroider if the fabric is fixed in a hoop or on a wooden frame. When choosing the second option, fastening is done using buttons;
- It is better to do embroidery using thread made of cotton fiber or nylon. Important advice: before starting, to prevent it from getting tangled, you should treat it with wax.
- for light-colored fabrics, beige, light gray, white threads are preferable, for dark ones - in the color of the fabric;
- The knots are tied small and neat. The fastening can be done using the reverse stitch technique. During the embroidery process, the area is covered with beads;
- The choice of needle has a special place. The best option for small beads would be a long and thin game, marking No. 11. We recommend using it, especially for beginners.
- It is better to cover the work area with a large piece of soft fabric (preferably in light colors), which will prevent the beads from rolling out if they fall apart.
- Beads are pre-selected according to the colors indicated in the embroidery pattern. For convenience, beads are poured in piles on a small piece of fabric, which is located on the table next to the backing.
- The beads used for work are pryed up with the tip of a needle, after which it is convenient to take them in your hand. Preliminary sorting of beads in small portions according to color will make the work easier, for which small containers or ordinary matchboxes are used.
- If you purchased new beads for work, the quality of which has not yet been tested, then first it is better to rub it a little between your fingers. If it does not lose color and is not dyed, then its beads can be used for embroidering clothes and accessories. Otherwise, beads are suitable for working on a painting.
- the part of the canvas that does not fit on the backing is carefully placed under it. As you embroider, the canvas must be periodically moved on the backing and secured with buttons on another section of it. It must be securely fastened and well stretched using a hoop, frame or regular buttons.
- To create bead paintings, regular canvas is used. And for sewing items of clothing and accessories you will need pull-out or water-soluble canvas.
- The work is carried out according to the principle - 1 colored square in the diagram is 1 bead.
- Embroidery is done line by line (in rows), starting from the bottom or top line of the pattern. In this case, the number of beads in a row is equal to the number of cells in a row of the diagram. The direction of movement in the row depends on which hand the embroiderer is using. A left-handed person works from left to right, and a right-handed person, on the contrary, works from right to left.
- To improve the fastening of the beads to the canvas, the thread at the end of the row is not cut off, but passed in the opposite direction (from the end of the row to its beginning) through all the beads and secured again at the beginning of the row. Thanks to this, all the beads in the row are aligned.
- and lastly, when working with beads you should be patient. This is especially true for beginning embroiderers, who, according to observations, will need from 10 days to 2 months to complete their first work.

These simple tips will help make such an exciting activity as bead embroidery more fun and comfortable. Doing something creative in the evening after work will help you relax, put your thoughts in order and at the same time create a unique picture or add some zest to your clothes. Beginners in bead embroidery will receive inspiration from the process of work and joy and satisfaction from the results of what they have created with their own hands.
What beautiful pictures can needlewomen create from threads. And if the tips are decorated with small beads, then the creativity takes on a precious look.
Thus, you can create a small brooch, a toy, and even decorate clothes. Read about bead embroidery techniques for beginners.
Don't rush into work if you don't know the basics of the production process. First, you need to purchase the necessary materials at a craft store.
If you just need to decorate the sides of the dress, then you don’t need to buy canvas.
The list of important purchases will include:
- Beads of different colors and sizes. To create voluminous and intricate paintings, you can purchase elongated glass beads, large beads and other materials.
- Embroidery threads. In this case, they should be thin but durable. Buy nylon or cotton threads.
- Needles for embroidery. It is worth purchasing a small set, size 10-11. Such thin needles will maintain the integrity of the fabric.
To avoid losing dangerous accessories, immediately acquire a needle case or a tool box for storing tools.
- Fabrics. The choice depends on the purpose of creativity - creating a new blouse or painting. Usually needlewomen buy canvas.
This fabric is made specifically for embroidery; you can choose any color of the material.
- Frames for stretching. It is impossible to accurately create a pattern without tensioning the fabric.
You will have to purchase a special frame, most often it is round in shape. The hoop consists of two rings, between which the fabric is fixed.
Advice! Buy a fingertip or a whole set so that you don’t injure your skin with a needle when working.
Keep in mind that you will need a lot of beads, but do not buy the entire counter. Choose threads that match the rest of the materials.
You can purchase a ready-made kit in the store, which includes an embroidery pattern, a detailed microcontroller with a description of the process, threads, needles and beads.
Important! To prevent beads from getting lost or scattered during the creative process, buy small boxes to store beads by color.
You can also make them yourself from a matchbox.
Lessons for Beginners
When all the materials are on the table, you can start working. If you have basic knowledge of cross or half-cross stitch, then mastering the technique of beading on fabric will not be difficult.
To do this, you need to know a few simple techniques and knots.
Check out the most common types of seams in the table:
| Basic Techniques | Description |
| Line stitch | This type of stitch is reminiscent of drawing spirals. The needle moves according to the same principle. Pull the thread on the right side, pull the bead, pierce the fabric again, but this time on the left. Move to the right, creating small curls |
| Stem seam | Similar to the previous technique, but you need to start sewing on the contrary from the front side. Move to the right, forming curls with the thread. This method allows you to create a tight tension and secure the beads well. |
| Monastic seam | Similar to the classic embroidery method. In this case, you need to move from cell to cell diagonally. Thread a needle and thread from the wrong side, place beads on the front side, and pull the thread into the adjacent hole. Continue knitting the row. To switch to the next one, simply make the transition from the inside out |
| Arch seam | A type of weave where the beads fit very tightly and are secured. You can place one or two more pieces between each stitch. |
| Sewing technique in the circle | With this type of embroidery, you can weave any designs. This type of work is especially often used to create icons. In this case, you need to start creating a picture from the center, moving in a spiral |

To create a picture from beads, use not one, but several types of seams. Arched can be used to place beads of different sizes, while lowercase can be used to build a general image.
To decorate clothes, you need to sew tightly; the ideal option is a stem stitch.
Schemes with descriptions
In classic patterns, the entire pattern is divided into squares. The colors used for embroidery are written on the side or bottom.
To select a suitable piece of border, you need to manually calculate the number of holes. According to the rules for designing the finished painting, you need to add 3-5 cm on the sides.

Important! You can create real masterpieces from beads. The drawing can not only be framed, but also decorate pillows.
To do this, the resulting canvas is sewn onto the front side of the pillowcase of a decorative pillow.

You can start embroidery from any side. Some needlewomen prefer to trace the design, making the first stitch in the center, others - from below or from above.
Be patient, sit down at the table and enjoy the creative process.
Advice! Choose the color of the canvas according to the style of the drawing. Colorful options fit harmoniously on white fabrics.
Bead embroidery master class step by step with photos
In order not to make mistakes when creating beautiful work, it is better to follow the general rules. Choose the template you will use to create the drawing.
Remember the simple Russian proverb: a long thread makes a lazy seamstress.
Follow the general rules of the master class:
- Hoop the canvas. Place the fabric on the inner ring and clamp it with the other part. Start embroidering.
- Embroider in squares. When you reach the border, check the correctness of the embroidery using the paper template.
- Tearing off the thread do not make it larger than a turn around the elbow. Otherwise, knots may form on the tissue.
- Each bead is sewn on with a separate stitch, only if you are not using an arched stitch.
- When the thread is no longer long enough, knit the same bead twice. Make a knot on the wrong side.
Continue knitting until the pattern is complete. If you purchase a ready-made set, then recommendations on which technique to use will be written on each square.
A gift made with your own hands is the most heartfelt thing in the world!
Useful video