Eggshell crackle technique. Eggshell crackle. History of "egg" art
KSU "Complex Tarkhan Secondary School - Kindergarten"
Development by technology teacher Natalya Dmitrievna Sheveleva
A lesson plan for a technology lesson in grade 4 (continuity between primary and secondary education), designed for 2 hours.
Task: teach students making mosaics from eggshells using the crackle technique.
Goals : -educational: familiarize students with the history of the origin and development of mosaics, types of products, materials and devices for work, workplace equipment, and familiarize them with manufacturing technology;
-educational: promote the formation of aesthetic taste, cultivate a sense of mutual assistance;
-developing: with the help of drawing, provide an opportunity to perform practical work, instill skills and abilities, teach students to analyze, and determine the features of performing this technology.
Lesson type : lesson - gaining new knowledge, applying knowledge and skills.
Lesson type : practical work.
Lesson methods : explanatory and illustrative, story, demonstration; reproductive (instruction, practical work).
Means of education :
Subject-natural objects, visual aids;
Practical: work activity;
Emotional: creative interest, job satisfaction.
Equipment and visuals : sample of the completed product, color photographs of the panel, handout - drawing, eggshells, PVA glue, brush for applying glue, sandpaper, cloth napkin, tweezers, gouache, for decoration - sparkles, beads.
During the classes:
1. Organizational part:
Preparing students to start work;
Greetings;
Marking absentees;
Checking readiness for the lesson.
2. Opening remarks:
Lesson topic message;
Setting goals and objectives for the lesson.
3. Main part:
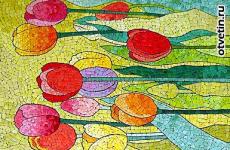
3.1 Guys, do you like beautiful and unusual things? Then I will introduce you to the wonderful world of this ancient art form and tell you how unique products are put together from small pieces of eggshell. Each item is individual, retains the warmth of the master’s hands and can become an original souvenir and gift for friends and family (demonstration of photographs of the panel and the finished product).
Mosaic needlework has been around for a long time and keeps many secrets that anyone can master if they wish. And, if skill can be learned, then such character traits as perseverance and patience should be inherent in those who want to take up this type of needlework.
3.2 Information from history.
Like any type of needlework, mosaic has its own history of origin and development. Listen to a short story about this.
Mosaic- a common type of decorative and applied art. It is used to decorate wall panels, decorate fountains, and create paintings. The word “mosaic” (from the Latin “application”) is the creation of artistic images by gluing pieces of any material onto a certain surface (base); also – an image, a pattern created in this way.
The history of mosaic making goes back centuries. Listen to how Victor Hugo talked about the mosaic: “...Notre Dame Cathedral is a remarkable example of this type. Each side, each stone of the venerable monument is not only a page in the history of France, but also in the history of art... Inside the cathedral it was dark and gloomy. The side lengths were shrouded in darkness, the lamps flickered like stars. So deep was the darkness that enveloped the vaults, only the large rosette of the facade, the multi-colored glass of which was bathed in the sunset ray, shimmered in the darkness, like a pile of diamonds, casting its spectrum to the other end of the sky ... "
Each nation is looking for its own material, its own ways of working. For example, in the cities of Central Asia, mosaics made of bricks covered with gray-yellow, blue, white, and dark blue glaze are very common. They richly decorate ancient mosques, mausoleums, and palaces.
Laotian artists make colorful mosaics from pieces of colored mirror. This mosaic, sparkling and shimmering in the sun, creates a joyful, triumphant mood.
For work, fragments of various materials are used: glass, ceramics, stone, polymer, paper and others. Using mosaic techniques, you can create thematic compositions on various subjects.
Most often, eggshells are used to make mosaics using the crackle technique, when individual pieces of the shell are glued to the surface. When straightened, the shells break into many small pieces, which are held in place by a thin film located on the inside. Craquelures - cracks form fancy mesh patterns on various materials, but they are almost invisible. Once you cover the shells with varnish or paint, the design immediately appears, and an ordinary shell turns into a magnificent material for creativity. This technique is very ancient; in oriental lacquer painting, masters glued eggshells in those fragments of the picture where it was necessary to depict a rock or stone wall covered with cracks, and with a scattering of small colored shells they accurately imitated the blooming of spring gardens.
3.3 Materials and equipment for work.
Before taking on a large mosaic panel, it is advisable to practice and try your hand at a piece of cardboard or thick paper - making an applique from an eggshell. It is better to choose figurines of different geometric shapes in order to learn how to fill both sharp corners and smooth curves with shells. This work will seem difficult only at first, then the shells will easily line up into patterns and designs.
Today you and I will acquire the first skills of making such a mosaic.
Before we get started, let's talk a little about those materials and devices that you will use in your work today.
Main material, of course, is eggshell This
- an interesting natural material that provides great opportunities for the development of creative activity and imagination. Its white surface gives us a huge opportunity to choose colors when working. Also, eggshell mosaic is a relatively cheap type of needlework. There is plenty of material for work in every home; the shells of both boiled and raw eggs, white or colored, can be used. The shells must be prepared for work in advance - rinsed under running water, dried well, they must be completely dry, they can be painted in the finished application.
PVA glue is used to glue the fragments of the pattern. For convenience, we use tweezers during the work - they lay out pieces of the shell according to the pattern.
3.4 Workplace organization Well, now that, I think, you are still interested in the topic of mosaics - you have become familiar with the history and materials - you can move on to the details of organizing the workplace.
The workplace should not be cluttered.
A special place should be given to the work table - its height should correspond to the height of the chair.
It is convenient when tools and devices are located on the right hand of the worker, and materials on the left.
During operation, the light should fall from the left side or from the front.
While working, you need to sit upright, on the entire surface of the chair, slightly tilting your body and head forward
To ensure a neat job, use a cloth to remove excess glue on the product, tweezers and hands.
3.5 Safety briefing.
You are already big - next year you will move to the secondary level of schooling, so you should know that when carrying out any work you must strictly follow the safety and labor protection rules. The type of our activity in the lesson refers to manual types of work. I won’t dwell on this for long, because you already know the general requirements of safety regulations, don’t you? (students' expected answers are “yes”). So, in addition to this, let us pay attention to the fact that the main method of work will bebreaking eggshells, the danger when working is that small fragments can get into the eye or prick your hand. It is fragile, but at the same time it is close to marble in hardness, it can be easily broken by hand, but there are practically no scratches on the surface. Therefore, as already mentioned, the product should be at a distance of 30 - 40 cm from the eyes. There is no need to wave your hands that contain the material, as you can injure your neighbor at the desk and injure yourself.
3.6 Induction training
Now let’s get to work - let’s try to make flowers like these (distribute the prepared drawings).
Repeat safety precautions when working.
Check the student’s readiness for work: for work you will need eggshells, PVA glue, a brush for applying glue, sandpaper, a cloth napkin, tweezers, gouache, for decoration - sparkles, beads, you prepared all this for the lesson at home.
Provide instructions on how to make mosaics.
1. Prepare a drawing that will be laid out with a shell. Cover a small part of the design with glue. Place a piece of shell on the smeared area of the design and lightly press it onto the glue. The shell will crack, creating a mesh pattern. Apply glue to the next area and stick on a suitable piece of shell.
2. Fill out the entire drawing in this way. The shells should be placed as close to one another as possible, trying not to go beyond the boundaries of the picture. The gaps that remain between the shells are filled at the end of the work. Select small shells according to the size and shape of the gaps, apply glue to the empty spaces with a thin brush, and carefully apply pieces of shell with tweezers. It is not necessary to fill in very small areas in the application, but during further work you can simply mix small particles of shell with glue and fill in tiny gaps with this mixture.
3. Let the application dry and paint over it, trying to paint over all the small cracks. Leave to dry. After the paint has completely dried, begin sanding with sandpaper. There are several options here - you can highlight individual places or heavily sand the entire design so that the paint remains only in the cracks. It all depends on the effect you want to achieve.
4. After this, decorate the design with sparkles or beads.
5. Glue the finished application onto cardboard, insert it into a frame and hang it on the wall.
Students begin practical work.
3.7 Current briefing
Targeted workplace walkthroughs:
check the organization of workplaces,
check that the work is being done correctly,
check compliance with TB.
4. Final briefing.
Summing up the work in the lesson (demonstration of work, repetition of acquired knowledge)
5 . Grading.
6 . Final words from the teacher.
Today you learned the mosaic technique - crackle. Eggshells can be used to decorate a variety of objects - vases, plates, bottles, boxes, picture and photo frames. You can decorate any surface - from wood and metal to thick paper and glass. The costs are minimal and, if you like the work, a huge scope for creativity will open up, and you can turn ordinary things into unique works of art. I wish you continued success!
EGGSHELL MOSAIC
EGGSHELL MOSAIC

Topic: "Mosaic from shells - crackle technique."
The technology lesson in 4th grade is related to continuity between the primary and secondary levels of education, and is designed for 2 hours.
This lesson is conducted in the form of practical work. A lesson is the acquisition of new knowledge and skills and their application.
At the end of the lesson, students demonstrated products and expanded their horizons on this topic.
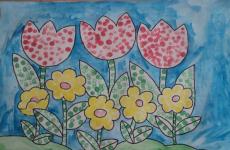
Master class on making mosaics from eggshells. Pansies
Pansies using crackle technique
Moiseeva Natalya Valentinovna, teacher of Gymnasium No. 1503 in MoscowMany centuries ago, Chinese and Vietnamese lacquer painters began using egg shells to create their miniatures. They noticed that when pressure is applied to the shell, a beautiful pattern of tiny cracks is formed, making the workpieces look like the surface of a cracked rock or an ancient wall. The shell began to be used in lacquer painting to depict various buildings and crowns of flowering trees. The masters of the East managed to turn the main drawback of eggshells - fragility - into its main artistic advantage.
In general, decorating the background with a mesh of cracks is used not only in eggshell mosaics, but also in other decorative crafts. This pattern can be seen on pottery coated with a special glaze, or on hand-painted fabric. Regardless of the material on which they are made, such cracks are always called craquelure, and the technique of creating a pattern of cracks that creates an antique effect is called CRACKLE.
Unlike eggshell toys, crackle mosaics made from the same material are strong and durable. If you work carefully and carefully finish even small parts of a mosaic set, you can learn how to make crafts that are in no way inferior to purchased souvenirs. Eggshell ornaments are used to decorate not only flat objects - all kinds of boxes and wall panels, but also blanks turned on a lathe - vases, pencil holders, decorative dishes and plates.
Let's try to make a mosaic picture of PANSY flowers from eggshells.
Target:
Creating a mosaic from eggshells.
Tasks:
Teach children to work with eggshells and master the crackle technique.
Generate interest in this technique.
Develop imagination and creativity.
Make a picture of pansy flowers.
Purpose:
The material is designed for children 6-7 years old.
Purpose:
The picture can be presented as a gift, or you can decorate the interior.
Preliminary work:
Rinse the shells of raw eggs thoroughly with warm running water, remove the films from the inside. Dry the shell.
Materials:
A sketchbook sheet, a simple pencil, a marker or felt-tip pen, PVA glue or stationery glue, prepared eggshells, watercolor paints and a brush, a jar of water and a wooden stick.
Progress
Violet tricolor, or Pansy, is a popular garden plant, common in temperate regions of Asia and Europe. The flower is characteristically colored: the upper petals are dark blue-violet, the two middle petals are lighter or yellow, the lower petal is yellowish-white or yellow, with bluish spur.
We draw flowers on a landscape sheet, in our case Pansies.

Cover the petal with glue

Carefully place the egg shell on the glue. We take a large shell and, starting from the edge, press the shell with our finger so that it covers the glued surface. You need to make sure that the shell fragments are not very large and not very small.

You can help yourself with a wooden stick or tweezers so that the shell lays more evenly.

We outline the shell-covered petals with a black felt-tip pen so that the borders of the petals do not merge.

Apply glue to the next petals and place the shells in the same way.

There are 5 petals in a Pansy flower, we cover the entire flower and outline it.

In this way we mosaic the entire pattern.


Now mash the egg shell finely in a saucer.

We cover the entire pattern laid with the shell with glue. Sprinkle small shells on top of the glue to fill the empty spaces between the shells.

Let's take gouache paints and start painting our flowers.

We paint one flower with yellow paint.


We paint another flower with purple paint.


When the yellow flower is dry, you can apply shades to the flower.

We color the leaves and buds with green.

The result is a mosaic like this.

And a flock of pansies
Velvety keeps the silhouette -
These are butterflies flying away
They left their portrait.
Anna Akhmatova
Today in decoupage art there are many ways to achieve the effect of aging. Traditionally, craquelure varnishes are used for this, which create cracks on the surface of the object. At the same time, you can use ordinary improvised means that will allow you to get an equally impressive look. The use of eggshells is a simple and affordable method that allows you to obtain a unique craquelure surface. Eggshells are an excellent material for handicrafts; they are quite strong, not prone to scratches, and can be easily sanded.
In order to create an egg craquelure, you must first prepare the required amount of eggshells. Rinse the shell thoroughly with water and soak in a 5% aqueous solution of baking soda; this procedure will degrease the shell and make it more suitable for subsequent work. While the shell is wet, you need to clear the film from the middle. After this, you need to leave the shell for the necessary time so that it dries thoroughly.

Eggshells are quite difficult to separate or cut into the required size and shape of particles. To slightly reduce its fragility and avoid crumbling, it should be covered with a thin layer of glue on both sides. The prepared shell pieces are glued to the desired surface using PVA glue; the smaller the shell particles, the finer the craquelure will be. For cracks to appear, convex pieces of shell glued to the surface must be lightly pressed with your finger.

After the eggshell has dried, you can glue a decoupage napkin onto it. It is recommended to first apply a layer of acrylic paint using a foam sponge. A layer of varnish is applied on top of the decoupage napkin with a brush, and after drying, another layer is applied. Thus, the unique eggshell mosaic is ready.
Ira Kondratieva
Dear teachers, I bring to your attention the sequence of work made from eggshells using the crackle technique.
Preparing material for work:
Wash the egg shells in warm water (it is better to use raw egg shells);
Dip in baking soda solution to degrease the surface;
Dry the eggshells;
Sort by shade.
Sequence of work:
1. Cover the surface selected for work with PVA glue.
2. Glue eggshells to the surface.
3. After the shell sticks, create a background (paint with acrylic or gouache paints). It is better to paint with foam rubber.
4. When the paint has dried, make decoupage from a multi-layer colored napkin (cut out the details of the design and stick it on the surface).
Works made from eggshells using the crackle technique are very durable and aesthetically pleasing. Children can be asked to decorate a box or vase, plate or panel, flower pots,
Activities with eggshells develop in children:
Fine hand motor skills;
Color perception;
Artistic taste.
Pieces of eggshell can be used to decorate the surface of various materials:
Ceramics.
"Sunflowers"

"Princess"

"Three Girlfriends"

"Snowman"

"Branch of Rosehip"

"Ladybugs"
And these are works made from painted eggshells.
The outline of the design is applied to the base, then the pre-painted shells are glued step by step.

This master class will be devoted to how you can remake a simple jar of Oriflame perfume cream. Most women know what it is and have probably used it more than once. Of course, you can throw away this jar after you've used it, but you can make something interesting out of it.
You can put some buttons, beads, jewelry, for example, in it and store it. But plastic is a cheap material, it is not very aesthetically pleasing and looks beautiful, it gets rubbed and scratched, so it is better to decorate it somehow.
Today I propose to cover it with eggshells, cover it with paint and make decoupage. Eggshells provide better paint adhesion to the surface. Paint can stick to plastic, but if not used carefully it can still rub off. And on eggshells, this has already been tested, it holds up very well.
1. To do this you need, naturally, to rinse well from the cream. Because it is greasy and will not stick well.

2. Apply PVA glue and glue eggshells. You can apply the glue this way, or you can apply it with a brush.

3. The entire surface must be covered with eggshells; After you paste it over, leave it to dry for several hours. Then you can continue working.

4. The next step is to apply 2-3 layers of white acrylic paint. It will serve as a background for decoupage and strengthen the shell.

5. Cut out small fragments from the decoupage napkin and glue them onto the jar with the same PVA. Carefully smooth out the fragment, from the center to the edges, expelling air and smoothing out wrinkles.


6. The next stage is tinting with the color you like. It is more convenient to tint with a sponge.

Now all that remains is the details, paint on some moments, make shadows, and you can also decorate with gold. You can use pastels or eye shadow. Now the egg texture will be clearly visible. You can use green color. We do the same with the lid.
7. Now we take gold acrylic and decorate the box a little. I don't think it should be used everywhere, but only at the edges.

8. The final finishing part is coating the product with acrylic varnish. Well, then you can think about who to give this box to.

Acrylic varnish can be matte or glossy. You need to apply several layers, one will not be enough. You need to cover it in thin layers and let each one dry.
Well, that’s it, our box is already dry, we can fill it with some personal treasures.
It took me a day to make it. Of course, if it weren’t for children and household responsibilities, it could have been done faster.