How to make flowers from satin ribbons. Flowers made from satin ribbons: the best ways. Satin ribbon rose
In this material we presented 6 step-by-step master classes for beginners, following which you can make flowers from ribbons for making/decorating with your own hands:
- Artificial flowers (interior);
- Wall panels;
- Topiaryev;
- Decorative and wedding bouquets;
- Costume jewelry (rings, brooches, necklaces, bracelets);
- Hair accessories (headbands, headbands, barrettes, elastic bands);
- Boutonniere;
- Gift packaging;
- Decorative pillows;
- Boxes for jewelry and other small items;
- Albums and notebooks;
- Applications for clothes, bags and shoes;
- ...and much more! This selection of photos shows only a small part of the crafts that you can make after mastering various techniques for making flowers from ribbons:

In addition to step-by-step instructions, you will find 30 photo ideas for inspiration, as well as a useful selection of videos.
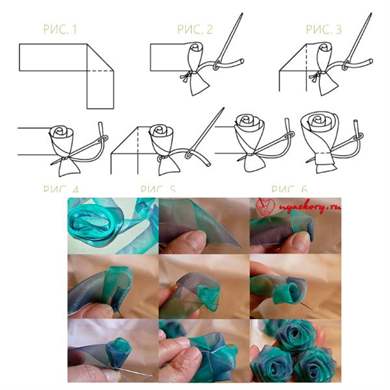
Master class 1. Twisted rose from a solid ribbon
Let's start with, perhaps, the simplest and fairly quick way to make roses from ribbons with your own hands. Once you master the technique of rolling roses from ribbon, you can make them while sitting in front of the TV. Depending on the width and length of the ribbon used, you can twist both small and lush buds. You can use a ribbon made of any material - organza, satin, cotton and even strips of linen fabric.

What you will need:
- Any ribbon - the longer and wider it is, the larger the bud will be. For a medium-sized rose, a 2.5 cm wide ribbon is enough.
- Thread and needle or hot glue gun.
- Scissors.
How to twist a rose from a ribbon:
Step 1. Straighten and place the tape in front of you, then bend one of the ends of the tape (either) along the bias, as shown in Fig. 1.

Step 2. Wrap the tip of the ribbon into a roll in two or three turns to form the core of the rose, fix its lower part with glue or simply sew it (see Fig. 2).
Step 3. Now we begin to form the rose petals. To do this, bend the tape again obliquely to the outer side (see Fig. 3) and wrap it around the core of the rose, holding (and, if desired, fixing with thread/glue) the entire workpiece from below (see Fig. 4).
Step 4. Next, continue to “build up” the layers of “petals” according to the scheme: bend the ribbon outward - wrap the bud - bend the ribbon outward - wrap the bud, etc. (see Fig. 5). Periodically fix the layers of tape at the base of the bud with glue or thread and a needle. Remember that the most important thing is to not let the ribbon unravel.
- Experienced decorators can twist a rose by fixing the layers of tape only a couple of times (at the beginning and at the end), but for beginners it is easier to stitch/glue the “petals” of a rose much more often.
- It is more convenient to roll a rose by holding the base of the bud between your index and middle fingers, so that the flower seems to be lying in your palm.
Step 5. When the rose reaches the desired size, press the end of the ribbon to the base and tie/glue (Fig. 6).
- Practice curling roses from ribbons of different widths and lengths, experiment with the angle of the ribbon, the number of folds per layer, or the tightness of the twist to achieve the effect you like best. So, for example, a rose twisted from ribbon can be very multi-layered or, conversely, softer, have sharper corners or, conversely, rounded.
If you have any questions, we suggest watching a video on how to make a flower from a satin ribbon with your own hands using this technique.
Master class 2. Realistic flowers from ribbons (peonies, roses or ranunculus)
Now we suggest you familiarize yourself with the technique, following which you can achieve the most realistic and elegant look of petals, which is only possible for flowers made by yourself. Take a look at this selection of photos and see for yourself.

Despite all the beauty and apparent complexity, even a beginner can make such flowers from ribbons with his own hands.
You will need:
- Candle or lighter.
- Ribbon 5 cm wide (for a medium peony) made of 100% polyester (it can be either rayon/satin or organza). Keep in mind that ribbons made from natural materials will not work. If you want to make a large and lush peony, then you can use either more petals and/or a ribbon 7-8 cm wide.
- Scissors.
- Needle and thread to match the ribbon.
How to make a peony with your own hands:
Step 1. Cut the ribbon into squares in the following sizes and numbers:
- 5×7 cm (6-10 pcs);
- 4×6 cm (6-10 pcs);
- 3×5 cm (6-10 pcs);
- 2×4 cm (6-10 pcs).
As a result, you should have a minimum of 24 and a maximum of 40 squares. The more petals you make, the more magnificent and larger the bud will be.
Step 2: Now arrange the groups of squares into piles. Then cut out petals from each stack (the shape is shown in the picture below). Keep in mind that accuracy is not important here, everything can be done by eye, without measurements and without using templates. The main thing is that you get petals of different sizes: very large - large - medium - small.

Step 3. It's time for the fun part - giving shape and volume to our petals. To do this, light a candle or lighter and, holding the edges of the petal at a distance of about 2 cm from the fire, melt them (but do not scorch them!). Rotate the petal smoothly but quickly. This way you need to process all your workpieces.
- If you want the petal to become more rounded, hold it over the fire a little longer, but do not reduce the distance from the fire. However, sometimes petals slightly blackened by fire look quite organic.


Step 4. Take one of the smallest petals, roll it into a roll and make a couple of stitches in its lower part to secure it. You now have the core of your flower.

Step 5. Attach the second small petal and secure it with a couple of stitches. Continue attaching the petals one after another, maintaining a checkerboard pattern. When you are done with the small petals, start attaching the middle petals, then the larger ones, and finally the largest ones.


Flowers made from ribbons in two shades

Flowers made from ribbons of the same shade
Well, that's all, the peony is ready!


Using the same principle, but by changing the number, shape, size and color of the petals, as well as adding stamens from beads or floss threads, you can create roses, tulips, poppies or ranunculus.

Following our master class, you can make flowers not only from satin ribbons, but also from organza. Why not use old ribbons for baby bows?
Master class 3. Simple flowers from ribbons in 5 minutes
If you need to make flowers from ribbons with your own hands as quickly as possible, for example, for gift wrapping, then this step-by-step instruction will help you out.

What you will need:
- Any tape;
- Beads;
- Scissors;
- Hot glue gun.
How to make a flower from a ribbon:
Step 1. Cut out a small circle with a diameter of about 5 cm from cardboard or thick paper. This circle will become the base of your flower and will be hidden under the petals, so it does not need to be cut out carefully.
Step 2: Start gluing the tape to the top edge of the circle, creating a pleat as shown in the photo below.

Step 3: Continue applying the tape in a spiral pattern in 3 or more layers. When you reach the center, cut off the excess tape, fold the end under, and carefully glue it in place.

Step 4: Place a large dot of hot glue in the center of the flower and quickly fill it with beads.

Master class 4. Small textured flower made from wave braid
If you want to decorate a ring, headband, brooch or necklace with a flower, then a rose made from wave braid is best suited. After all, it turns out so neat, strong, elegant and small.

What you will need:
- A wave braid of medium width and a length of 50-60 cm (for one rose) or two ribbons of different colors of the same width, 25-30 cm long (if you want to make a two-color rose). However, the length can be longer or shorter, it depends on what size you want to make the bud.
- Scissors.
- Sewing machine.
- Threads with a needle to match the braid.
Step 1. Take two wave braids of the same length and intertwine them together as shown in the photo. Before you start weaving, secure the two ribbons with some kind of clamp so that they do not unravel.

Step 2: Machine stitch along the edge of your piece to secure the weave.

If you don't have a machine, it doesn't matter. Just run large stitches along the entire length of the braid.

Step 3. To make the flower, simply start folding the ribbon at one end, securing the layers with hot glue in some places.

Step 4: When you're done, you should have a bud that looks something like this. Simply tuck the remaining end of the braid under the flower and secure it with glue.

Step 5. Glue a small circle of felt, cardboard or thick fabric to the base. In the future, you can glue anything to this base - from a hairpin to a ring.
Step 6. Have you noticed that all the petals of our flower are closed? In this form, it looks more like a peony or ranunculus. If you want the flower to become a rose, simply spread each petal outward one by one.

Master class 5. Poinsettia with leaves
It's time to tell you how to make poinsettias from ribbons, which can be used to decorate anything, for example, an autumn wreath as in the photo below.

What you will need:
- Ribbon 4-6 cm wide in red, cream or any other desired shade;
- Green ribbon (for leaves) 2-3 cm wide;
- Scissors;
- A needle and thread to match the ribbon for the petals or thin copper wire (jewelry);
- Beads;
- Hot glue.
How to make a poinsettia from ribbons:
Step 1. Cut three pieces of equal length from the ribbon. How long should the segments be? It depends on what size flower you need. If you want to make a flower with a diameter of 12 cm, then the segments should be exactly this length.
Step 2. Give the resulting rectangles a diamond shape. You can do this in the following way: stack the pieces on top of each other, fold the stack in half, then give the resulting square a triangle shape by cutting off the excess on the sides. Voila, you've got diamonds!
Step 3. Pinch each diamond in the middle and tie the folds with thread (you can do a couple of stitches) or jewelry wire.
Step 4. Place all three pieces next to each other, then tie them with thread or jewelry wire to create a flower. Adjust the petals if necessary.

Step 5. Glue several stamen beads into the center of the flower.
Step 6. Now let's work on the leaves. Cut two lengths of 6-9 cm from the green ribbon (the length of the pieces should be approximately three times the width of your green ribbon). Place one of the rectangles on the table, wrong side up. Bend its right side downwards along the bias so that the workpiece takes on an L-shape (see photo). Now fold your letter G in half to create a house-shaped piece with a roof. Gather the bottom of the “house” with a couple of stitches or glue.

Step 7. Now the leaves can be glued/sewn to the back of the poinsettia, to a felt round base (if you have one) or directly to a decorative object (headband, pillow, etc.).
Master class 6. Lace ribbon flower
And finally, we present another express method for making a simple but beautiful flower with your own hands. The principle of operation in this technique is similar to that described in MK No. 3, but instead of glue, a thread with a needle is used to fix the craft, and instead of a satin ribbon, a lace ribbon is used. However, you can use any other one. Lace flowers make wonderful brooches and hair clips.


What you will need:
- Lace ribbon;
- Scissors;
- Needle and thread to match the ribbon;
- Beads;
- Hot glue.
How to make a lace flower:
Step 1: Baste the tape along the bottom edge using wide stitches.

Step 2. Once you are done sewing, gather the ribbon by pulling the thread and bring the two ends together to complete the circle and create the first layer of petals.


Step 3. Glue a small circle of felt or other fabric into the center on the wrong side of the flower. Sew the necessary accessories to it, for example, a pin, to make a brooch.
Step 4. Glue beads, rhinestones, stones or other decor to the center.

If you want to continue your acquaintance with the art of making flowers from ribbons with your own hands, we offer you to watch the following step-by-step video instructions.
In this video, you will learn how to make kanzashi flowers from 2.5 cm ribbon.
This video shows a method for making a rose from a satin ribbon, which differs from our master class No. 1.
Here is another master class on making roses in shabby chic style.
I welcome everyone gathered on my blog on this sunny (or maybe not so sunny) day. If you want to learn how to make cool flowers from ribbons, then I highly recommend reading this article to the end.
Flowers made from satin (and other) ribbons can be used both to decorate gift packaging and as a gift itself.
Especially if you collect such flowers in an elegant bouquet.
The most amazing thing is that sometimes the most beautiful of these plants are so easy to make with your own hands that it takes 10-15 minutes even for a beginner (trust my experience).
Recently I have been making different flowers quite often and now I will share with you excellent master classes on making them
DIY flowers made from satin ribbons
I'll show you 15 cool (and easy) ways to create amazing flowers. You can “take” each of the photos from the master classes with you by copying the corresponding image.
Let's start with, perhaps, the most romantic and popular plants among girls - roses.
Ribbon roses
Stop buying expensive store-bought roses! Let's learn how to make them ourselves and save the lion's share of the budget.
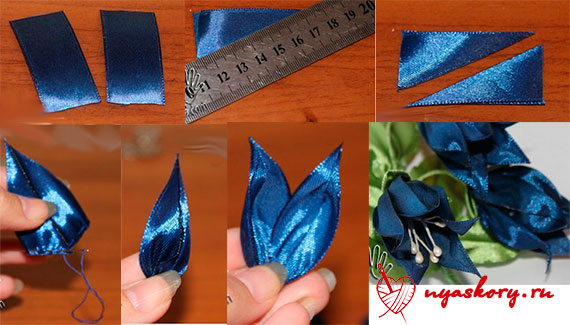
We will have several roses today. The first of these is a rose, made by folding triangles as you go. To make it, prepare a piece of ribbon at least 2 cm wide and at least 50 cm long.
Unblown
Form a center by bending one end as in the photo. Twist and secure.

twisted rose
In terms of the method of creation, it vaguely resembles the previous one (at least the beginning). After forming the center, alternately turn the ribbon, twisting it and applying layer by layer. Secure at the end.

Kanzashi
The peculiarity of this rose is that all its petals are processed separately.

From braid
Finally, a rose, which is obtained by intertwining two wavy ribbons. After weaving, they need to be swept along the edge so that they do not fall apart. And then just roll it up.

Flowers from kanzashi ribbons
In general, kanzashi is originally a “hair decoration” from Japanese. It dates back to the times of geishas, who were distinguished, among other things, by their ability to skillfully do needlework.
Kanzashi has two petal shapes - round and pointed. The rest are already subspecies. So all flowers, to some extent, can be attributed to this type of art.
Hibiscus
An exotic guest, for which you will need a wide ribbon (about 5 cm wide), a base and stamens.

Just a flower with 5 petals
To make pointed elements, sew the center. Fold the future petal in half and hem it from the inside. Prepare 5 pieces, then string them on a thread. Decorate the middle.

Bell
For the bell, prepare the petals according to the photo. To roll them, fold the petals with their tall, straight edges facing each other and sew around the edge (glue the top a little). Pull the thread, assemble the resulting parts, decorating with stamens or beads.
Semitsvetik
For it you need to prepare 7-9 petals using the classic method used in kanzashi. Then all the petals are collected on a thread and, if necessary, glued together on the sides.

Aster
Just a dream, not a flower in terms of ease of execution. To make an aster, take a ribbon and sew a line of zig-zag running stitches across the entire width. Pull, roll. All

Peony
For the peony, take three ribbons: two for the petals, one for the green leaf.
Please note that the peony consists of two parts - a more closed bud and opening petals.

Master classes on colors in video format
Not everyone likes to study photographs, so I have prepared several flower-making tutorials for you in video format.
Bright flowers made from ribbons can be used to decorate a gift, hairpin, or brooch. You can even make a whole bouquet out of them. They will not cause allergies and will not lose their appearance even after a whole day of wear. Therefore, wedding accessories are often decorated with such flowers. Making your own decoration is very easy. Even an inexperienced needlewoman will spend no more than twenty minutes on one flower. Read the article on how to make flowers from ribbons. The master class in each section is designed for beginners and does not require special skills or tools. And the presence of a photo will make the procedure even more clear.
Solid ribbon rose
The most popular satin ribbon flower is the rose. There are many different types: twisted, in bud, with separate petals. The easiest way to make a flower with your own hands is from a single piece of ribbon. Here are two simple and beautiful options.
For the first, you will need a piece of tape 2 cm wide and at least half a meter long.
Instructions:
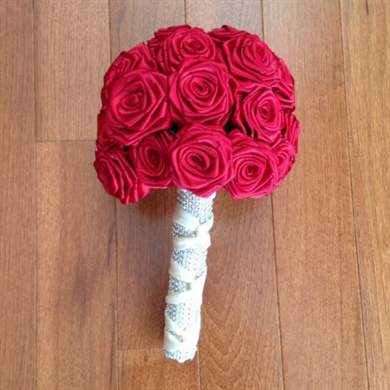
The flower is ready. From several of these decorations you can make a whole bouquet. Place it in a vase or use it as a stand-in for your wedding. 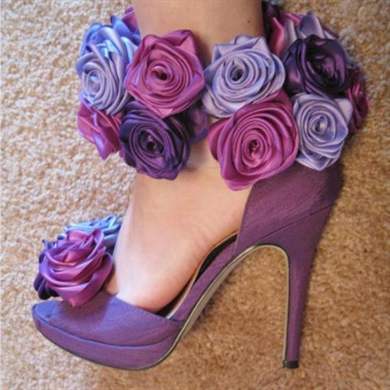
The second option - a twisted rose - is very similar to the first. They have the same manufacturing principle, but the tape needs to be folded slightly differently.
The longer the piece of ribbon, the more magnificent the flower will be. Experiment with different colors and you are sure to get the most unusual decoration.
Video instruction:
Rose from individual petals
To make it, you will need a tape five centimeters wide and at least one and a half meters long. The more petals, the more magnificent the flower. We'll tell you step by step how to make a rose.

Solid ribbon aster
The easiest flower to make.

Kanzashi flower made from ribbons
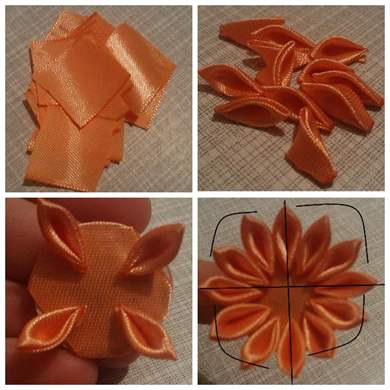
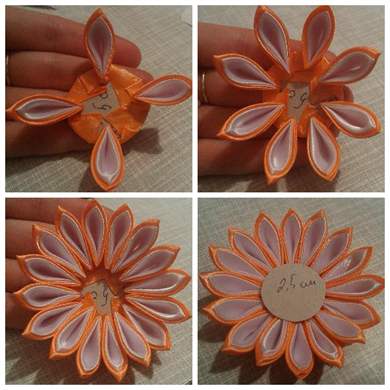
Kanzashi is the ancient Japanese art of making jewelry from fabric. Today, this technique has been successfully mastered by craftswomen around the world. The ancient recipes have been supplemented, and all we can do is successfully use the ready-made instructions. We will describe one of them below. It will be a flower of sharp petals.
For production you will need:
- Satin ribbons in orange and white colors:
Orange ribbon 5 cm wide - 1 m.
White ribbon 5 cm wide – 80 cm.
Orange ribbon 2.5 cm wide - 30 cm;
- Bead to decorate the middle;
- Cardboard mugs with a diameter of 3.5 cm and 2.5 cm;
- Fabric glue: hot glue or moment crystal;
- Candle or lighter;
- Barrette.
Progress:


Organza flower
It’s easy to make a large lush flower from a piece of organza or nylon ribbon. Use it as a bow on a hairpin or as a decoration on a headband. The decoration is suitable for both little girls and brides for their own wedding. Step by step description:


Since ancient times, women have decorated their hair with flowers. Times change, but habits largely remain the same. And since flowers are a rather short-lived decoration, and progress does not stand still, women have learned to replace plants with artificial materials. What are hair decorations made of now? This article will discuss the master class “Flowers from satin ribbon”. Moreover, options for creating different widths will be presented.
Kanzashi as the art of creating flowers from satin ribbons
Kanzashi is a hair ornament traditionally worn by beautiful women in Japan. More recently, such jewelry was worn mainly by brides, but today they are not only available to everyone, but also have a huge range of stylistic options, suitable for almost any outfit.
By studying the same master class, flowers from satin ribbon can be made both for a beach outfit and for a gala evening. Everything will depend on the quality and color of the materials used.
A little history
In the 1700s, beauties from Japan began to use a large number of pins and combs to decorate their hairstyles. Kanzashi in Japan are not worn just like that. They must certainly correspond not only to the age of the person wearing them, but also to his social status. These decorations are made from various materials. At first, hairstyles were decorated with thin sticks. There was an opinion among the people that they removed the evil eye from their owners. They then began to create ridges from bunches of such sticks. Later, the masters of creating kanzashi reached a very high level of skill. And today, almost any needlewoman is able to create a Master class on creating such flowers will be discussed below.
What material can flowers be made from to decorate hairstyles?
Flowers for decorating hairstyles can be made from ribbons of various materials or simply from fabric cut into squares. Very beautiful petals are made from organza. But working with her is quite difficult. It is not only very free-flowing, but also easily deformed during operation. the master class of which will be discussed throughout the article are the most preferred among craftswomen. Working with ribbons is much easier than working with fabric. They melt better and are less deformed during operation.
Does the width of the tape matter?
The most popular tape width for creating basic ones is five centimeters. But this does not mean that tapes of a different width will not suit your work. The master class “Flowers from satin ribbon” involves the use of both wide and narrow ribbons. And flowers created using a narrow ribbon are in no way inferior in beauty to those made from wide ribbons. Often they turn out even more voluminous and airy. Also, do not forget that no one prohibited combinations of petals created from ribbons of different widths. If you combine them correctly, you can get simply amazing work.
Tools and materials needed to work with tapes
So that you can make flowers from satin ribbons with your own hands without much difficulty, a master class on creating them will require you to have some tools and materials. First of all, both the tapes and the material should be cut. For this you will, of course, need sharp scissors. You also need tweezers for clamping the petal blanks and a candle or lighter for melting them. In addition, the petals will have to be connected. This means that a material is needed to connect them. This can be Moment glue or hot melt glue. Sometimes it is necessary to tint some petals or part of them. And then, of course, you can’t do without fabric paints and brushes. And also do not forget about various decorative elements. Such as beads, pendants, stones and many others.
Types of petals in kanzashi art
Before creating flowers from satin ribbon, the master class of which is presented in this article, you should study their main component. Namely, a petal. The basis of the work is made up of two types of petals - sharp and round. Based on them, all other options are created.

Petals can be single or double, with a hole or with curls. They can also consist of ribbons of different colors. You can also create a flower from a narrow satin ribbon with your own hands. The master class for this petal is somewhat different from all the others. But this does not mean that such a petal is not beautiful enough. It has its undeniable advantages.
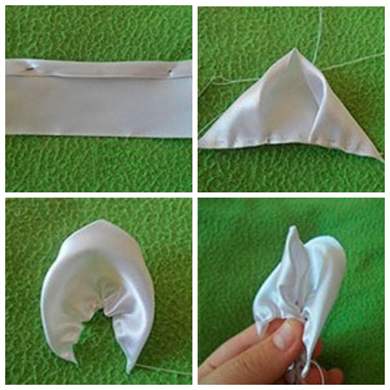
Sharp petals
A satin ribbon flower (master class), a photo of which can be seen in this section, consists of sharp petals. To make such a petal, you need to take a square of satin ribbon and fold it in half diagonally. The triangle that results from these manipulations needs to be folded in half and in half again. The resulting petal should be cut off. The height of the petal, and therefore the model of the flower as a whole, will depend on how much you trim it. After trimming the edges, you can singe and solder only the tips. Then the petal will have a hole. And if the edges are completely soldered, then there will be no hole. Sharp petals can be successfully combined with round ones.
Round petals
Flowers created from round petals look very voluminous and at the same time quite gentle and elegant. Here it is especially important to choose the right color and pay attention to the quality of the material from which the flowers will be made. To create round petals for flowers, you need to take the same square as in the previous version and fold it diagonally. Then you should bend the side corners to the bottom and solder them together (or secure with thread). After these manipulations, the workpiece should be turned over and the side corners folded towards the middle. Secure them together with the help of Now we fold the workpiece in half, cut off the tip a little and seal it with a candle. Round petals, as well as sharp ones, can be of two colors. In addition, they are wonderfully combined with any other types of
DIY flowers made from satin ribbons. Step by step
To start, take a tape about four centimeters wide. The simplest option is to cut five pieces of seven and a half centimeters and five pieces of nine centimeters.
Of course, don't forget to scorch the edges on both sides. First, take one of the shorter pieces and fold it in half. Align the edge well and sew it with neat and very small stitches, leaving about three millimeters from the edge. To make everything look very neat, try to most accurately match the shade of the thread to the color of the ribbon. After the bottom edge of the petal is sewn, pull it as tight as possible and sew the next one without cutting the thread. Thus, collect all five petals of the same size on one thread and, pulling them together, assemble a circle. Similarly, make a circle of five larger petals. Now connect both pieces together. The larger part should be placed below, and the smaller one on top. Glue a beautiful bead or decorative button to the center. To make the backside look beautiful, you need to cut out a circle from cardboard or a plastic bottle and cover it with the same satin ribbon, and then sew or glue it on the bottom side. You can use just a circle of felt in a shade that matches the satin ribbon.
Narrow ribbon flower
To learn how to make a flower from a narrow master class, more than one can be used. Petals of various shapes and sizes can be used for flowers. You can create different interesting compositions from different flowers. You can easily create flowers from 1 cm wide satin ribbon. And even more subtle. If the width of your tape does not exceed half a centimeter, then you should cut it into equal pieces. There should be two options for such segments. Take one and fold it in half (right side inward). Now we cut both tapes diagonally from the side and solder them together. We unfold the workpiece and connect the free ends together by placing them one on top of the other.

Along the way we adjust the width of the petal. After the required number of petals has been made, you need to collect them into one flower, alternating different colors. There is another way to create a flower from a thin satin ribbon. The master class for creating such a flower is that each petal looks like a loop. For greater pomp, tie a knot in the center of such a loop.

All loops are assembled into a round dense piece. And on its reverse side a hair elastic or other blank is attached. If the ribbon is wider (for example, one and a half or two centimeters wide), then you can use the third method of creating flowers. A flower made from a narrow satin ribbon, the master class of which explains the third method, consists of petals pointed at one edge and gathered at the other.

The cut end of the petal is certainly scorched over the candle. These petals are collected by gluing them in a circle onto a cardboard piece covered with tape.
Flower made of satin ribbon (master class “Barrette”) in diagrams
To turn your satin ribbon flower into a hairpin, you need to work with it a little. When creating a flower, you can follow the diagrams so as not to make mistakes. This is especially true for novice needlewomen. It doesn't matter how the flower's petals were created.

After it is ready, you should turn it into a hairpin. For these purposes, you will undoubtedly need Moment glue (or hot glue) and a blank for a hairpin. If you could not find a blank suitable for you, then you can use an old hairpin or simply buy an option that is suitable for you. Having completed the flower and tidied up its underside, you just need to drip some glue and glue it to the hairpin. That's all the wisdom. Don't forget that you can further decorate your hairpin with beads, decorative stones or hanging elements. Don't limit yourself in creativity, but don't overdo it either. All elements of the hairpin must be correctly combined with each other, not only in color, but also in shape and even size.
For what decorations can flowers made from satin ribbons be used?
From flowers, the creation of which is based on the use of satin ribbon, you can create not only hairpins. They can be successfully attached to hairpins, bobby pins, combs or headbands. And even to ordinary elastic bands. The principles of attachment to all these elements are not much different from each other. But there are some nuances. For example, before attaching flowers to the headband, it is better to cover it with tape. And when you attach it to the underside of the flower, for reliability it is better to stick a small piece of tape over the elastic band to match the color of the flower itself.

Of course, from these flowers, in addition to hair decorations, you can make wonderful brooches, belts and any other accessories and even jewelry. It all depends on what kind of blank the flower will be attached to. Do not forget that if you degrease the place where the decorative elements will be glued, then everything will be attached and held much better.
After reviewing more than one master class “Flowers from satin ribbon,” it became clear that if you want, you can decorate anything with a wonderful flower. And it can be made from material of absolutely any width. Even if the transverse size of your tape does not exceed half a centimeter. The main thing is a creative approach and a little imagination. And also we must not forget that any compositions should not be overloaded; all elements should be harmoniously combined with each other both in color and size.
at 07/02/2017 2,276 Views
A composition of satin ribbons will not leave anyone indifferent at your event.
Not a single wedding salon or store selling decorative goods is complete without flowers made from satin ribbons. Photos of festive decorations amaze with the variety of shapes and colors. Often this “extravaganza” surprises not only with its beauty, but also with its prices, so many needlewomen decided to make a decisive move - to learn how to create flowers from satin ribbons with their own hands. The result was so stunning that many opened their own mini-shops with affordable prices for finished products for those who do not have time to do handicrafts, and websites where they give handmade lessons to everyone.
- Complicated flower made of satin ribbon: master class
- Satin ribbons. We focus on the intended purpose: if it is a gift, we take bright, rich shades of red, orange, yellow, scarlet, etc. For a middle-aged lady, it is better to mute the tones and turn to burgundy, and for a young girl, choose pastel colors - pink, lilac, white, etc. A separate topic is wedding accessories. Here you should not deviate from the classics, and if you do not have a revolutionary red or black dress, it is better to create a composition from a white and blue palette or light yellow and green shades.
- Scissors.
- Threads. And it doesn’t have to be in tone - they can be anything.
- Set of sewing needles.
- Glue gun or just glue; the main thing is that the tube has a sharp tip.
- Lighter - you will have to set the silk on fire. So that the cut edges do not unravel.
- Tweezers are needed to protect your fingers when working with fire when burning the edges of the ribbons.
- Wire – it will be needed to secure many elements.
- Additional items - headbands, hairpins, baskets, polystyrene foam, gift paper for bouquets, beads, rhinestones, etc.
- white and green ribbons;
- scissors;
- lighter;
- glue;
- felt;
- beads and sequins.
- Cut several pieces of green ribbon 6-7 cm long and cut out the shape of the leaves.
- We burn each piece, holding it over the flame with tweezers, so that the material becomes slightly wavy.
- We bend each sheet lengthwise and pass it over the fire again to create a longitudinal strip.
- We make petals - cut 10 pieces of white tape, half 7 cm, the other half 5 cm.
- We cut out the petals and burn them along the edges.
- We form the middle, take felt, cut out a circle.
- We gradually glue leaves and petals to the circle of felt in tiers - the way a poinsettia should look.
- We glue sequins and beads in the middle to disguise the rough work.
- We make stamens - we glue pieces of light felt imitating pollen onto pieces of straw or plastic thin and bendable white tubes. Bend slightly in different directions.
- We squeeze the flower from below in the area of the hole, insert the stamens and wrap the base with thread, sewing the structure tightly so that it does not fall apart.
- You can make leaves - fold a rectangular piece of tape 10 cm long with its corners towards the center and stitch it. We tighten the thread at the base and sew it up with a hidden stitch from the inside out. We make another sheet of slightly smaller size and place it on a circle of green felt. We place the rose itself on this blank.
- If you attach a pin to the back, you will get a beautiful brooch.
- prepare 4 petals 5 cm long;
- bend one edge of each petal at an angle of 45°;
- heat and fix with tweezers;
- We repeat the same procedure on the other side, we get diamond candies.
- We twist the first piece into a tube and glue it together;
- We attach the remaining 3 around, getting the middle of the bud;
- We fasten the outer and middle leaves around the perimeter, forming the blooming part of the flower;
- glue the leaves, attach a pin.

Delicate bouquet of satin ribbons

Accent combination of turquoise and purple

Beautiful artificial flower made of satin ribbons

Luxurious peony made of satin ribbons

Original bouquet-basket with artificial flowers made of satin
Flowers made from satin ribbons (step by step instructions)
Before you start creating masterpieces, you need to decide what and what type of flower we need. Next, all that remains is to prepare the tools and materials and you can start creating.
What may be required
Advice! It is worth using ribbons of different widths - this way the flowers in the overall bouquet will look more diverse.

Cute two-tone satin flower
14


Advice! If you don't have a lighter, but you're already inspired, you can use a lit candle.

Tools needed to create satin ribbon flowers
If you're going to be making hair accessories, you'll need a hair clip or headband; If you are planning an ikebana or a basket of flowers, prepare wicker containers and foam plastic - flowers attached to wire will be stuck into it. You can also use decorative flowers to decorate photo frames for yourself or as a gift.

Airy and delicate satin chamomile

Beautiful hoop with a large bright flower made of satin
Creation options and technology
It is not difficult to make a flower from satin ribbons, guided by the photo and description of the step-by-step technology.
Simple version for working with children
Let's move in measured steps from simple to professional. In order not to kill the soul's wonderful impulses with the first disappointment, there is no need to take on the most “twisted” versions. Beginning creators and children should practice from the basics, and then move on to more complex options.
Let's practice on the rims. For this we need a couple of ribbons and two beautiful decorative buttons. We take a narrow ribbon and cut several strips from it, the length of each petal will be equal to a quarter of each strip, so we mentally divide the piece of ribbon into 4 parts and determine the size of the flower with the rim. Having found the desired size, prepare 3-5-8 stripes, depending on how many daisies you want to see on your headband.
15


Advice! To prevent the ribbons from fraying, use a candle flame or a lighter to touch them along the edges.
Place a drop of glue in the middle of the strip, lift the ends, bring them to the center and glue them. We get several blanks, form them into a daisy, gluing them together in the middle or sewing them with a needle and thread. Sew a decorative button into the middle.
We coat the headband with glue, wrap it with a plain ribbon, and sew or glue daisies on top. One daisy can be attached with wire to a clip-on hairpin.

An unusual composition with a lush flower crown will be an excellent decoration for a celebration.
Poinsettia
From satin and other fabrics you can create not only the usual roses and daisies: let’s try to “grow” a poinsettia in half an hour. The satin consumption will be small, and the effect will be unusual.
Materials:

Delicate wedding bouquet of artificial flowers
Progress:

Accent bouquet in blue and beige tones
Almost a narcissist
We cut five yellow strips of the same length, mark the middle, pinch and glue the opposite edges in the middle, getting bows, and treat the edges with fire. We fold each bow in half and glue it from the bottom edge, then we collect all the petals on a thread, pulling them together in the center so that there is no hole, forming a flower. Sew an orange button in the middle.

Bright autumn composition made of satin
Wild rose hips
We make patterns for petals - we draw templates for three types of petals, reducing them by a centimeter. For example, one is 7, the second is 6, the third is 5 cm. We fold ribbons of the same color, but of different widths several times. To speed up the process, we apply templates and cut out several blanks at once.
As a result, we get three types of petals, 6 pieces of each type. We process all the workpieces in advance over the fire, and then assemble them one by one in tiers. First, in a circle with each other, then we attach the lower one to the larger tier in the middle so that there is a hole in the middle between all the tiers.

You can easily create beautiful peonies from satin with your own hands

Hairband with flowers made of satin ribbons
Complicated flower made of satin ribbon: master class
Now let's look at a more complicated version of a composite flower made from individual petals of a more bizarre shape. Let's take the rose.
Start:

A satin composition can be used to decorate a jewelry box, gift box, or complement a postcard.
Making the middle, outer petals and leaves:
We bend four pieces of 5 cm each on both sides, sewing them together with threads, forming a small gather along the seam. These are the middle petals. We also make the outer petals from pieces 7 cm long, there should be 8 of them.
We cut out leaves measuring 2.5 x 5 cm, burn them, and make folds. We form veins - we bend and heat the leaves, squeezing them hot.
Assembly:
15


Kanzashi flowers made of satin ribbon
The term “kanzashi” came to our lands from Japan, where once upon a time the best geisha decorated their hair with homemade flowers, secretly competing in skills. This was the name for hair decorations. Kanzashi flowers differ in shape and complexity. Let's consider the most popular option.
The technique is simple - many identical petals are made, but different in size. Then they are assembled in tiers using a needle, thread and glue, distributed evenly around the middle, which at the end is crowned with a shining large diamond, in our case a rhinestone.

Contrasting bright flower created using the kanzashi technique
The lower tier is formed from the largest petals and strung on one thread, then the second tier and so on, gradually decreasing in size towards the center. After this, the layers are stacked on top of each other and secured with glue.
You can make any kind of flowers this way, the main thing is to create the desired shape of the petals.
Sharp kanzashi petals for dahlia
We cut off squares measuring 5 x 5 cm, fold them in half diagonally twice, pinch them at the edge with tweezers, and remove the frayed parts. We solder the ends with fire. Then the raw corner is trimmed and also soldered by fire in its folded form.

Bright bridal bouquet made of satin
Nature is not always able to delight our eyes and satisfy the need for contemplation of beauty. Beautiful fabric, especially satin, allows a miracle to happen and gives us and our loved ones a magical garden that blooms all year round. The manufacturing technique only seems complicated, as you might think when looking at the finished masterpiece. However, turning to the step-by-step instructions, we understand one thing: the eyes are afraid, but the hands do. The work is so captivating that in the end you can only be surprised at your own professionalism and think about starting your own business related to decor.