Do-it-yourself educational layout books. We sew an educational textile book for a baby with our own hands. Educational book page - master class
Today in children's stores you can find a huge number of different educational toys. However, not all parents are satisfied with either their price or quality. Yes, and I want such a toy to serve longer and not get boring for the baby.
There is an alternative to purchased toys - things made with your own hands.
First option
Such toys have many advantages that their commercial counterparts do not have. Firstly, such a thing can be modified as many times as desired. Your toy will grow with your child. Secondly, it will be cheaper than constantly buying new things for your baby. And also, in such an item you can put a piece of your soul, your love for the baby. While playing, he will be surrounded by your care for him.
What educational toy can be offered for a child so that it is interesting, useful, and even changes as the baby grows? Sew him a developmental active book. If you make it of a special design, where the leaves can be taken out and new ones put in, then your idea will last a very long time and will teach the young researcher a lot.
What do you need to prepare for your homemade product?
We will need fabrics of various textures and colors, thermal applications, padding polyester, non-woven fabric, rustling materials (cellophane bags), Velcro, buttons, cardboard and colored paper, laces, elastic bands, in general, everything that will help us with a creative idea will be useful.
Look in your closets and stashes - most likely, you won’t have to buy anything else in order to sew a book.
First, think over a sketch of your book, draw what you have planned on paper, and then start working with the fabric. Also decide on its size.
In order for the book to be taken apart and new pages added, sew loops on each leaf or make holes in them. Now the entire structure can be assembled onto a ribbon or curtain rings.
You will need to put a layer of synthetic padding into the pages to make them soft, and you can put cardboard in the cover and one will be dense. Glue small parts with non-woven fabric and stitch them to the background with a zigzag. For large designs, simply cut them out of the fabric and sew them with the same seam. If you want the individual elements to be convex, then leave a small hole and fill them with padding polyester.
In order to build “movable” elements, you need a cut-out glued with non-woven fabric, stitched to a piece of fabric, filled with padding polyester, cut along the contour, and attached with Velcro. Thus, you can make a page with elements that can be moved (starry sky, sun with clouds, numbers, letters...).
You can make an active page by attaching the cut-outs to the page with a string and sewing a string that you can use to pull and release the pictures. Using this technology, you can make an aquarium page with “swimming” fish, or a flower field where butterflies will “flutter”.
To develop fine motor skills, make a lacing page. To do this, attach a picture of shoes with holes through which you can thread a lace.
Make a page with a pocket or purse with a button - let your baby learn how to button and unbutton it. You can put a key on a string in the pocket.
On some pages, sew rustling elements, or you can put cellophane into the sheets themselves. You can make any picture three-dimensional and fill it with cellophane. Using this method, you can make a grass clipping that rises, and a bug sits behind it. Such a game will attract the child’s attention and help develop fine motor skills.
You can make a house page in which everything will open and close, and the figures behind the windows and doors can visit each other (elements with Velcro). You can also attach a section of the top from a plastic bottle with a neck on which you can screw the cap.
Make a page with geometric shapes of different colors (circle, square, triangle).
The page on which the zipper is sewn will teach the baby how to use it.

To make figures that can be moved and moved, it is better to use non-flowing fabrics such as fleece or felt.
Sewn on various buttons will help your baby become familiar with sizes and colors.
Elements made from fabrics with different textures will develop fine motor skills and attentiveness.

It is worth keeping in mind that children really like various hidden figures, for example, you lift a leaf and there is a bug under it, you open a window and a bunny sits behind it.
So we ended up with an assorted book. However, you can come up with a toy with a certain plot: seasons, clothes, going to visit, the animal world, numbers and letters. Although such a craft requires time, patience and effort from you, it will be an excellent gift for your child.
Such a book will develop the child's development and will also become very useful on a walk or, for example, in a clinic, when, while waiting for an appointment, you need to keep the child occupied with something.
Second option
This is such a voluminous book. Inside the pages there is 10 cm foam rubber.
A rustling tree with fruit buttons and berries hidden in grass pockets; 2 – a rustling apple, the leaves also rustle and are attached to buttons...
The sun is soft with rustling rays and a three-dimensional ribbon rainbow sewn on one side (Every Hunter Wants to Know Where the Pheasant Sits - to study the colors of the rainbow); a house made of soft fabrics, the door opens with Velcro and a Cheburashka peeks out.
Butterfly with voluminous wings with Velcro on the edges and with different squares; ladybug - a pocket with a zipper, you can hide something in it.
A flower with petals made from ribbons of different colors; soft shiny voluminous star with buttons around it.
A ship with smooth rustling sails, you turn them aside, there is a duckling captain; denim locomotive - buckwheat inside, for fingers
The fish rustles with voluminous fins and a Velcro tail, the tape is thin like seaweed, buttons are like pebbles; whale - thick fabric, soft cotton fin and tail, fountain from a bag.
The back cover of the book is a side feeder. You can not sew the book, but cut out the loops and tie them with ribbon, so the book will turn out to be a transformer, and you can add or change pages.
Third option
It’s easy to sew a book that develops a soft toy yourself: sheets of pages - double material with a layer of padding polyester - are sewn together, forming the most ordinary book, it is unusual only in that everything in it is made of fabric, and therefore is easily washed, does not tear, and you can play with it from the moment the child began to grab something with his little hands.


The theme of the applications can be absolutely anything - animals, berries and fruits, cars. I made my book from what I found at home, and I found a piece of calico from a sheet. It showed a cheerful score. A number and a picture for it. Three kittens, five hedgehogs and so on. This is what I took as a basis.
I sewed cut-out appliqués in a zigzag pattern, sewed on beautiful baby buttons in some places, and added Velcro and bows in others.
If you don’t have beautiful material with different pictures at home, then you can buy thermal appliqués, their only drawback is the price.
 DIY toys photo. DIY soft book. How to sew a soft educational book for a child." />
The main goal is to make the book bright, interesting for the child, with clear drawings, use different materials to develop fine motor skills, it would be nice to insert a squeaker or a fishing bell somewhere, if possible, of course.
Page 1 – an elephant, the sun can be pulled by its rays, flowers can be put on a button with a ladybug.
Page 2 – a bear with a pocket; in the pocket you can hide small toys, cookies and candies for the bear.
Page 3 – example 2-1=1 made in the form of flowers, one flower with Velcro, the second with a button. It is clearly visible that there were 2 flowers, one was removed. How much is left? Simple and clear teaching of counting
 DIY toys photo. DIY soft book. How to sew a soft educational book for a child." />
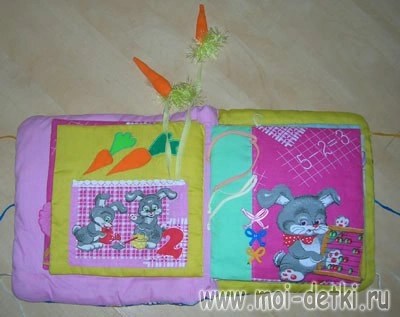
Page 4 – a pocket with two bunnies, and in the pocket there are 2 carrots. The carrots are soft, sewn on with an elastic band. The tail of the carrot is “grass” thread, the carrot itself is made of orange knitwear. It is very useful for little children's fingers to feel fabrics of different textures, so rest assured that all your efforts will not be in vain! You can pull the carrots, the rubber band stretches and, if you let go, the carrots fly apart.
Page 5 – example 5-2=3 made on the basis of bows. Of the five bows, two are untied, the rest are simply sewn on.
 DIY toys photo. DIY soft book. How to sew a soft educational book for a child." />
Page 6 – three kittens and three cherries. Cherries are bright and develop color perception in a child. Cute kittens generally evoke a lot of positive emotions in children. Well, besides, we again repeat the count and how pussies meow.
Page 7 – 4 ducklings and 4 pears. We count ducklings and pears, touch small button pears with our fingers. And at the same time we teach that pears grow on trees, and ducklings quack, “Quack, quack.”
 DIY toys photo. DIY soft book. How to sew a soft educational book for a child." />
Page 8 – applique: elephant (cut from fabric (calico) and sewn in a zigzag along the contour to a flannel base), again developing fine motor skills and the sense of touch. The birch tree and the mushroom are simply cut from fabrics of different textures. I embroidered black dots on a birch trunk with black thread.
Page 9 – just 5 chickens and 6 apples.
DIY toys photo. DIY soft book. How to sew a soft educational book for a child." />
Page 10 – pocket with a bone for a dog. A bone made of white knitwear, stuffed with padding polyester. The bone is sewn on with an elastic band so it doesn't get lost. In general, I made a conclusion for myself - as for the book, it is better to sew on all small and potentially lost objects (carrots, seeds, butterflies, flowers). Everything that is not sewn then has to be collected throughout the apartment. When I was sewing this book, such a thought did not occur to me, and therefore when my daughter began to play with the book (chew it, sit on it, try to tear it in every possible way, etc., etc. - well, everything that a child of six months or a year can do), I I had to urgently revise and complete the book. This is how carrots on an elastic band and a butterfly on a string appeared.
Page 11 – a boat and 4 fish of different colors (children’s buttons)
 DIY toys photo. DIY soft book. How to sew a soft educational book for a child." />
Page 12 – 8 butterflies, one of which has Velcro, you can tear it off and tug. As I wrote above, initially the butterfly was not sewn on a string. This is an already modified, so to speak, version, corrected by circumstances. Yes, yes, after each reading of a book, try playing hide and seek with carrots and butterflies throughout the apartment. This is a fun game for “bored” mom and dad.
Page 13 – pocket with carrots for the bunny. There is a fishing bell inside one of the carrots; the carrot rattles loudly, delights the baby and develops sound perception.
 DIY toys photo. DIY soft book. How to sew a soft educational book for a child." />
Page 14 – bright fruits and berries, cut from fabrics that feel different to the touch.
I made the cover for the book from delicate chintz with daisies, glued a cute Dalmatian dog onto the cover and quilted it with padding polyester.
The book turned out to be voluminous and soft, you can cuddle with it, sleep, and play with it. You can also play an interesting game. For example, hide a piece of candy or a small toy in one of the pockets of a book and ask the child to find it.
Fourth option
For ages 0.5-1.5 years. The book is made from fabrics of different textures and colors, with buttons and beads; plastic napkins are placed between the pages so that it does not bend and holds its shape. Everything can be crushed, chewed, washed.
First spread:

The cat, the dog's ear and tongue are knitted, the mouse is fluffy, all the eyes/noses/claws are beads/beads, the whiskers, ear, and mouse tail can be pulled, sewn on only one side. The bone is made from a tube of Blend-a-honey :)
Second spread:

The petals of the flower are also not sewn completely, in addition, they have beads sewn into them, so you can knock on them, but they will rattle a little. The stem and leaf are also beads of different textures. You can pull the rays of the sun. Clouds are like a terry towel.
Third spread:

Knitted caterpillar, velvet cherries, bead cuttings. Butterflies, I confess, are purchased appliqués, but they are beautiful and bright.
Fifth option. Educational book – Numbers

The number of flowers on each page corresponds to the number. Each page contains rustling cellophane. Thanks to this book, a 2-year-old child learned all the numbers!

Sixth option
The book consists of 12 pages and a cover.
The total size of the book is about 25x25 centimeters. The edges of each page are finished with colored satin bias tape. The cover of the book is fastened with a loop and button. Inside the pages and cover there is padding polyester.
Cover (front side) – the bunny is made in the form of an applique (I cut out a design from printed chintz), the inside of the cover – an applique with a bear cub.
Page 1 A girl in the form of an appliqué made of colored pieces of fabric, embroidered parts of the face, a voluminous nose, filled with synthetic padding, and bead earrings sewn on the ears. The hair is made of yellow braid, sewn to fly away so that you can braid, you can learn to weave a ribbon. A button in the shape of a shiny handbag or wallet is sewn onto the palm, and a thermal replica of a kitten is glued next to it.
Page 2 Lilac page with elements for counting - beads, buckle, ribbon and cord clip for training finger muscles.
Page 3 The shoe is made in the form of an appliqué, so you can learn to lace.
Page 4 The blue flower is made in the form of an appliqué; the leaves are made of satin ribbon. You can count and study colors.
Page 5 Tulip with a bee. On this page, the tulip is sewn so that it is empty inside and you can hide a bumblebee there. The bumblebee is sewn to the braid. The sun is made of yellow fleece, the clouds are made of white fleece with Velcro, they can be detached. A small butterfly, white flowers and strawberries are embroidered iron-on appliques.
Page 6 Penguin page. All details of the page are appliqués. Penguin - embroidered thermal appliqué.
Page 7 Sea. The boat is made in the form of a pocket - you can “carry” your favorite toys, it moves left and right along a satin ribbon on the “horizon of the sea”. The sea is made in the form of a pocket in which there are fish - separately sewn parts, 2 shells, in the middle of one there is a pearl - a large mother-of-pearl bead. Shell on the button.
A seahorse button is sewn on the foreground.
Page 8 Tree. A padding polyester is inserted into the tree crown for volume. There are apple buttons sewn onto the tree. (from can be counted), there are flower buttons on the grass. The butterfly is a separately sewn piece with Velcro.
Page 9 Christmas tree with padding polyester inside for volume. There is a star button sewn onto the top of the tree. Toys – colored plastic sparkles. Next to the tree there is a bunny - a separate detail on the button and an applique gift.
Page 10 Snowman. All parts of the snowman are made of white fleece with Velcro. You can build a snowman. Month --yellow fleece.snowballs - thermal application.
Page 11 Present. Gift applique with zipper, satin yellow ribbon can be tied in the form of a bow. Put something inside the pocket.
Page 12 Seven-flowered flower. Petals made from multi-colored pieces of fabric. with Velcro. You can learn colors, or you can play a game: make a wish and tear off a petal.
The inside cover has a pocket with a button. The back cover has an apple appliqué.
Seventh option


Eighth option
Pages 30X20, inside there is batting.
1. COVER. The words BOOK and FOR are in braid, the name is embroidered with beads. And I embroidered a little with ribbons, I decided to try it for the first time.

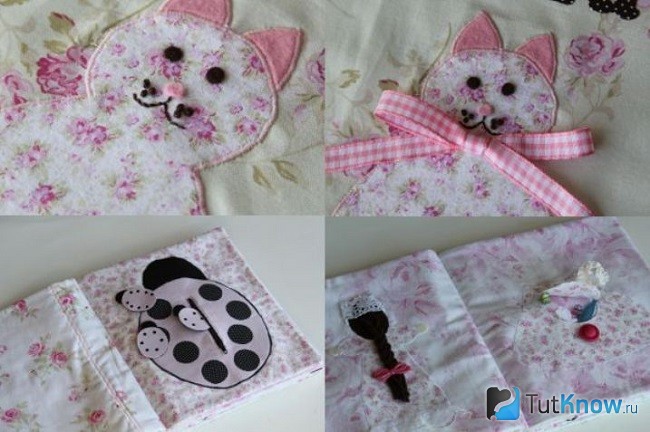
2. SNAIL– there are beads inside the shell, you need to roll them with your fingers.
3. FLOWER- a bee is hiding, a butterfly and a spider are hiding under the leaves. The leaves are rustling.


4. BUTTERFLY– turns into an impudent caterpillar or vice versa. The wings are rustling, there is a package inside.


6. 7. GIRL and BOY We study the fasteners and braid the girl’s hair.


8. LADYBUG AND BUTTERFLY. A butterfly flies from flower to flower, a ladybug also tries to fly away.
9. HEDGEHOG. Carries supplies - on Velcro.


10. GILT. We put our hands in and hide little differences. Raccoon – applique.
11.BOOTE there must be lacing, the workshop is closed on weekends and did not install eyelets.

12 POCKET. The last page is for varieties, sweets. Learning to deal with lightning.

Ninth option

I made this soft educational book as a gift for my friend's son. The book is made of individual pages with loops, you can play with each page separately. All pages are soft - padding inside.
On the first page there is a pocket with a zipper. The base is chintz, the pocket is calico.

The next page is the house. The smoke from the chimney is soft fluffy threads for knitting. The windows and door are closed with Velcro. Materials: calico and chintz.

There is a bear hiding behind the window, and a monkey behind the door.

The next page is a flower. Petals - different fillings - buckwheat, rustling bag, beans, holofiber. Material – calico, flower – satin of different colors.

The next page is a butterfly. The butterfly has a soft body (holofiber inside), sewn to the page only with the back, the head is not sewn, the horns are ropes, the wings are sewn only on the back, they bend, buttons of 3 colors are symmetrically sewn on the wings - learn the colors, look for the same ones. Material: butterfly body – satin, wings – chintz, back of the wings – teak. The calico base is blue with flowers and butterflies. On this page you can count butterflies, count buttons on wings, look for identical buttons, get acquainted with the concepts of big-small, symmetrically (buttons on wings)

Next to the butterfly is a Velcro flower.

The next page is a Christmas tree. The base is chintz, the Christmas tree is calico, the gift bag is knitwear, the appliqués are flannel.
There are multi-colored buttons sewn onto the tree, on the top there is a button with a star, a string with buttons and beads - you can finger them, on the branches there are rings (small ones for curtains, sold at hardware stores), and you can learn how to lace. Another fluffy sparkler. A bag with gifts on a drawstring. Velcro applications of a cat, a mouse and a dog dance in a circle under the Christmas tree. On this site you can search for identical buttons by color, shape, and learn how to lace.


The last page is a snail. The base is calico, the snail's body is leatherette, the eyes are buttons, the mouth is embroidered, the shell is material for curtains, smooth, inside the shell there are beads of different sizes (two circles), in the middle there is a button. You can move the beads around with your fingers.

The cover is calico with a drawing from the cartoon “38 Parrots”.
The book closes with Velcro.

When studying with a book, you need to pay the child’s attention to the color of the parts, their position (top, bottom, right, left, inside, outside, etc.), the properties of the material (smooth, rough, soft, etc.).
While playing with a book, the child will gain ideas about color, develop fine motor skills, tactile perception (the toy parts are made of fabrics of different textures), attention, speech, imagination, and all this, of course, with the help of a loving mother.
DIY educational book for kids.
Author: Rak Anna Vasilievna, primary school teacher at Municipal Educational Institution Gymnasium No. 1, Millerovo, Rostov RegionDescription of material: I bring to your attention a description of a soft educational book that you can sew with your own hands. This material may be useful to mothers of babies, grandmothers and teachers working with children (mothers can be involved in the work).
Target: comprehensive development of the child.
Tasks:
develop fine motor skills of the hands,
develop the child’s thinking and speech,
cultivate love for mother and grandmother.
Since childhood, we have all heard the phrase more than once: “The best gift is the one made with your own hands.” You may not agree with this, but a bright and joyful period is coming - you have become a mother or grandmother. Among all the pleasant troubles, the question arises: where to get good, harmless, useful and educational toys?
The answer is: sew it yourself!
Pros:
environmentally friendly materials (after all, we use natural fabrics for work),
safety (all fragments are soft),
positive energy (so much love invested!),
developmental purpose (each fragment with some task).
Minuses:
I didn't find them.
When my grandson was born, I decided to sew him a soft educational book. Before starting work, I drew the future pages, thought about it, prepared the necessary materials - and this is what I came up with:
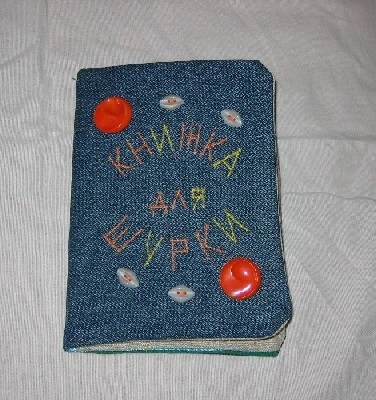
1. This is the cover of a book. Artyom really likes that the book bears his name. The iron-on adhesive is attached using an iron, the letters are stitched on a sewing machine.
2. Unfasten the zipper on the boot - a mouse lives inside (it lies freely, not sewn on). The toe of the boot has a Velcro fastener.

3. The shoe will help the child learn to thread the lace into the holes. The boot mouse loves to get into the shoe.

4. The pyramid can be disassembled and then reassembled (all fragments are on Velcro). The top element is on a large button.

5. The wheels of the truck are double-sided and fastened with buttons. The driver and passenger periodically change places.

6. The butterfly, apples and fungus are attached with Velcro; the hedgehog’s prey can be swapped.

7. A worm lives in an apple under a leaf - you can get it out by unscrewing the leaf. The butterfly was once a caterpillar - this is the body of the butterfly, it can be separated by pulling it up.

8. Merry Christmas tree, Santa Claus, Snow Maiden and a bag of gifts. Each element of the tree has Velcro; you can put a small souvenir or sweet in the bag.

9. “Making” a snowman. Each lump is separated, they are on buttons. The broom can be picked up by pulling it up.

10. The pocket on the last page (on the cover) is for a reason: so as not to lose the parts that the child separated, we put it in it.

Now my grandson is 4 years and 3 months old. He loves his book very much and periodically “re-reads” it. Fine motor skills develop, attention develops, speech develops, and when we look at him, we rejoice.
An educational book made of fabric is an interesting and useful gift for a baby. You don’t have to buy it for a lot of money; you can make it yourself. To do this, you don’t need to be a professional seamstress or a keen needlewoman; it’s very easy to sew such a thing yourself.

About the benefits of educational fabric books for children
Such a book can captivate the baby for quite a long time, which the mother can devote to herself or to homework.
Such books, unlike cardboard or paper ones, can be crushed, twisted, chewed, wet - absolutely nothing will happen to them. If necessary, they can be washed and ironed, and the book will serve for a long time.


To sew books, they use various fabrics, such as fur, felt, or various fillings, for example, cereals, rustling candy wrappers, and bells. This promotes the development of the baby's tactile sensations.
Thanks to many details, such as lacing, linden, zippers, buttons, buttons and others, A fabric book promotes the development of fine motor skills and teaches the child to be independent. In the future, the baby will be able to easily button a jacket, shirt, tie a knot, etc.


With the help of this wonderful educational toy, you can teach your little one colors, counting, letters, seasons, the concepts of “day-night”, “big-small”, geometric shapes and much more. Here everything will depend only on your imagination.
You can take this sensory book with you anywhere, and the child will be busy with useful activities when it is necessary to behave calmly.


At what age should it be used?
Fabric books must be made taking into account the age of your child:
- Children under 1 year old can only be offered options that do not contain small fastening parts.
- Starting from 1 year old, you can already place large parts on the pages that can be removed and attached back, for example, on linden trees.
- At the age of three, the content of pages can expand. There is already a much larger variety of fasteners and fasteners; the plot of the book may include simple games that can be played together, role-playing games in the form of a fairy tale.
- Children of older preschool age will like a more complex version that develops logical thinking. Here you can place a finger theater based on a specific fairy tale or cartoon, complicated games and tasks.


Materials
To sew a children's book from fabric, natural materials are used - felt, fur, leather, woolen threads, chintz, silk, linen, etc.
It is better to choose bright colors (red, blue, green, purple, white, black, etc.), they are more attractive to children, especially at an early age.
Make sure that the color of the plot matches reality. For example, a dog cannot be blue, and the sea cannot be yellow.
Choose a suitable pattern on the fabric. If the balloons can be “flowered” or “polka dotted”, then for the spruce you need a plain green fabric, the pattern in this case will be inappropriate.


You may also need:
- cardboard;
- padding polyester;
- cotton wool;
- threads of different thicknesses;
- ribbons of different colors and widths;
- different types of fasteners - linden, magnetic buttons, zippers, buttons, etc.
- fabric applications;
- beads;
- laces of different colors;
- rustling candy wrappers;
- cereals;
- small pebbles;
- bells.
Your imagination, shown when creating the layout of each page, will tell you what else you need to purchase.
To learn about what materials can be used for sewing educational books, see the following video.
Where to start?
Before you start sewing a book for your baby you need:
- Consider the number of pages.
- Show your imagination and work out the plot of each page in detail;
- Think about what each spread of the book will teach your little one, and what elements are needed for this.
- Choose the shape and size of the future book. The easiest shapes to sew are square or rectangle. For those who have sewing skills and are confident in their abilities, you can choose more complex shapes - a circle, an oval, a boat, a flower, a sun - it depends on your imagination, sewing ability, and the thematic content of the book.
- Decide how the pages will be attached to each other - you can fasten them with ribbons, strips of felt, using rings or laces. The most convenient size is approximately 20 cm wide and 25 cm long.
On small pages you will not be able to place all the material that you would like, and when looking at large pages, the child will get lost, get tired quickly, and attention will be scattered.


- Select or draw the patterns you need. There is no need to look for any specific patterns for your book; you can even use children's coloring books.
- Calculate approximately how much material and various decorative elements you will need for sewing. Get everything you need.
- Choose your free time to create a unique book for your beloved child.


Step-by-step guide and basic principles
The principles of sewing books from fabric are the same, only the content of the pages changes:
- In order to sew the pages, you will need to cut them out of the fabric and sew them on three sides (if you chose a square or rectangular shape).
- Next, we fill the resulting pocket with sealing material - it can be thick cardboard, foam rubber or padding polyester - and sew up the pocket.
- It is more convenient to design the pages and cover before you have sewn the pocket, that is, on felt cut out for the page. On it you sew appliques and various details in accordance with your idea.


- At the decorating stage, attach various accessories and ribbons. Then two sheets of felt are sewn together so that the wrong side is hidden.
- The algorithm for sewing a book cover is approximately the same. The difference is that you need to leave a supply of felt for the spine, the size of which depends on the thickness and how many pages you make. Don't forget that the cover should be thicker than the pages. To do this, if you are sewing a book from felt, you can fold it in half.


Master Class
We offer you a master class on sewing a simple book.
You will need:
- 11 sheets of felt measuring 20*20 cm for sewing pages and 20 leaves measuring 15*15 cm for details;
- needles and threads, the color of which should be matched to the page and details, pins;
- magnetic buttons – 5 pcs;
- buttons for decoration (butterflies, birds) – 10 pcs. It is better to choose buttons made from natural materials, such as wood.
- 6 beads each in black and white;
- 2 white flat buttons and 6 pieces of black;
- hat elastic will require 1 m of black and 1 m of purple;
- 50 cm black and 50 cm white Velcro tape;
- simple buttons – 4 pcs;
- 20 grams of holofiber as a filler or you can use padding polyester;
- 15 cm of regular grosgrain ribbon;
- 1 m each of blue, white and light blue zigzag grosgrain ribbon;
- zipper: 15 cm and 20 cm.

Here are approximate calculations for sewing a sample book. It’s better if you have a small supply of the necessary materials (felt, tape, Velcro, holofiber). Depending on your desire or the availability of the necessary materials in stores, you can easily change them.
To sew pages, use the above algorithm. In this case it does not change. Seams can be done by hand or using a sewing machine.
Elements attached to the pages are sewn separately.
If you sew by hand, then choose a “forward with a needle” seam for removable elements, “behind the needle” for elements that will be sewn, and a “loop” seam for processing pages.

When sewing elements on linden, it is better to sew the part with hooks on removable parts, and the soft part of linden to the page itself. This will be much more convenient to use the book, because if the book is closed without removable parts, its pages will remain safe and sound.

If you want to make the pages more rigid, you can use thick cardboard or tarpaulin rather than padding polyester. We will attach the pages to each other using felt, cutting it into strips. The patterns in this version are very simple; we draw them by hand.
The first cover of the book will look like this. On it we place an inscription and a cute lamb, as well as a button for fastening the book.

On the first page we have a flower and ladybugs, which are attached to it using magnetic buttons. With this page you will learn colors with your baby. It is also good for strengthening counting skills from 1 to 5.

A large ladybug has settled on the second page. Its wings are connected with a zipper, and underneath there is a pocket where you can put the ladybugs from the previous page.

On the third page there is a beautiful apple tree. Flowers or apples are attached to it using linden. This apple tree will help you and your child learn the stages of tree development and the seasons (spring, summer). You can complicate this page if you first make a large pocket where you will put removable elements, and on top of it you only sew the trunk and bare branches; the foliage will also be attached using linden.
In this case, you will need two options for the tree crown - spring and autumn.
This way you will expand the development capabilities of this page. In the spring, green foliage and flowers will appear on the apple tree, in the summer apples will grow instead of flowers, in the fall the foliage will change its color to yellow, and by winter it will fall off.

On the next page we will introduce a cheerful hedgehog harvesting his crops. Using Velcro, you can attach mushrooms or apples from an apple tree to its needles.

On the second, a jellyfish will swim in the sea. Instead of tentacles, we sew multi-colored ribbons and beads onto the hat's elastic band. We sew the sea in the form of a pocket and we can let the residents into it, whom it is worth introducing the child to before this.

On the cover we make a pocket with a zipper for removable elements and embroider the contours of the pyramid on top. We sew the details of the pyramid separately and attach them to the contours using linden.

An interesting book for your baby is ready! It will certainly become one of his favorite toys, because it was made by his beloved mother!
A soft educational book will help your child improve and learn new things. Mom will sew it from scraps, braid, and beads left over from needlework.
Developmental book design ideas

- Try to keep the pages of different colors so that the child can distinguish between them from infancy. It would be good if there were inscriptions with the name of the color. Then he will remember how these words are written.
- So that your child can develop fine motor skills and thinking, come up with tasks for him. So, the pages may have elements that are attached to the base using Velcro or buttons. For example, vegetables that need to be “planted” in the garden, apples and mushrooms, will be attached by the child to the hedgehog. Having removed the element with buttons, the child will see something interesting behind it. By unzipping the zipper, the baby will reveal the ladybug's wings.
- On some pages it is necessary to sew pockets so that the child can put objects of a suitable shape and size there. On others, sew a sneaker made of leather or fabric so that the child learns how to tie lacing, thereby gaining the necessary skill.
- So that he can braid his hair, sew several ribbons nearby. Show your baby how to do it.
- To help your child learn to count, number the pages by sewing a specific number onto each page in order.
- Each page of the book is dedicated to something. For example, one is garden-themed, another is animal-themed, the third is rainbow-themed, and the fourth is marine-themed.
How to make a cover for a soft educational book?
Its dimensions depend on what you want the soft educational book to be. Take fleece or felt with your own hands. These fabrics are soft and hold their shape. You can use both canvases at once, one for the top part of the binding, the other for the inside.
The rectangle should be of such a size that you can still add a 1 cm seam allowance and a 5 cm allowance on the central fold. If you will have appliques on the cover, then sew them on the front side first. Then fold the two sheets of the page so that the wrong side is at the top, stitch along the edge, leaving 15 cm free on the small side. Through this hole, you turn the workpiece right side out, insert into it a rectangle of padding polyester smaller than the cover.
Another option is to make separate pages, make holes in them with a special tool, attach rings here so that the pages can be laced together, connecting them.
You can combine them with a flap, one edge of which you sew to the first page of the binding, the second to the last. This flap needs to be basted to each page so that from the binding side they look like an accordion.

DIY soft book - master class
Now you know how to make a binding for it. Here's how to design one of the pages. Ask your child to place fruits and berries in the vase; they will be attached using buttons and Velcro.

You will need to make the page:
- rectangle of fabric;
- pieces of canvas;
- large buttons;
- needle and thread;
- buttons;
- Velcro;
- thin padding polyester.

Master Class:
- From thick fabric, cut out all the parts that you will sew onto the page. It's better if they are paired.
- Sew both layers of round berries using a zigzag stitch, also use a sewing machine to make a loop in the center and cut it. Sew a strawberry. Attach a green tail to it.
- Cherries can be crocheted in the round. On the reverse side, sew buttons to them, paired elements of this fittings, as well as buttons to the page of the book.
- Take a piece of fabric measuring 20 by 20 cm, and apply the same on it. These parts are placed right sides together and stitched along the edge, leaving a gap through which the resulting bag is turned right side out. You need to iron its seams, then insert a sheet of padding polyester inside, which is 1 cm smaller than the page on all sides. Sew up the gap on the arms.

If you want him to know the seasons well, then for such a soft book for babies, make 4 pages. To create them, you will need:
- base fabric;
- bright threads;
- scissors;
- tape measure;
- pins;
- needle;
- braid;
- threads;
- beads.

To create books, you can use the most unexpected materials, for example, fabric napkins, household rags. If they have a pattern, turn them over to the wrong side.
Cut out Christmas trees from a green napkin. Since they have this color all year round to show the winter landscape, cut out snowflakes and decorate the trees with colorful balls from napkins of a different color.

If a child spends the summer at the dacha, there is probably a fish pond there. Transfer this theme to a textile book by cutting out algae, fish, and aquatic vegetation from napkins or felt.

In spring, the ground is covered with bright green grass and flowers bloom. Tell all this to your child by making the appropriate application on the page.

In autumn, clouds appear more often, but the sun still shines. You can also sew a braid here to make it rain.

If you are satisfied with all the elements, then you can sew them directly onto the pages of the book. Sew large parts on a sewing machine, and sew small ones on your hands.

Where there is an autumn landscape, sew a thin braid on top, and firmly tie beads to these ribbons from below.
Since soft books for children contain quite a lot of small elements, attach them firmly, but do not move away from the child while playing with such an object.
If you want a car to drive across the cover of the book, then make small vertical slits in the center and insert a ribbon here. Sew the car to the base. Secure the edges of the tape on one side and the other of the cover.

This is what a soft educational book looks like from the inside.

It will be enough to tie it with a ribbon and you can close the book.

It will be interesting for kids to insert various objects, so sew pockets on the book in the shape of a steam locomotive. Make various animals out of felt. Let the child put these passengers into open carriages. Sew buttons in the shape of wheels and you can send the train on the road.

To help your child develop fine motor skills, sew threads in the form of a cobweb onto a book page and sew plastic rings here. Let your child thread the ribbon through them, creating a web.

Cut out a sneaker from fabric or leather, sew rings vertically in the center so that the child can thread a lace through them and learn to tie shoes. These skills will be very useful to him, as well as zipping.

For this book page you need to take:
- textile;
- lightning;
- wool threads.
For kids, we can recommend one more page, which will have a soft educational book. Children will be able to dress dolls with their own hands, thereby learning this simple activity.
To do this, a doll made of a thick base is sewn onto the book, and Velcro must be attached to it. Cut out the clothing items for this toy. Place a cabinet in the form of a pocket nearby. Put the doll's clothes there, on the back of which you will sew Velcro in advance. Let the child put on the doll in the correct order.

Kids can be advised to make one more page of the book. Sew a thin elastic band here, pull it over beads, balls, buttons, securing them tightly. The child will probably like the proposed toy.

Playing with the first book in his life, the baby will learn to assemble a pyramid according to height and color. To do this, take:
- textile;
- filler;
- Velcro;
- needle and thread.
He will probably enjoy putting the bear to bed and covering it with a blanket. With such a toy, the child will soon fall asleep with company.

So that he knows that evening is coming and it’s time to go to bed, make a figure of the month on the next page. When the baby wakes up, he will look with pleasure at the sun, which will smile kindly at him.
DIY educational book for baby boys
Young gentlemen have loved cars since childhood, so use them to create a soft educational toy.

Take:
- colored fabric;
- buttons;
- small household sponges;
- markers.
We sew only on the right pages, the left ones will become a garage. Attach Velcro here, as well as on the back of the cars, so that the child can park his vehicle at night.
If children are small, it is better not to attach buttons to the lips, but to draw wheels. Or you need to constantly monitor children during such a game so that they do not harm themselves with small objects torn off.

For another baby boy book, use fabric in bright colors. Your child will love playing the fireman you create from fabric.
Let his car have a rising boom, this can be done by securing two elements with two buttons. Make a gate with a Velcro lock so that, if necessary, a child can open it and get into the building that is on fire. The braid will turn into a firefighter, the boy will enjoy playing with such objects and feel like a fireman.

Soft books on the theme of home farm and vegetable garden
You can also make soft books on this topic. This is a wonderful experience for kids; they will learn the names of animals and know how to care for them. You will tell us what vegetables can be grown, how to collect and store them.
Let's start with the home farm.

The chicken and duck are cut out of felt, and other items in the book are made from the same material. Let the door in the house open, to do this, sew a button on it, and next to it an elastic loop. The window will also swing open; secure it with two ribbons.
A fence is made from rectangular strips of fabric; turn the green fabric into grass and into a tree crown. Edge the pages with folded strips of fabric. After which the soft book is ready, you can buy it, of course, but it is very expensive, and your own can be created from leftover material.
After all, to create vegetables for the garden you need very small scraps. Cut out triangles from orange ones, sew them in the form of cones, fill them with filler through the top hole, and sew green fleece tops here. Now the carrots are ready. To “plant” it in the garden bed, place the braid horizontally and sew it so that the root vegetables fit between the seams. Attach a large pocket nearby, this is where the child will put the harvest.
Place a bunny nearby, let the baby know that this animal really loves carrots. Also in such a book you can sew a flower in the form of a pocket into which a bee will fly and collect nectar.
The butterfly flutters over the flowers, so it would also be very appropriate here. You can sew a zipper between her back wings; when you close it, she will turn into a semicircular bug. By unfastening the snake, you will transform it back into a butterfly.

If you want your child to know that caterpillars appear first, and after pupation they turn into butterflies, then make the body of this insect separately in the form of a sausage. The child will insert it into the ribbon between the wings, thereby turning the caterpillar into a butterfly.
The bee is made of yellow fleece, black strips of braid are sewn across the body, and a ribbon needs to be attached to it.

The child will learn about the vegetable garden, pets, if the next book is made from fabric.

Sew characters from felt and attach Velcro to them on the back side. Then your beloved child will place them in the right order, gradually learning how to do this. At the same time, you will get acquainted with the fairy tale Repka.
Make secret corners in the book so that the baby gradually finds them. Let the hedgehog live in a mushroom house, only by opening the door will you be able to discover this animal, to the great joy of the child.

Children learn that chickens are children of hens by opening the hen's wing.

Tell the children how apples grow in the country. Make a fabric applique like this in the book and place the fruit here using Velcro. Let the baby tear them off, place them on the hedgehog’s needles, and secure them in the same way.

The apples on the tree can be arranged in a different way by sewing buttons on it and loops on them. The fruits themselves are made of red or yellow felt or other similar material.

Educational toy for girls
It's done in the same way, but it's a little different. The baby will probably enjoy dressing the doll, this was mentioned above. She will also be interested in hanging laundry on a line and taking it off.

To make such a book, you will need:
- felt;
- fleece;
- thin elastic band;
- clothespins;
- hairpins
Cut out various items of clothing from fleece and felt. Let the child hang them on a rope using real clothespins and bobby pins.
The next textile book is made in pink tones that girls like.

To make one, take:
- textile;
- beads;
- button;
- wax pencils;
- threads;
- beads.
You can sew a ladybug inside by making a slit in the center so that the baby insects can enter here. For a girl to learn how to braid, on the next page there will be an applique of a young lady with long hair made from yarn.
So that the girl learns neatness from infancy, attach an organizer for pencils and a handkerchief on the next spread. Velcro flowers next to the vase will hint to her that she needs to place them in this container. The linen closet stores doll clothes that the child will be happy to put on them. But you read about this earlier; the young housewife will also like this kind of entertainment.

Perhaps she would like to become a doctor if she opens the next page of the soft book. The pockets here contain various animals made of felt; on the other side there is a cabinet, upon opening which the child will find items of simple help and learn to provide it.

Learning to count using a soft educational book
Just like that, in passing, the child will remember how the initial numbers are written, if you do not forget to number the pages. To help him learn to count, make the following soft educational book. To create it you will need:
- base fabric;
- laces;
- large beads;
- marker.

As you move them along, count with your child. To help your child learn to draw numbers, make appliqués from fabric. Sew a pocket where the chalk will be stored. Then the child will be able to take it out and circle the numbers, thereby learning to draw them.

In the same way, you can introduce children to some letters, then make syllables and short words from them.
This is how, in a relaxed atmosphere, while playing, a child can develop and improve, learn new things. It is very important for parents to show him how to handle certain objects so that a soft educational book really becomes one.
To make it easier for adults to make it, we suggest watching a fascinating story.
You will learn how to make a page for boys so that they know what kind of transport exists in the following video.
The girl will be happy to play with a book made in the shape of a house, put the doll to bed, wash it in the bath, and wash things in the machine.
An article about how to make an educational book for a child with your own hands. Description of all stages of work and all the subtleties that you need to know in order to sew a beautiful baby book.
By touching objects with their fingers, young children receive information about the world around them. The child learns to understand what is cold, what is hot, that objects are sharp, soft, rough, smooth.
Children like soft and warm things and it is no coincidence that they are worn from morning to evening with soft toys and do not part when they go to bed. This is why children really love soft fabric books that parents can sew themselves.

Homemade books for kindergarten with your own hands from felt step-by-step instructions
By playing with soft books, children can learn:
- Understand the difference between large and small objects
- Remember what a circle, square, triangle and rectangle look like and what they are called
- Count to ten and solve addition and subtraction problems
- Solve logical problems in which the child determines whether the color and object correspond to its place
- Learn to tie a bow and braid a pigtail
- Learn letters

In order to make a book from fabric at home you need to stock up
- felt of different colors
- fabric that will be the basis for the pages
- suitable thread for sewing
- a piece of padding polyester
You can calculate the amount of materials for sewing if you have decided how many pages there will be in your book and what size these pages will be. If the pages are of different colors, you will have to make calculations for each color separately.

Make a template out of paper the length and width of the book page. Next you will need to calculate how many such pages will fit on the width of the fabric you are going to buy.
Do not forget that since each page will be sewn from two pieces of fabric, you will need twice as much fabric
Inside the pages you will need to put padding polyester and sealing fabric so that the pages do not wrinkle and appliqués, buttons, buttons and other stripes hold firmly.

DIY soft educational book ideas
Next, you will need to figure out what will be on each page of the book. For example, you can make a page where the child will learn what the colors of the rainbow are called. You can bring this idea to life by sewing multi-colored buttons onto the fabric that match these colors.

If you make numbers in the book with Velcro, your child will be able to stick them in place and learn to count.

For a math page, make plus, minus and equal signs. This way you can solve simple examples and problems right in the book. Instead of numbers, for the little ones, sometimes they use figures of animals and insects, fruits and vegetables.

On such a page, the child will be able to attach multi-colored circles that will match the color of the feathers on the peacock’s tail.

And on this page, pyramid strips are attached to the baby book with Velcro, which need to be folded from small to large.

The flowers are removed and put on with buttons. A bug sits under a leaf. On this page you can remember which flowers need to be put on yellow, red and blue buttons.

A soft puzzle with Velcro on a book page. The baby will have to work hard to fold it.

Soft geometric shapes fastened with buttons, on the adjacent page there is a zipper in all the colors of the rainbow.

DIY educational book for little ones made from felt: step-by-step instructions
To make it easier to sew a book, make sketches on paper for the most difficult pages to sew. Draw animal figures, flowers, geometric shapes. You can use ready-made templates for these purposes. After the idea is thought up and a sketch is made, it’s time to start sewing the pages.

Each page of the book consists of fabric, which will be the face of the page, and adhesive fabric of the same size.
- Iron on the sealing adhesive fabric to the face fabric
- Cut out figures for applique and small parts for figures from felt.
- Hand-assemble figurines of animals, flowers, numbers and letters
- Machine sew all the details
- Pin the finished appliqués to the fabric or attach them with a few stitches by hand using a needle.
- Using a zigzag or straight stitch, sew the shapes onto the page.
Video: How to sew felt blanks to a page?
The pages of a book where animals seem to be sitting in the grass, flowers or trees look interesting.

How to make Velcro appliques?
You can sew Velcro directly onto the felt from the wrong side. But, if you have doubts that during the process of tearing off and gluing the figure with Velcro will not tear, then you can lay a sealing fabric under the felt. Sew a square of Velcro onto a thick fabric larger than the applique.

- Place the sealing fabric on the back of the applique in the center
- Pin and zigzag sew the applique to the backing fabric.
- Then carefully trim the protruding edge of the fabric with scissors.
- Sew all the pieces together
If the applique is small, then the Velcro can be sewn not in the center, but along the contour of the part. You can learn in detail how to do this by watching the video. The second soft side of the Velcro is sewn directly to the book page.
Video: How to sew Velcro to the details of a developmental book?
After all the appliqués, buttons, laces and other details are sewn on, you can begin sewing the pages and assembling the book. Take the fabric with sewn appliqués, lay it face down on the table, place the padding polyester on top and the second part of the page face up.
Now you can sew the page manually along the edge, and then trim off the protruding edges of the padding polyester. The edge of the page is trimmed with trim as shown in the following video.
Video: How to sew a page from an educational soft book?
To assemble the pages of a book into a binding, a strip of fabric is attached to them. The line goes from the inside out, so when you turn the book you can see a neat transition from one page to another. The stages of working with binding can be seen more clearly in the video below.
Video: how to stitch the binding of a soft book?
When the pages are sewn on, all that remains is to beautifully close the binding with a piece of fabric. It is sewn by hand and then sewn to the book with one line. How to do this is described in detail in the fourth video.
Video: How to beautifully close the binding of a soft book?
DIY soft educational book: patterns
Cutting out a fabric base for a homemade book in the form of rectangles will probably not be too difficult. Just decide what length and width the pages will be and transfer the dimensions to the fabric. Before work, count how many pieces of fabric you need to cut out. You will need twice as many of them as there will be pages in your book plus fabric for the cover.
It is more difficult to cut blanks from fabric for figures of animals, insects, berries, flowers, leaves. You will need to draw sketches on paper, cut them out with scissors and transfer them to fabric. If you don’t know how to draw, ready-made templates for such drawings will come to your aid.
Advice for those who want to decorate a soft book in an unusual way - look for drawings in black and white pictures for coloring

Cut out the design you like with scissors and transfer it to the fabric. Eyes, nose, mouth and ears can be decorated with buttons, beads, embroidery or contrasting fabrics.
DIY baby book for kindergarten made of fabric
In fact, there are no strict rules or restrictions for parents who want to sew a baby book themselves. You can choose a simplified version of the book, where the cover will be separate and the pages will simply be inserted inside. To sew a page, glue an adhesive sealing fabric to the fabric from which the page will be made from the reverse side, then sew appliqués onto it.

Fold the fabric in half with the appliqués facing inward. Sew around the perimeter of the page, leaving one side unstitched. Then turn the page blank right side out and insert a padding polyester rectangle inside, which will be 2 cm smaller in width and length than the page.

Hand or machine baste the fourth raw side. The page is ready. Now make the remaining pages and cover. The cover for such a book will simply bend in the middle.

Cover length is twice the length of pages plus you will need to add an allowance for the volume of nested pages. You can find out the size of the allowance if you stack the finished pages and use a ruler to measure the height of the stack.

If you wish, you can fasten the pages to the cover with stitches, but you don’t have to do this because it may be more interesting for the child to disassemble and assemble the pages of the book.
How to make a baby book with your own hands for school?
For school, children can easily make a baby book with their own hands. Of course, all parents want to help their child in this matter. Because they don’t cut the paper evenly enough, they don’t cut it very nicely, and they write a little crookedly.

But if you do all the work for them yourself, will they be proud of this book? Are you going through your child’s children’s drawings and having found this very book that you, and not the child, made, will you look through its pages with a smile? Therefore, give the author, that is, your child, complete freedom and allow him to cut, paste, write and draw what he wants in his own book.

How to make a book with your own hands from paper?
A paper book can be glued together, the pages can be sewn together with a needle and thread, or the pages can be stapled together. Most often, standard books are made in the form of a notebook or album, but sheets of fancy, free-form shapes look more interesting.

If you want to create a baby book of a non-standard shape, then it will be most convenient to make pages using a stencil. Cut out one sheet of thick paper and copy the rest of the sheets from it. Inside the baby book there can be poems, sayings, drawings and applications. Topics for books are sometimes set by the teacher at school, and on free themes it is interesting to write fairy tales and draw illustrations for them yourself.

Video: Soft educational book with your own hands


