Kanzashi made from ribbons in the shape of a butterfly, dragonfly and ladybug. Master class Kanzashi butterfly, dragonfly and ladybug Video: DIY Kanzashi ladybug
A hair clip in the shape of a charming ladybug will definitely decorate the hairstyle of even the most fastidious young fashionista.
To make the “Ladybug” hairpin you need to prepare:
- scissors.
- satin ribbons in two shades: black and red.
- glue gun.
- black half beads.
- hairclip.
- thread and needle for handicrafts.
- a lighter.
Sequence of making hairpins.
Two shades of satin ribbons must be cut into identical square pieces, the sides of which must be equal to 5 cm.

Then they need to be folded in half to form triangles.

Now you need to wrap the right corners to the middle of the parts and hold them in this position.

Then repeat the action, but this time from the left edges.

Two fold lines are gathered in the center of the workpiece. Along these folds, each piece should be folded in half.

Now the thin and slightly uneven corners need to be trimmed.

Having scorched the created sections with the fire of a lighter, the remaining unprocessed edges of the parts must be aligned by cutting off all excess tape.

After this, it is necessary to singe the lower sections, but be sure to ensure that the edges of the ribbons are divided into two equal parts.

Now the parts are completely ready, all that remains is to turn them right side out.

7 similar parts should be prepared in black and 26 in red.

Now the 4 red parts need to be connected in pairs.

Then these double blanks should be glued to both sides of one black part.

The first row of parts is ready. In the second, it is necessary to repeat the number of red and black parts and fasten them to the upper edges of the blanks of the previous row.

And at the edges all that remains is to add one more red blank. This will complete the second row.

For the next row you will need two black paired blanks and 4 paired red pieces.

After this, they should be attached to the top of the parts of the second row, making sure to match the colors.

In the fourth row you will need the same number of red paired parts and three separate black pieces.

All prepared paired and single parts must be secured in accordance with the shades of the ribbons.

This body of the ladybug is ready, all that remains is to design the head. It is made from a square of black satin ribbon. It must be folded in half to give it a triangle shape.

Now the fold needs to be secured, to do this, using ordinary sewing threads to create small stitches, sew two layers of tape.

Then, without cutting the thread, gently pull the thread slightly, creating several folds. After this, having made several fastening loops, the thread can be cut.

All that remains is to turn the part over and decorate it with half beads. You need to glue two beads onto the bug's head to replace the eyes. Glue 4 black half-beads onto each wing.
The “Ladybug” hairpin is ready!
Using the kanzashi technique it is possible to make not only flowers, but also animals. Only at first glance it seems that it is very difficult, but only after starting the process, it will absorb you completely. We present to your attention a step-by-step master class on how to create a small baby - a Kanzashi ladybug.
To make a ladybug using the kanzashi technique, you and I will need satin ribbons 2.5 cm wide in black and red. Their length will depend on what size you make the product itself. This can be used either 10 m or 5 m. You will also need a candle and a glue gun. When everything is prepared, we get to work.

First, take a red satin ribbon and cut it into 2.5 cm pieces. As a result, we get a 2.5x2.5 square. And we begin to gradually burn the edges of the tape on both sides on a candle on each piece. Be careful not to have black spots on the corners. If this happens, then it would be best to replace it with a new part. We fold the segment evenly into a corner.
We bend the corners again, both on the left and on the right, towards the middle of the part.
Fold it up. We try not to fall apart during bending. We burn the ends of the workpiece.
In total you will need: 12 petals - black and approximately 40 pieces - red.
Now we make an oval from a piece of tape 4.5 cm and 5 cm long. This will serve as the basis for the ladybug. Fold in half. On the fold line, press the tape well so that the middle is visible. The pieces will not stick tightly to the tape itself, so you need to cut out an oval of the same size from felt (the color is preferably red or black, if you don’t have that color, then you can use white) and glue it to the tape itself. Then the product will not bend. By the way, you are allowed to use a glue gun here. He won't be visible anyway. Unwrap it, apply glue (the more, the better it will stick) and glue the first black petal.

Then on both sides the petals are red. We correct it, and the first row is ready. He turns out to be the smallest among all.
Do the same to the end with all the petals. We glue black in the middle, and then red ones.
On the last three rows we add a little more black. First glue two petals, and then the next rows of three.
You will also need black rhinestones. Glue them at your discretion on red. We glue 6 pieces, using a glue gun. If the glue stick is black, then the stasis can be replaced with drops of glue.
We take a black stamen and fold it in half. We straighten it a little, and glue a large dark bead on top. We make the length at our discretion. Cut off what is unnecessary.
We carefully glue this blank to the tapes. We try to make sure that the glue does not leak out from the side. This mistake, which happens most often, cannot be corrected by anything. After gluing, do not press tightly so as not to get a flattened head. The result is such an original ladybug.

It can then be used to make decorations for hair and clothes, as well as paintings that are made using this technique.
Ladybug on a flower
Materials you will need for work:
- satin ribbon red, white, width 5 cm
- black, width 2.5 cm
- green organza, width 2.5cm
- stamens for flowers are red and one stamen is black
- felt base, circle – diameter 4 cm
- black half beads and rhinestones
Cut 11 squares of 5 by 5 cm from white tape and singe the edges. Fold the square diagonally. Fold it in half again, begin to model the folds, and form an accordion. We need two folds, while lowering the corner down. On the other side we do everything exactly the same: fold up, then down, up again, down again and lower the corner. We straighten the petal, trim the bottom, and solder it. You will need 10 pieces.


Let's move on to creating leaves. They consist of triangular petals. Organza square, fold diagonally. Since the part is very small, it is better to use tweezers. Hold the center of the triangle and fold it again. We place the tweezers in the center and bend them again, fixing everything with a lighter. We cut the back part and also fix it with a lighter. In total you need to form 6 petals.


Let's start assembling the flower: the first row is 6 petals, the second is 5. Apply glue along the edge of the felt base and glue the petals. Glue the petals of the second row together, then apply glue to the middle, and glue the second row to the first.


We glue leaves under the bottom of the resulting flower.


We cut off the red stamens and glue them between the petals of the first and second row.

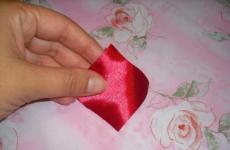
For the ladybug, you need to prepare two inverted triangular petals. Red square 5 by 5 cm, connect the corners, fold the resulting triangle twice in the middle. We ended up with an inverted petal.
We cut and singe the bottom. We turn out the petal.


Today we will look at a detailed master class on making a ladybug from satin ribbons. This ladybug can be glued either to a children's hoop or to a hairpin. Such an unusual accessory will perfectly complement any outfit of your little princess, and at the same time will look very unusual and quite original. Handmade jewelry is considered quite valuable and unique in the modern world.
What do we take for this creation:
Red satin ribbon 5 cm wide, two meters;
Black satin ribbon 5 cm wide, about 0.5 meters;
Lighter;
Sharp scissors;
Ruler;
Pencil;
Tweezers;
Glue gun;
Thick cardboard for the base, a small cut.

So let's get started. We take a red satin ribbon and measure out equal squares measuring 5 by 5 cm. We should get 38-40 of them. We’ve cut it, now we take a lighter and trim the edges on each square so that the ribbon does not unravel.


We get ready-made red blanks for the petals.


Now we take a black satin ribbon and cut it into squares, also 5 by 5 cm, approximately 12-13 pieces.


We also take a lighter and process the edges. We get black blanks for the petals.


Take one red square and fold it diagonally.


Then fold it diagonally a second time. And also for the third time.


Now we take tweezers, insert the petal into it, and squeeze it. Using sharp scissors, cut the petal obliquely, as in the photo below.


Use a lighter to carefully process the petal sections.
We unfold it carefully and straighten it, we get this red petal.


We also make a black petal in the same way as the red one. Fold diagonally once.


Then we also insert the second and third into tweezers and cut off the edges. In black petals, the cuts can be made a little larger, and accordingly the petals will be a little smaller than red ones.


We burn the cuts with a lighter and straighten the petal.


This is how we make all the petals from red and black squares. Cut out an oval from red pearlescent cardboard. We cut off one side at the top, this will be the cow's head.


Making the head of a ladybug. I made it from cotton pads in several layers, and then covered it and trimmed it with black tape. You can also use a button or a ready-made half-bead. Glue the head with a glue gun. Now we take the petals and glue some of them together in pairs, you can even glue three petals together. Now we spread the petals evenly and glue them to the cardboard base with a gun.


In each row we gradually add one petal. As you work, it becomes clear how many petals you need to add. Place black petals in the center. So we completely glue all the petals and form a ladybug. All that remains is to glue either a clip-clip or a hoop and the ladybug is ready. If desired, you can add a few green petals as a base, if you allow it to match the color of the outfit. Thanks everyone and good luck!


Master class Kanzashi butterfly, dragonfly and ladybug
The kanzashi technique is often used to create original hair decorations. Basically, all kinds of flowers are made from satin ribbons. Today we will talk about making wonderful butterflies, ladybugs and dragonflies with our own hands. There are many techniques on the basis of which such accessories can be made. In kanzashi, the principle of making products from pieces of ribbon is taken as a basis. Following the step-by-step MK, as well as photo and video examples, you can easily repeat similar products after experienced needlewomen. 


Kanzashi butterfly
Before starting the master class (MK) on creating a butterfly kanzashi, prepare the following materials and tools for work:

The kanzashi butterfly will be created from small pieces of ribbon. At first. We take a small piece and chop it together with the second one. These parts need to be bent into an airplane shape, as in the photo, and secured at the bottom with a needle. We do this to avoid seam divergence. Next, at the cut site you need to glue a rhinestone to hold the borders. If you don’t have rhinestones, you can skip this step when adding the elements, just hold the seams with your fingers. We singe the lower part and squeeze the seam with our hands. As a result, we get the next element, as in the photo. Now, you need to fold it evenly, press it with tweezers and cut it. In order to determine the amount of tape to be cut, fold it as follows, as shown in the photo or video: 


The lower part is trimmed and singed. If you didn't use rhinestone, just use your hands to press the seam down along the bottom to keep it in place. Next, the first of the wings must be attached in such a way as to determine the amount of material to be cut from the second. 
We continue the master class and form a petal with a fold. There should be 3 similar folds in total for subsequent insertion of the petal. 
Please note that you need to glue a small petal into the center of the petal with a fold. Glue is applied along the bottom of the part, after which the fold widens and the petal is carefully placed inside. The next step is to glue the petal with a fold into the large element. In this case, the glue is applied to the seam, so that it is on the underside of the seam and a little on the side parts. Do this carefully so that you do not end up with excess glue. In the place where the petals begin, it is necessary to fix the rhinestone. 
At the bottom, we make round petals. If you are not familiar with the technique of creating them, the MK video will tell you how to do it. You can make them triple and fix the rhinestone on the finished element. At the next stage, the master class moves on to creating a ponytail. 
You need to take a needle and thread and stitch the workpieces at equal intervals. Please note that the butterfly wings located in the upper part must be pierced and all three parts captured. The needle is pulled out in the center of the tail, a bead is put on and goes in the opposite direction. Next, the process needs to be pulled together and three knots made. At the bottom of the butterfly's wing gathering area, apply a bead of glue to capture all the wings and smooth them out. 

Now, our butterfly must acquire a body. We take a pin and string one small bead on it, a rondelle, another large bead, a cap, five beads. We perform the same actions with the next pin. Next, you need to insert the first and second pins into the rondel, string a large bead, rondel, and beads along the entire remaining length of the pin. The ends must be rounded using round nose pliers for this purpose. As a result, you should have a butterfly body, as in the photo. 

In the center of the wings, carefully glue the created body.
The thread comes out from the bottom of the rondel that is located at the top. We make a circle around it and draw a thread on the bottom of the other side. Thus, you need to hide the thread among the rondel and the bead. Similarly, we draw the thread on the second rondel.
The remaining ends of the threads are tied with three knots.
We take lace, in the center of which there should be no holes. The folds are straightened, and the kanzashi butterfly is glued to this material. After which, each of the wings is fixed on the lace. An elastic band or other special fastening is sewn at the bottom, depending on what your butterfly will serve as a hairpin, a decorative element on a headband or hoop, etc. 


This completes the master class. This delightful butterfly can also be made from satin ribbons in contrasting shades. Experiment, make your butterflies in an original and unique style. The video tutorials at the end of the article will show you more options on how to make butterflies from satin ribbons. 
Video: Making a kanzashi butterfly
Dragonfly
Another option for a hairpin is the kanzashi dragonfly.
We will need:
- ribbons of a suitable shade;
- lighter or candle;
- base for hairpin;
- beads;
- glue.
The master class begins, as usual, with cutting satin ribbons into squares. You need to make round petals from white ribbons. Next, the square blank is bent obliquely. The next step is to wrap the sharp corners of the resulting triangular figure in the middle of the right corner. We take the resulting element and connect it along the central line. We delete what is unnecessary. The cut areas must be scorched with a candle or lighter. As a result, you should get a round petal, from which the wings of the kanzashi dragonfly will be formed. In total, you need to make four petals for the wings. 


Next, the dragonfly must acquire a body. To create the body, we create a sharp-shaped petal. The square segment is folded in half several times. The corner is cut and singed with a lighter. This way we get a part for the dragonfly body. In total, we create three blanks. The round petals are connected to each other using glue. In the photo you can see this process. Then, using glue, attach the dragonfly wings to the base of the clip. Sharp-shaped elements are placed on top, thus creating the body of the dragonfly and covering the area where the rounded petals meet. All that remains is to decorate the dragonfly with beads with your own hands. 


This is the kind of wonderful dragonfly you should get. 
Video: Hairpin in the shape of a dragonfly
Ladybug
The final master class (MK) is devoted to creating a ladybug from ribbons. 
This ladybug is quick and easy to make. One of the longest processes is fixing rhinestones on ribbons. So, to make it, prepare:
- satin ribbon (from four to six centimeters wide);
- small black rhinestones;
- narrow satin ribbon (six millimeters);
- beads;
- Super glue;
- glue gun;
- thick thread.
The ribbon ladybug begins by creating a petal with a sharp kanzashi shape, which then needs to be singed and turned out. It turns out one wing. In total we make two such inverted elements. Next, prepare a narrow ribbon, roll one part, singe it and make a head for the ladybug with your own hands. The tail is made from the second segment. Using hot glue, we fix the wing petals to each other. After that we glue the head and antennae. We make the antennae from two pieces of thread, the length of which is equal to one centimeter. All that remains is to attach the tail and stick the rhinestones on the wings. 


This ladybug will look great as a hairpin or brooch. Just choose a special mount for it.
A few more video lessons will show you how to create similar crafts using the kanzashi technique in an interesting style.
Video: DIY Kanzashi ladybug