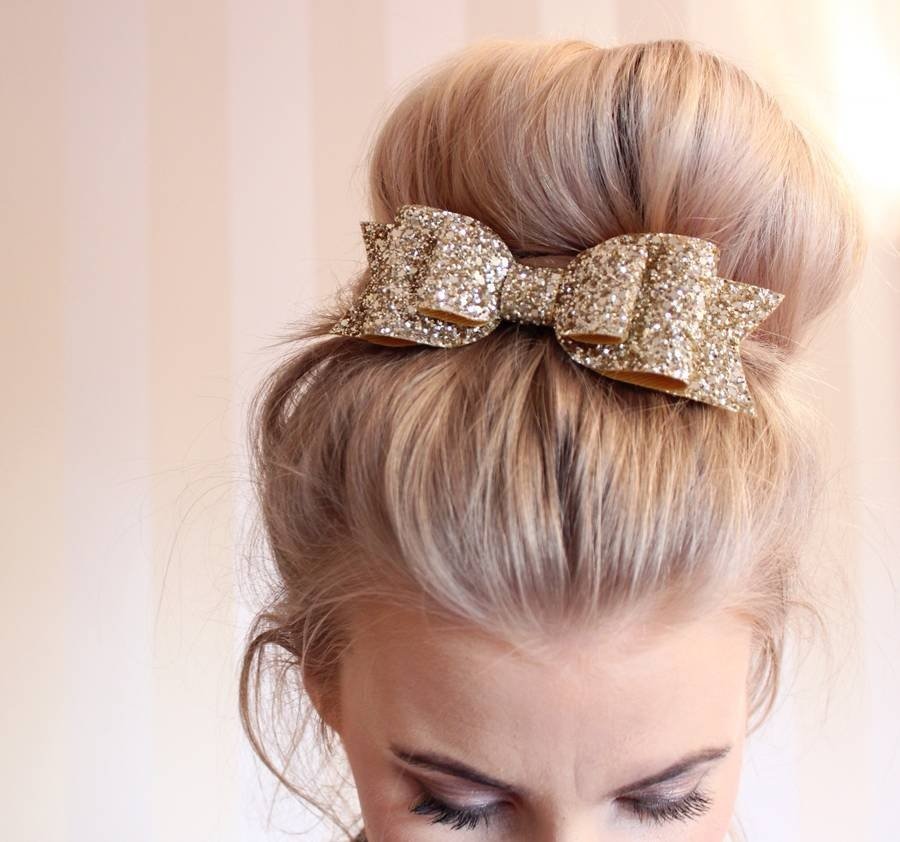
A bun with a hair bow. How to make a hair bow: detailed instructions with photos. Bow with little one
The bow by its nature gives the appearance a more youthful, fresh, flirty and girlish look.
You've probably already seen beautiful ballerina buns, decorated with a textile accessory in the form of a bow. Instead of such a decoration, you can make a bow from your hair. This style is not at all difficult to master; you can easily do your hair with your own hands, without anyone’s help.
If the texture of your hair is curly, you should first smooth out the curls with an iron, because the bow looks more beautiful on straight hair. However, you can create a slightly sloppy bun with a bow, it all depends on your imagination and mood.
A bow is a super cute way to make the best natural hair accessory! The fashion trend has long spread around the world, turning the everyday routine of hair styling into a real art.
Variations of a bun decorated with a bow or a braid flower. Which one do you like better?

All you need is a few bobby pins, elastic bands, a hair donut and styling product.
Master class on hairstyles with a ballerina bun and bow


We'll take you through a ballerina bun with a hair bow in a few simple steps.
To begin, gather your hair into a high and sleek ponytail. To get rid of frizz, you can use gel or gel wax while styling your hair.


Spread the hair from the ponytail around the elastic and smooth it well with a fine-tipped comb.
Place a small elastic band on the bagel to secure the bun.

Gather the loose hair at the bottom and divide it into 2 parts: the first for the braid, and the second for the bow.

Weave a braid from one part: it can be any weaving that you like - a fishtail braid, a regular Russian braid of 3 strands, a multi-strand braid, a snake braid. In general, whatever your heart desires.

Wrap the braid around the left side of the bun, try to secure the braid with bobby pins so that there is free space on the right for a bow.

Now let's create the bow. To do this, divide part of the hair by 3.
We backcomb the right strand of hair a little from below and roll it into a ring. We straighten the sides of the bow and secure it with 2 bobby pins.


Repeat with the left strand.

It remains to model the central part of the hairstyle. To do this, we braid a thin braid from the last strand of hair, twist it into a ring and secure it with bobby pins.
On the eve of the holidays, women think about choosing not only an outfit, but also how to style their hair and give the image integrity. For several years now, a butterfly or a hair bow has been in the TOP of holiday hairstyles.
A hairstyle with a hair bow is so versatile that it can be done not only for holidays, it is also suitable for every day. It all depends on how exactly to make it and where to place the bow. If you do it on the back of your head, this hairstyle will look elegant and sophisticated. If the bow is placed high in the parietal area, it will add a mischievous character and playfulness.
Tools for creating a bow
So, let's figure out how to make a bow on your head out of hair. First, let's find out what tools are needed. Prepare everything you need according to this list:

Varieties of hairstyles
Hairdressers offer many variations of this hairstyle. You can make a tall, flirty bow that resembles the ears of a playful cat, a bow in a “malvinka” will help create a sophisticated and romantic look, and one made at the back of the head will give a sophisticated and luxurious look. Even a little girl can make small bows and it will look very cute. It all depends on where to place the bow on your head.
High bow and technique of its execution
This option is ideal for girls with long hair. An average length of curls (approximately 10 cm below the shoulders) is also suitable. With this hairstyle you will definitely become the star of the party and attract everyone's attention.

Medium length hairstyle
 It’s easy to make a bow on your head from medium-length hair if you braid the bow at the back of your head. Suitable for young women and girls.
If you place a bow along the line of your ears, you will get a daytime hairstyle that will fit perfectly into the strict dress code of serious organizations and educational institutions.
To create an evening, playful look, make the bow as low as possible, almost at the base of the neck. Step-by-step instruction:

Hair butterfly
Very young girls will love a hair butterfly, which can be “planted” on the left or right and create a flirty look.
To create this hairstyle you need:

Bow with little one
This romantic little bow will appeal to romantic dreamers. This hairstyle will make its owner the star of a theme party and is suitable for going to the theater.
It’s not that difficult to do, but it’s worth practicing according to these instructions:

Unconventional idea with a tail
Many women love to wear tails. But this hairstyle is pretty boring. A bow at the base of the tail can spice it up. Do it according to our instructions:

Using similar patterns, you can combine a bow and a Greek headband, or even from bows, and also first, and then form bows from them.
Original options with weaving
A bow with weaving looks very impressive. Suitable for confident, active young girls.
To create this hairstyle you need long hair; with medium length, creating a hairstyle can be difficult. It is made on the basis of a French braid, and weaving can be done both from the bottom up and from the top down.

Baby butterflies
For younger fashionistas, you can offer your own version of bows on a spikelet. Moms will have to try, but it's worth it. And our step-by-step instructions for a bow from hair will help you figure out how to make it:

Girls can also be offered a large, spectacular hair bow. This hairstyle will make your little one the star of a children's party.
The hairstyle suits any style of clothing. It will not fall apart during your morning jog, and will attract admiring glances from others on the red carpet. Depending on the size of the bow, shape and method of creation, you can set the mood for the whole day.

A hair bow is also considered a universal hairstyle because it can be made from straight and curly strands on any side of the head. However, there is no need to do it if your hair is in poor condition. Dull and brittle curls will not look good. The design is not suitable for girls with coarse facial features: a large nose, wide forehead and rectangular chin will visually increase.


7 easy ways to make a hair bow
Before you start creating any of the hairstyles, you need to determine the location of the bow. It can be on top, bottom, side or a strand dotted with small bows. The color of the elastic should be chosen as similar to the hair as possible so that it is not noticeable.


- Method 1. For long hair.
The first step is to gather your hair in a high ponytail. It is tied tightly with an elastic band. The tail is secured with a second elastic band so that it curls in half, forming a loop. The ends should fall forward, onto the frontal area of the head. Then the resulting loop is divided into two equal parts using the ends falling onto the forehead and fastened with bobby pins from behind.


Long hair gives you the opportunity to experiment. Therefore, we can highlight another method of creating a stylish bow at home. A tail is also made for it, but it is divided into three equal parts with rubber bands. Each elastic band must be carefully hidden behind a small strand, wrapped around them and secured with an invisible hairpin. Then the divided tail needs to be laid so that it is in front of the base of the tail. The ends can be evenly distributed at the back of the head, hidden in a bow, or positioned so that they look funny from behind the hairstyle.

At the end, the hairstyle is sprayed with varnish to keep it well.
- Method 2. For medium length hair.
First you need to carefully comb all your hair into a high ponytail. When tightening them with an elastic band, you do not need to remove the hair completely. There should be a loop left, with the end falling forward. The loop should be divided into two equal parts and smoothed in the middle. The front strand is moved back, forming the middle of the bow. It is carefully secured with invisible screws.

The tail can be tied in a different way. A small strand for the core is selected from the main tail and secured in front. The ponytail is then divided into two parts using a second elastic band. It is fixed at the very ends. A loop is made from the hair that remains between the elastic bands. It is rewound with the remaining strand and closed into a bow.
Finally, we fix the structure with strong-hold varnish.


- Method 3. For short hair.
Owners of short hair rarely can boast of a beautiful hairstyle. Usually they get by with styling or backcombing. However, there is no need to deny yourself feminine tricks. If you are patient, you can make a hair bow on such hair.


First, you need to separate two identical strands in the temporal area and take them towards the back of the head. There they are connected with a thin, almost invisible elastic band so that a small loop is formed. That is, there is no need to pull the ends out of the elastic band. Then we divide the loop into two “ears” of the bow. The hairstyle is obtained from the bottom of the head. The bow should be secured with additional hairpins so that it does not hang to the bulk of the hair. The middle is made as a separate selected strand. It is best to select it in advance from above, so as not to repeat all the manipulations again.

- Method 4. In combination with malvinka.
The Malvinka hairstyle is familiar to all girls since childhood. Its essence is to use side strands, twisted into thin flagella, to make a headband on the head. They are connected at the back with a hair clip or elastic band, and the rest of the hair remains untouched. To create an evening robin, you can twist them or, on the contrary, straighten them.


Those with long hair are lucky. They can style the familiar little one and use a beautiful bow from their own hair instead of the usual hairpin at the ends. This way you can not only save on hairpins, but also surprise others with the originality of your hairstyle.


This hairstyle is slightly different from the classic version. To do this, you do not need to collect all the hair in a ponytail, but only highlight the top strands. It won't be very thick, but it will look great in the end. The bow itself is formed according to the same pattern. The resulting loop of hair must be divided into equal parts, twisted together and the core secured with a separate pre-prepared curl.


- Method 5. Bow as a decoration for weaving.
You can experiment with braids in different ways, creating new amazing looks. This comfortable hairstyle can be worn for daily walks, shopping, work and festive events. A bow hairstyle with a braid will last a long time and will not ruin your mood with fallen strands.


To create it, you must first braid the well-known braid. But you need to weave it not in the standard way, but from the bottom up, starting from the neck, rising to the back of the head. To make braiding comfortable, tilt your head forward, comb your hair well, and treat your hands with wax or gel. Next, a regular French braid is woven. In the process, additional strands are selected from both sides and added to the main ones. When the braid is braided to the level of the back of the head, you need to tie the tail with an elastic band and a loop is formed from the remaining ends. The loop is smoothly turned into a bow, dividing it into two equal parts. The core is fixed with a curl left in advance.


Braids can be woven in different ways in any direction. The main thing is to leave some of the hair to create a bow.
- Method 6. Bow on the side.
For your hairstyle you will need a beautiful elastic band. First, the hair needs to be divided into four parts. They should be the same, so select the area from ear to ear, and then use a comb to draw a line in the middle of the head. All hair is not needed for the hairstyle. You need to choose one of the parts, depending on which side you want the bow to be on.

 Bow on the side of the head
 A strong ponytail is formed from the selected hair with an elastic band. You need to tie a loop with a beautiful elastic band, and hide all the ends under it. A bow is formed from the loop, the ears of which should be well straightened so that they are voluminous. Secure the structure with invisible pins or pins. You can maintain a neat appearance for a long time using varnish.
The hair that is left can be left loose, slightly twisting individual strands, straightened or braided - any creative wish.
- Method 7. Small bows.
The hairstyle is based on a French braid, however, once you get the hang of making small, neat bows yourself, they can be introduced as separate elements into other hairstyles. For ease of weaving, you will need one large pin for work and many small ones for fastenings. In the standard version, bows are located on the sides of the head, but in fact they can be done diagonally, along the bangs, around the head or behind.


For the hairstyle, you need to comb your hair and divide it with an even parting into two equal parts. A strand of hair measuring 1–2 cm is separated near the parting. If the bows need to be large, you can take a thicker strand. It is removed separately from the rest of the hair mass.
On the right side you need to braid a tight French braid and tie the end with an elastic band. Next, the formation of bows begins. The strand separated in advance should be sprinkled with water or varnish. A large hairpin is threaded through one braid and catches the loop of the treated strand, pulling it out.

The result is a bow, the size of which can be adjusted by changing the size of the loops. The ponytail that remains from the strand should be placed along the braid; the next strand will hide it.
You need to repeat the steps until the end of the braid.
Advice!Before you do your hair, you need to prepare your hair. Clean and dried, they will be manageable, especially in combination with gel and mousse for fixation. To obtain additional shine, you can use wax.


Step-by-step creation instructions
To create a hairstyle, you should prepare in advance several thin, almost invisible elastic bands and bobby pins or hairpins. Every fashionista should have a wide-tooth comb and styling products.
- First step. To obtain additional volume, you must initially wind the strands with large curlers. It is enough to select those hairs that are located in the triangle of the parietal zone. Visually it has the shape of the letter V.

- Second step. The remaining hair should be gathered into a ponytail at the back of the head. You don't need to make it too high, it will get in the way. Hair will not fall apart in different directions if you pre-treat your hands with wax or gel. The top strand from the resulting ponytail is separated and secured above it with an elastic band; it will be needed in the process of completing the design.
- Third step. At the bottom, another ponytail is formed with an elastic band so that the hair is divided into two equal parts. A neat bow is formed from these strands. It is firmly fixed with invisible pins. You can hide the ends directly in the right or left half of the bow. They can serve as additional volume for your hair.

- Fourth step. The strand left at the top helps make the middle of the bow. It needs to be placed in the middle and secured with pins. It is fixed from below, and the ends are also hidden inside the loops of the bow.
 Hairstyle with a bow and a Greek headband. Hairstyle with a bow and a Greek headband. Step 9-10
 - Fifth step. The strands that did not participate in the creation of the bow and remained on the sides need to be twisted into flagella and also hidden in the structure.
- Sixth step. You need to complete the overall picture by styling your bangs. A light wave looks impressive. The entire hairstyle is treated with strong hold hairspray.
 Bow braided and decorated with a beautiful hairpin
 DIY ribbon bows: simple, fast and beautiful
You don’t always have the time or desire to do your hair yourself. For such cases, you can stock up on original bows made from ribbons of your own making. They can be made in different sizes, shapes, colors. Any hairstyle will look bright and stylish with a homemade accessory.
To make a simple bow from a satin ribbon, you need to arm yourself with 20 cm of ribbon and a good mood. The material is folded in half to form a loop that is lowered down. The resulting two small loops are crossed with each other.
For a flower-shaped bow, it is recommended to choose a medium-width ribbon. It is twisted so that the resulting first turn is connected crosswise to the tip. You need to repeat this action several times until you get a flower of the desired size. It is attached using the last turn and a knot in the center.
A ribbon bow can be placed on an elastic band or attached to the hair with a hairpin It is convenient to make a small bow using a regular fork. To do this, wrap a thin ribbon around the fork so that one edge is free. It should be about 5cm long. This end is wrapped around the fork and pulled out at the bottom of the short edge. Then this tip is placed in the middle of the teeth of the cutlery at the top of the tape and lowered. All that remains is to thread the end of the ribbon into the loop that has formed.
Bun with a bow- an ideal hairstyle for every day, especially in the summer. The hair is securely fastened and does not get into the eyes, and the piquant bow makes the hairstyle cute. This bun is perfect for school or just for a walk. There are two types of girls. Those who like to wear bows and those who prefer to do without them. I fall into the former category, but if you haven't worn a bow in your hair as an accessory or a bow modeled from real hair, perhaps I can sway you into the former ranks.
If the texture of your hair is curly, you should first smooth out the curls with an iron, because the bow looks more beautiful on straight hair. However, you can create a slightly sloppy bun with a bow, it all depends on your imagination and mood.
How to make a bun with a bow step by step

- Make a high ponytail and secure it with a tight elastic band. It is better that the hair is damp, so it can be collected comfortably, and the hairstyle will be more neat.
- Separate a small strand 3-4 cm wide and secure it with an elastic band. We won't need it for now.
- In order to make a volumetric bun, we use a special round roller.
- If you don’t have such a device, then you can make it yourself; to do this, take a thick sock and cut off its tip, twist the sock into a ring and you will get a similar roller.
- Distribute the hair evenly over the roller and put a thin elastic band on top.
- Starting from the back of the head, we separate a small strand and begin to twist it, gradually adding hair, in this way we must twist all the hair until it ends, you may end up with one or two turns around the bun.
- Secure the tip with a bobby pin or bobby pin.
- Now let's start creating the bow.
- To do this, take our strand and put an elastic band on the base.
- Pass the strand through the elastic several times, when it is already a little tight, thread the strand not all the way, leaving a small loop, this will be one part of the bow.
- Now twist the elastic band and thread the same strand of hair into the resulting loop to form the second part of the bow.
- The remaining tail will serve as the middle of the bow, place a strand between two loops and secure with a bobby pin, hide the remaining tip under the bun.
Who should get a bun?
In addition, a hair bun is suitable for all women without exception; It is only important to choose the desired variety, shape and size of the beam. Thus, if a woman has a thin, graceful neck and aristocratic facial features, almost any bun will suit her, even the most unkempt one. In a word, every woman can choose her own version of the bun, based on the length of her hair, its thickness, as well as her own preferences.
Be that as it may, a hair bun can be made, as mentioned above, for formal events and business dinners, and with such a bun you can also go for a walk with friends or go shopping. The only difference is that for a bun for a formal event you can use various additional accessories, but the main thing is not to overdo it with them.
So, we suggest getting acquainted with the main variations of the beam. By the way, due to the fact that it will take a maximum of half an hour to create a hairstyle, you don’t have to worry about being late for the meeting.
Volumetric bun using a sock with a bow

This hairstyle (bun with a donut) was very popular last season, as it looks very beautiful and unusual. A lush, voluminous hair bun is very easy to create from long hair, but what should those who cannot boast of such luxury do?
- Don't be upset, there is a way out. For this hairstyle you will need... a sock, yes, exactly a sock, which will become a kind of elastic band. Just to start, you need to cut off the foot from the sock, after which the sock needs to be twisted into a tube. This comes from the name of another famous hairstyle, the “donut bun.” A hair bun with a donut is the use of a special donut elastic band, which allows you to make it neat and beautiful. But now we are talking about a sock, or more precisely, about a bun with a sock.
- To understand how to make a hair bun with a sock, you need to gather your hair and make a tight ponytail; secure the tail with a regular thin elastic band, as mentioned above.
- Then, put a rolled sock on the base of the ponytail, and then lay the hair over the elastic in the shape of a sun. If the hair is short, then the conics can simply be folded under the lower edge of the sock; if it’s long, you first need to put an elastic band on top, after which you need to wrap your hair around it.
- A bun of hair with a sock can be decorated with a beautiful hair clip, bobby pin or artificial braid, as shown above.
Learn more about how to make a hair bun with a sock.
Volumetric bow bow

- A voluminous bun - a bow - simultaneously combines childish spontaneity and girlish tenderness. This amazingly cute hairstyle is done as follows:
- First, you need to gather your hair into a ponytail at the level of the back of your head, and at the moment when you pass it through the elastic band for the last time, you need to pull the hair through the elastic band only halfway.
- You will end up with a loop of hair, which will then need to be divided into two equal parts. The ends of the tail that remain free need to be pulled up a little and carefully secured under the elastic band. If the bun with an elastic band turns out to be rather weak, you can secure it with hairpins.
Ballerina bun with bow

Ballerinas are always so collected, neat, chiseled - in a word, an ideal image. Everything about them is thought out and in moderation: both the outfit and the hairstyle. Speaking of hairstyle.
- Traditionally, ballerinas make a tight, even bun of their hair with an elastic band, which is necessary for them so that their hair does not interfere while dancing. Now we suggest you build the same one.
- To do this, you need to gather your hair into a high ponytail, twist it into a rope and wrap the rope around the ponytail. The bun can be secured on top with a regular elastic band, or with a special mesh elastic band that will tightly clasp the bun.
- If necessary, a bun of hair with an elastic band can be secured with hairpins.
- A ballerina's bun of hair can be made either exactly in the middle, or on top or on the side.
See more details on how to make a hair bun with an elastic band
Bun with braiding and bow

A bun with braided hair can rightfully be called one of the most fashionable hairstyles of the season. In some ways, the bun is similar to a ballerina’s bun, but at the same time, it is more interesting and unusual. A bun with braided hair is made as follows:
- You need to comb your hair and gather it into a tight ponytail, as you did before.
- The tail, gathered at the back of the head, must be divided into four parts, each of which must be braided. Braids can be braided tightly or not very tightly - it all depends on what we want to get in the end. For example, for a business meeting it is better to have the braids braided tightly, but if you are going on a date or going out, you need to loosen the braids.
- Each braided braid must be wound around the tail, and each subsequent braid must be wound around the previous one. If necessary, the bun can be strengthened with hairpins.
Bun for long hair

A bun for long hair (as opposed to medium and short) can be done in as many ways as possible. With long hair, a bun can be made either on the top of the head, on the back of the head or on the side - it all depends on your imagination and your own preferences.
- The hair is gathered into a ponytail (tight or not), after which it is threaded through an elastic band, but not all the way.
- The ends of the hair need to be hidden under the ponytail and secured on top with another elastic band. If desired, you can release a few strands on the sides and curl them with a curling iron - this will give you a more elegant hairstyle.
- You can also pre-comb the hair in the front to make the bun more formal. The top of the hairstyle can be fixed with hairspray.
- You can see how to make a bun for long hair below.
French bun with bow

The French hair bun received this name due to the fact that many French film actresses who shine on television resorted to its help. This hairstyle immediately became the personification of femininity and sophistication and therefore acquired an entire army of fans.
- The French hair bun can vary depending on the occasion and purpose of the event for which you are going to do it, however, in most cases the general technique remains approximately the same.
- First you need to backcomb the hair on the top of your head. To do this, you will need a thin comb (for the backcomb itself), a small amount of mousse or styling foam, a hair dryer and hairspray. Comb each center strand in turn, moving from the back of the head towards the crown. The backcombing can be varied depending on your own preferences, however, it is worth remembering that overcombed hair will give a comical rather than sophisticated look. Measure, measure and measure again.
- After combing, you need to make the bun itself from the hair, the higher it is, the better. But you still need to build on the length of your hair. You can strengthen the hair bun with hairpins.
Bun with bow

- Make one or two ponytails and secure fluffy accessories with elastic bands on top.
- A great option for a holiday lineup; braid your hair, decorate the top and them with small bows.
- Neat hairpins are acceptable at the front; gather your hair into a bun at the top of your head, secure it carefully with hairpins, and attach a flat bow to the front or back; braid the spikelet not from the front, but from the back of the head towards the crown.
- Gather the rest of the length into a ponytail and make a bun.
- Attach an accessory of any size under the bun.
Openwork bun

- Gather the hair at the back of your head into a ponytail and tie an elastic band with a satin ribbon of the desired color.
- Divide your hair into 3 parts, and the ribbon is considered the fourth strand.
- Place the ribbon at the edge and label it as the “first strand.”
- Place the second strand on top of the third, then take the ribbon and pass it under the third strand of hair.
- Then place the fourth strand on the ribbon, and then the same fourth strand goes under the second.
- The next step is to place the third strand under the fourth and on the second.
- Then place the ribbon on the third strand and pass it under the second strand.
- Repeat.
- The principle is that the ribbon remains in the center, and the strands of hair curl around it.
- It will be easier for you if you constantly say your action out loud, this way you won’t get confused and will remember the order faster.
Ballerina bun and bow

We'll take you through a ballerina bun with a hair bow in a few simple steps.
- To begin, gather your hair into a high and sleek ponytail.
- To get rid of frizz, you can use gel or gel wax while styling your hair.
- Next, put a large donut elastic band on the bun.
- Spread the hair from the ponytail around the elastic and smooth it well with a fine-tipped comb.
- Place a small elastic band on the bagel to secure the bun.
- Gather loose hair at the bottom and divide it into 2 parts: the first for the braid, and the second for the bow.
- Weave a braid from one part: it can be any weaving that you like - a fishtail braid, a regular Russian braid of 3 strands, a multi-strand braid, a snake braid.
- In general, whatever your heart desires.
- Wrap the braid around the left side of the bun, try to secure the braid with bobby pins so that there is free space on the right for a bow.
- Now let's create the bow.
- To do this, divide part of the hair by 3.
- We backcomb the right strand of hair a little from below and roll it into a ring. We straighten the sides of the bow and secure it with 2 bobby pins.
- Repeat with the left strand.
- It remains to model the central part of the hairstyle. To do this, we braid a thin braid from the last strand of hair, twist it into a ring and secure it with bobby pins
- Treat with hairspray and gloss.
The perfect bun with a bow

- comb or hair brush;
- two elastic bands;
- ribbon;
- invisible.
- Comb your hair and gather it into a ponytail.
- You can comb your hair completely, or you can leave a natural parting.
- Choose what is most beautiful for you.
- Take the ribbon, insert it into the elastic band, fold the upper part of the ribbon or pin it so that it does not interfere.
- Make sure that the bottom of the ribbon is no shorter or longer than the hair in the ponytail.
- Start weaving a regular braid of three strands, only adding the bottom part of the ribbon to the middle strand.
- Try to keep the tape always on top of the strand.
- Braid the braid all the way to the bottom and use an elastic band.
- Twist the braid into a bun and secure with bobby pins.
- Tie the ends of the ribbon into a knot and make a nice bow on the side.
- If your hair is thick and heavy, use special large or very large bobby pins.
- They will help securely secure your hairstyle, and you will need much less of them.
- Contrasting ribbons look beautiful, for example, on black hair - bright yellow or white, on light hair - red, blue, and so on.
- Try to ensure that the color refreshes your face and goes well with your chosen clothes.
Bunches with bows

- Divide your hair into two parts. The parting can be done straight or zigzag, whichever you prefer.
- Pull your hair into two regular straight ponytails. Read more:
- Take one ponytail and put a transparent elastic band on it, about 10 centimeters below the first elastic band - this will be the top of the ear.
- Now lift the ponytail up, the transparent elastic is the top, bend the hair down in this place, make the necessary shape, take another large elastic and put it on top. The ends will remain hanging freely from below.
- Take a varnish or spray, spray the resulting form well and dry it a little with a hairdryer.
- Place a bow on the top elastic band or tie it with a ribbon.
- Repeat the previous steps for the second tail.
Video: bun with bow
On a hot, rainy or windy day, you want to lift your hair higher and securely secure it. The usual ponytail and bun are already boring. Therefore, there is an interesting, beautiful way to collect hair. You can make a bow out of hair. The hairstyle will help create an unusual look. Several detailed master classes will help you make it in a few minutes.
Hairstyle nuances
The bow hairstyle is quite versatile. It can easily be made from curly or smooth hair. Collect them at the back of the head, at the top of the head. It all depends on the length. This hairstyle can act as a daytime, as well as for an evening out. But there are a couple of significant nuances, ignoring which is the same as harming yourself.
1. First nuance: You should not make a “Bow” if your curls are dull, thin, lifeless, and brittle. He won't look decent. It will not be able to maintain its shape for the time you need.
2. Second nuance: The bow draws attention to the face. If you have a large nose, chin or wide forehead, it will not suit you.
Bow hairstyle for girls
This hairstyle is so cute that many people will like it. At first glance it seems difficult, but if you look at all the steps, anyone can do it. It can be made for a children's party or other holiday.

A beautiful bow hairstyle allows you to create a doll-like look. A great option for a festive occasion, such as a children's party.
STEP 1. Gather your curls into a ponytail.
STEP 2. Separate a small strand from the very center of the ponytail and move it to the side, securing it with a clip so that it does not interfere.
STEP 3. Divide the remaining ones in the ponytail into 2 parts and carefully backcomb each one.
STEP 4. Using curling irons, from the base of the ponytail (near the elastic band), curl each strand separately into a curl. If your hair is long, curl the strand in several steps - it is important to get a beautiful spiral curl.
STEP 5. Let's make a bow. Roll the strand in the form of half a bow, securing it with bobby pins near the base of the tail. Do the same on the other side.
STEP 6. Now we take the strand left at the beginning, it can be secured with a bobby pin or a transparent elastic band to the tail, and braid it into a braid. The main thing is that this pigtail is in the center of our bow.