Craft for kindergarten on the theme of February 23. What a gift for a child to congratulate dad and grandfather on Defender of the Fatherland Day. Interesting ideas from napkins and cotton pads for kindergarten
Well, of course, there is no way to leave dads without gifts on February 23rd. Both current and potential defenders of the Fatherland will be happy to receive a carefully crafted craft from their son or daughter. Be sure to check out this section. Having looked through its pages, you can easily find several (to choose from) ideas and master classes you like for creating original postcards, applications, small models of military equipment, medals and souvenirs. And the variety of creative techniques and materials used will really surprise you.
Let's surprise dads with unusual and touching gifts from children!
Contained in sections:Includes sections:
- Postcards for February 23. We make DIY gifts for dads for Defender of the Fatherland Day
Showing publications 1-10 of 2128.
All sections | Crafts for February 23. Gifts for dad
Material for working with children “Our Army. Defender of the Fatherland Day" Subject dictionary: Defender of the Fatherland Day, defenders, Fatherland, Motherland, Motherland, Russia, army, protection, work, specialty, labor, profession, strength, dexterity, troops, hero, obelisk, border, courage, bravery, parachute, ship, equipment, pilot , tanker, sailor, general,...
« Gift for mom» Master class with dads and their children « Gift for mom» for Mother's Day. Junior group Application using paper flowers, packaging film and decorative tape. Materials for work: A4 color sheet, printed flower and leaf templates on A4 sheet,...
Crafts for February 23. Gifts for dad - Master class on making a souvenir gift for dads for February 23rd “Cats Soldiers”
Publication “Master class on making a souvenir-gift for dads on February 23...”  By February 23, every child wants to give dad a gift worthy of him. I decided to help my students realize their desires. I suggested that the children make souvenirs: “Soldier Cats” and I was not mistaken! The idea was a great success! So, let's begin! Materials: - white calico fabric, - padding polyester,...
 Image library "MAAM-pictures"
 Material: paper; glue; cardboard tubes. Our “brave soldiers” are ready to become gifts for dads, grandfathers and brothers. The boys had a desire to immediately pick up and play with their soldiers. I was looking for a sample for the lesson, started making it and noted several points for myself that...
 Preschool age is a period very susceptible to everything that happens around. Everything, absolutely everything that happens to a child under 5 years old leaves its mark for the rest of his life. It is during this period that children especially need the attention of their parents. Missed during this time...
 Autumn is the most beautiful time of the year, when nature dresses in its most beautiful outfit so that people admire this unearthly beauty. In autumn we collect crops and leaves from which we can make incredibly beautiful things. Autumn is the time for crafts from vegetables and...
Crafts for February 23. Gifts for dad - Scenario of sports entertainment with parents “We are building a house in the spring, dad is the master, I am with him”
Entertainment script “We are building a house in the spring, dad is a master, I’m with him!” Joint activities of children and parents OO Physical development Integration OO *Cognitive *Speech *Social-communicative Goal: the use of relay games that promote joint activities...
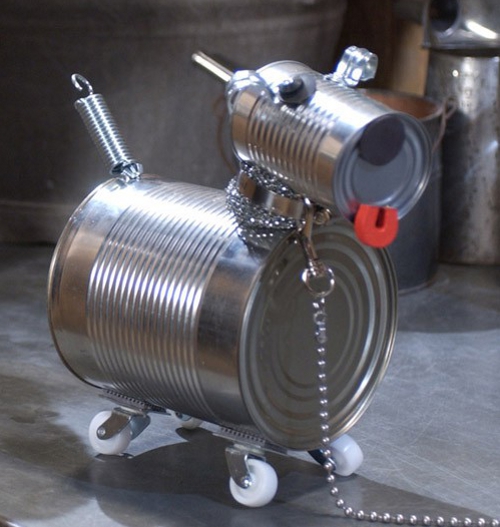
In our previous articles, we told you about how you can make interesting and original greeting cards for your grandfather or father for February 23rd. You will find such articles without any problems on our portal. A gift in the form of a handmade postcard can become an independent present. But still, it would be better to supplement it with a children’s craft for Defender of the Fatherland Day. Perhaps it will be a cardboard plane, a paper boat or a car, maybe even a DIY tank. There is another very interesting craft for Men's Day, which we will tell you about today in our article. This is a homemade robot made from tin cans, nuts, plastic caps, unnecessary screws and radio components.
February 23 with your own hands. Crafts for February 23
Here are special crafts for dads on February 23rd. A great gift for your grandfather or father on February 23 could well be a boat made by the child himself. And such a craft can be made from various materials: wood, cardboard, walnut shells, plastic bottles. The simplest option would be to make a paper boat. You can attach flags to the finished paper boat. An ordinary wooden toothpick will serve as a mast.

A very original gift-craft for February 23rd, which any grandfather or father will surely like - this is a paper boat filled with various sweets.

If you make waves from strips of paper, you will get a boat sailing on oxen. This will be a beautiful and impressive gift for dad or grandfather on Defender's Day. On our website you can find detailed instructions on how to fold a paper steamer. If you complement the steamer with a seascape made from colored paper, then you will have a beautiful craft for this wonderful holiday.


Crafts for February 23. DIY gift for dad
Grandpa or dad will definitely really like this homemade airplane. In this article we will bring to your attention three simple options for making this craft for February 23rd.
An airplane made from a matchbox.
Our site invites you to make a gift for your grandfather or father on Defender's Day - an airplane made from a matchbox. To do this, you will need to take 1 matchbox, scissors, colored cardboard and glue.

Craft airplane.
It is worth noting that handmade crafts for dads on February 23 can be created directly from handy materials. From a simple clothespin and wooden ice cream sticks (or medical spatulas) you can make a craft - an airplane for the holiday of February 23rd. When making this craft, we advise you to use a glue gun and acrylic paints. If you make a lot of these colorful airplanes, you can make a whole suspended mobile. Below you can look at the picture and see that the tail of the plane can be made from cardboard.


Airplane made of cardboard.
Even on our website you can see many articles that allow you to make various crafts directly from garbage. Indeed, if you look at this site, you will learn how to make your own boats, cars, airplanes, funny animals from simple garbage: cardboard boxes and packaging, lids, etc. Basically, every craft from this site can serve as a great gift for your dad or grandfather on February 23rd. Choose, watch, create! And of all the crafts presented, we liked the cardboard airplane the most, for the reason that it is very original and beautiful. And it's quite easy to make. In addition to all this, ready-made templates are also included with this craft. You need to first print this template and transfer it onto cardboard. In order to make this craft for a men's holiday with your own hands, you will also need a paper cup from a roll of toilet paper.

Airplane made from a plastic bottle.
A special article has been published on our website that is dedicated to crafts made from plastic bottles. As a rule, such crafts are made quickly and easily. Therefore, if you put a little effort into this, you will end up with a wonderful airplane.

DIY crafts for February 23rd. February 23 in kindergarten
There is another very interesting DIY craft for February 23rd. This is a tank made from matchboxes. Therefore, if you are looking for crafts for February 23 that you can do in kindergarten in the preparatory group, then you should like this idea. In order to make such an interesting gift, you will need: a cover from a regular notebook or a piece of wallpaper, magazine paper, three matchboxes, a plastic bottle cap and corrugated cardboard.

In preparation for the February 23rd holiday in kindergarten, you can make another interesting tank yourself as a gift for your grandfather or father.

We have for you another very interesting version of a tank made from a matchbox. This tank has a cannon barrel made of a cotton swab, tracks made of corrugated cardboard, and rollers made of buttons. Using corrugated cardboard, you can make not only tracks for your tank, but also the entire tank.

DIY crafts for February 23rd. Gift for dad on February 23
Your little child will also like to make a gift for dad on February 23rd. Small children, of course, cannot make very complex crafts. For this reason, we specifically published simple crafts for February 23 in our article. One of them is a machine made of cardboard. You will need a cardboard toilet paper roll, paint, cardboard, and glue.

Crafts February 23. Children's crafts for February 23
If you want to surprise your grandfather or father with something original, then original crafts for February 23rd will suit you. On our website you can find paper boats, various models of paper cars, helicopters, airplanes and all kinds of architectural buildings. Making these crafts for Defender of the Fatherland Day will be very interesting and exciting for both schoolchildren and adults.
Now we move from transport to robots. From simple cans, plastic bottles, caps, cogs, screws, nuts, washcloths and other things you can make many cute robots. It’s very easy to make such a gift for your dad yourself. Especially if you have a glue gun.


You can also make a robot-shaped pen and pencil holder. There is also a very interesting option for a pen stand. You can see below how to make such a gift for your dad or grandfather for the holiday. In addition, you can make a pencil holder by folding it from Lego Duplo.

If you want to make your own pencil holder, which will be decorated with a photograph, then you will need a part from the designer to make such a craft - a transparent door. The photo is inserted into the space between the door and the wall.

If you want to surprise your grandfather or father with a wonderful holiday gift, then make these beautiful cubes. In order to make this original craft for February 23, you will need: pasta of various shapes, cardboard, golden spray paint, a glue gun, various jewelry. It is necessary to cut out a cup from cardboard and make a stand from it. Then you need to stick pasta of different shapes onto the cardboard. The easiest way to do this is with a glue gun. After the glue has completely dried, you should paint the craft with golden spray paint. Next, you need to decorate the cup with various clippings from family photos and jewelry. It should be said that such a gift can be given to dad or grandfather not only for a men's holiday, but also for a birthday. You can write on the craft: “To the best father from the children,” or “To the best grandfather from the grandchildren.”

Here you can also find paper crafts for dad on February 23rd. If your dad wears a formal suit and tie to work, then the following gift for the twenty-third of February may well be suitable for him. Help your child make this interesting gift for dad - a paper tie. You can cut out a tie from cardstock or paper and then decorate it. Below in our article we have presented to your attention a detailed diagram of how to fold an origami paper tie. You should pay attention to the numbering of the photo in the above diagram of an origami tie.


Children's crafts for February 23. Crafts February 23
Make a paper airplane mobile for your dad as a Men's Day gift. This gift can create a good, festive mood. In order to make this craft yourself, you need to take colored paper and fold a lot of airplanes out of it. And then, using a thread, hang them from the chandelier.

Crafts for February 23. DIY gift for grandfather
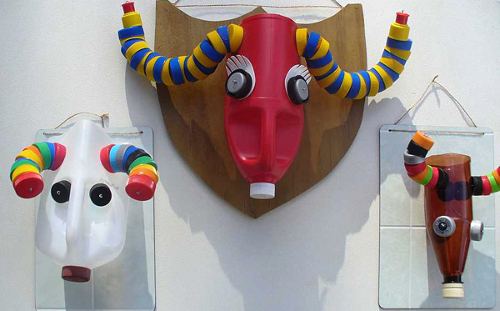
At the end of our article, which is dedicated to children's crafts for Defender's Day, we will tell you about another very original and interesting craft made from waste material - a deer head, made from the caps of plastic bottles and the bottles themselves. If your grandfather or father is an avid hunter, then such a craft will be very relevant.
Finally
This extensive article was able to offer you a large number of different crafts for every taste. Just choose what you like and help your child create something interesting.
Material courtesy of svoimi-rukamy.com – Read original
You may like:
- Crocheted rugs: interesting patterns, patterns and…
The men's holiday is approaching and I want to please the stronger sex with pleasant surprises and gifts. Crafts for February 23rd are an opportunity to show your imagination and please your loved ones. Involve your child in creativity, make a gift for dad or grandfather with your own hands. Any father would appreciate a touching craft or a children's card from his son or daughter.
TO
getting a gift for February 23rd in a store is not a big problem. Each store puts out the appropriate products before the holidays. It seems to us that a gift made with your own hands will be much nicer and more memorable than just a purchase. And your men, be it dad, husband, brother, will definitely appreciate the efforts of you and your child.
It's a good idea to give dad a photo frame as a gift on February 23rd. Only one child cannot cope with this work. If you take part in creativity, it will work out.
To work you will need:
- Colored cardboard.
- Thicker cardboard (you can take any color).
- Colored applique paper or colored cardboard.
- Scissors.
- PVA glue.
- Ruler.
Take green cardboard, step back 4-5 cm from the edge with a ruler and draw a photo frame with a pencil. First, we figure out which photo will fit here; all our calculations depend on this. Drew it and attached a photo. If everything works out, carefully cut out the frame.

We cut out the details to decorate the frame, drawing them by hand or printing them on a printer.

We glue the colored applique to the frame and begin to make the frame itself. We cut out a rectangle from thick cardboard, the area equal to the frame, to form the back part of the product. Glue two pieces of cardboard and glue the leg for stability. The gift is ready.

You can decorate the frame by gluing a shell, a beaded fish, an anchor, a steering wheel - on the theme of the sea.
If you don’t know what to give a young man on February 23, there is a good option, here’s a tank:

It is assembled from corrugated paper, double-sided tape or glue.

This makes for an interesting gift:

Another tank, but with different “contents”.

The same materials are used, only here there is more sweetness.

The result was an original gift:

Crafts made from salt dough, made together with a child on February 23, can be presented at home and at work, at school and in kindergarten. These gifts do not require large expenses, but will delight you with care and attention.

Salt dough is easy to prepare. You can use the dough to make a figurine, a keychain, or a refrigerator magnet.
One of many salt dough recipes:
- Flour - 300 grams.
- Regular salt, coarse - 300 grams.
- Water - 200 grams.
- Vegetable oil - 1 tbsp. spoon.
Knead the dough, adding water gradually. When it’s ready, roll it out on the table and squeeze out the parts using molds. Even small children can cope with such simple work. Dry the pieces in the oven. You can paint with food grade paints or acrylic paints. It's up to you to decide whether you give for food or for beauty.


Our next craft for February 23rd is a keychain made from salt dough. We make it for fathers, grandfathers, brothers and mothers (after all, there are military mothers).

We collect all sorts of little things: coins, nuts, buttons, screws, nails - all this will be useful to us for working with the dough.

We cut out letters from cardboard: “P”, “M” or the initial letter of the name, for example, Sasha. Make a hole in the corner with a hole punch or scissors.


Place the “sausage” of dough onto the cardboard, distributing it evenly over the surface of the letter.

Use an awl or scissors to make a through hole for the ring.


We paint the keychain in any color, preferably with acrylic paints. If the paint is not waterproof, coat the top of the keychain with varnish (you can use nail polish).

Leave to dry or dry in the oven. When it dries, we put the ring through the hole and you can give it as a gift.
We have created an original keychain in the steampunk style. What is "steampunk"? Science fiction and mechanics, a very interesting style.

First, let's come up with the design of our paper postcard. It will be simple to implement or complex - you decide. The main thing is that it should be a beautiful congratulation on February 23rd.

Volumetric postcards in kindergarten and school:
Let's start with an original postcard on which we will write congratulations and wishes. We will make postcards using different techniques. You can make a card like this using the origami technique. For the postcard you will need a rectangular sheet of colored paper. Take plain A4 size paper for testing, fold it according to the instructions, you will understand which sheet size is most suitable.

Fold the rectangle in half along the sheet. The paper folds like a book, there is nothing complicated about the work.

Unfold the sheet and fold it again, from the sides to the center.

We have a rectangle: on one side there is a sheet, and on the other there is a vest.

The photo shows that you need to bend it inward, this is a mistake. Bend the corners outward so that the corners protrude slightly beyond the fold. We made “sleeves”, turn the work over and bend it 2 cm in the opposite direction.


This is how the “collar” turns out; we will direct the square of the shirt into the corners of the collar.


A tie or bow tie can be cut out and glued to the “shirt”, or you can make a tie, as in the video.

Don't forget to write congratulations and wishes inside the sheet. We hope that your man will be satisfied. And if you add a small gift (for his hobby), it will be just wonderful.
This is an interesting card you can make together with your child. A very interesting technique that requires only perseverance and patience.

To work you will need:
- A set of paper ribbons (you can cut it yourself).
- Cardboard.
- PVA glue.
- Tweezers.
- Scissors.
A special tool for twisting ribbons (you can make it yourself).
How to make a twisting tool: insert a needle with a large eye into a wooden stick (pencil, art brush stick) and bite the eye in half.

Scheme of working on a postcard:

Cut out the base from cardboard, cut thin strips, winding them onto the tool, fix the edges, and then glue them onto the base.
Any CDs are also suitable for postcards. For this card, cut out a star from red cardboard, paste a CD on top of the star and add inscriptions and clippings from magazines or drawings.

In our country it is customary to celebrate all public holidays. February 23 is considered one of these. On this day, as a rule, all men are congratulated. In addition, they prepare for such a holiday in advance. People buy gifts, but schools hold creative classes where they create crafts for Defender of the Fatherland Day. In this article we will offer modern craft ideas for schoolchildren. All these crafts can be made without any problems in class, and then given to loved ones: dads, grandfathers and uncles.
What crafts to make for February 23 at school
Creative shirt for dad.
It’s easy enough to please every man with a shirt. This item is simply irreplaceable in the wardrobe. Children who attend school, of course, cannot afford to buy this product. But in this case, they may act completely differently. For example, you can make this shirt yourself. For this work you will need a sheet of A4 cardboard. This sheet can be of absolutely any color. 
Progress:
- On this sheet it is worth folding one edge.
- Then make cuts and bend the collar.
- Next, cut out buttons and stripes from contrasting colored paper. They need to be glued to the collar.
- Now it's time to make a tie. To create it you will need a sheet of paper that will have a square shape. Fold it into a scarf, then straighten it and lay it in a diamond shape.
- Then the corners of the tie are folded diagonally.
- Now bend the top corner, after which the part that is raised to the top should be folded again.
- To make the tie look festive, you need to stick stars on it, which were cut out of colored paper.
- Glue the tie to the shirt.

Craft - tank.
The attributes of February 23rd are: weapons, tanks and other camouflage symbols. Surely, every dad will be pleased to receive a tank from his child, which he made with his soul. The next craft is very easy to make. For it you will need: a pair of dish sponges, super glue, cardboard and a lollipop tube.
Progress:
- First of all, you should cut out a smaller rectangle from one sponge. It is glued to the first sponge.
- A barrel is made from a Chupa Chups tube. A black strip is wound on one side of the tube.
- The tube is inserted into the sponge.
- Now all that remains is to cut out a star and circles from cardboard, which will be the wheels. All these elements are glued to the tank.
Creative postcard for Defender of the Fatherland Day.
In this article we present crafts on the theme Defender of the Fatherland Day. Of course, it is customary to give cards on this day. But we offer high school students to make an unusual postcard.
Progress:
- To create a postcard, you will need a regular album sheet on which you need to write the number 23.
- Now you should take green paper from which you need to cut strips. The postcard will be made using the quilling technique. Therefore, each strip is wound onto a pen or quilling tool to form rolls. To make them look tight, the tip of the strip must be coated with glue.
- In order for the rolls to get the shape of a leaf, they need to be flattened. Such rolls of leaves are mainly used for gluing difficult places.
- After which, green blanks are used to paste over the numbers.
- Decorate the card with a star using the quilling technique. In addition, do not forget to sign this product.

Funny hussars.
The next craft for Defender of the Fatherland Day looks very beautiful. In addition, a high school can do it. And these are guys aged 10 years and older. To create a craft, you should stock up on all the necessary materials in advance. So, you will need: 
- plastic spoons and bottles,
- newspaper and wire
- thin foam for packaging,
- polystyrene foam and construction tape,
- scissors, awl and universal glue,
- paints, threads, gouache and markers.
Progress:
- So, holes are pierced in plastic bottles with an awl. You need to insert wire into these holes. After that, disposable spoons are inserted into the bottles. Stuff these items with newspaper.
- Now cut out rectangles from thin foam rubber that will correspond to the length of your arms. Wrap your hands with this foam and wrap it with tape or thread.
- It is worth cutting out hats for hussars from a piece of foam plastic. It is worth making holes in them in order to place them on a spoon.
- Next, coat the workpiece with water-based paint.
- Now the uniform and shako should be painted. For this, the following colors can be used: blue, green and red. The lower part of the body can be left white. You can also paint it with black or blue paint.
- Now it’s worth cutting out of thin foam plastic: sabers, guns, visors and boots.
- Draw a face using a marker or felt-tip pen and your craft will be ready.
Order for dad.
The following children's crafts for Defender of the Fatherland Day look quite bright. In order to make them you will need CDs. You will also need plasticine and beautiful cardboard.
Progress:
- First, we decorate the disk with cardboard. You can use any colors for this. You should cut out a flower with petals from cardboard. You can draw stripes on these petals.
- Glue the disk to the cardboard.
- From plasticine you can make the number 23, the Russian flag, a helicopter, an airplane and other military-themed elements. Naturally, these elements should be attached to disk.

Big rocket.

Applique tank made of colored paper.
In our article we have already described several ideas for creating tanks. The next tank is easier to create. To create it, you only need colored paper and a sheet of cardboard.
Progress:
- Strips of different lengths are cut out of colored paper. They are glued onto a sheet of cardboard in the form of tubes. A slightly smaller strip is used for the muzzle.
- All that remains is to paint the star and wheels for the tank.

Finally
Use your imagination, create wonderful crafts that will delight your loved ones on the wonderful holiday of February 23rd.
The long-awaited month of February has arrived. It is at the end of winter that Defender of the Fatherland Day is celebrated. All children congratulate their fathers and grandfathers.
DIY crafts are the most popular gifts for children. After all, this is how they show how much they love and value their family.
Crafts from little inventors can be made from a variety of materials. The simplest ones: made of colored paper and cardboard. More complex: from the most unexpected materials. For example, a plane made of popsicle sticks or a tank made of kitchen sponges for washing dishes.
In our article, you will learn some interesting ideas for DIY crafts for Defender of the Fatherland Day.
DIY craft for children from plastic bottles
You can make an excellent airplane from paper of different colors and a plastic bottle. Older children can master it on their own. For kids who have recently learned how to make simple paper crafts, their mothers will help them.

We will need:
- plastic bottle (transparent, 0.5 liter volume);
- ruler;
- pencil;
- scissors;
- PVA paper glue;
- colored paper or non-hard cardboard: white, green and juicy green.
Stages of work:
1. First, let's move on to the body of the aircraft. It will be white. To do this, take an A4 sheet. Let's put it vertically. Place the bottle across the white paper. So that its bottom is exactly along the edge of the paper, and the neck protrudes beyond.
2. Now we determine the place where the bottle narrows - the beginning of the neck. We put a mark, in pencil, on a white sheet. We remove the bottle and draw a vertical line across the sheet, in the place where we left the mark.
3. Take scissors and divide the A4 sheet into two equal parts, exactly along our line. We throw out the left part, and the right one will become the main part of the aircraft.
4. Fold the remaining piece of paper in half. We draw the tail part of the plane, precisely the one that does not adhere to the plastic bottle, but rises upward in the form of a tail.
5. Next, cut out according to your drawing on the side that will be closer to the bottom of the bottle. We wrap the “white body” around the bottle. We stack them on top of each other and glue them together. We fold the two parts of the tail and glue them together.
6. Cut out two trapezoids from bright green - these will be the wings of the airplane. And two rectangles for the engines of our “aircraft”. Bend the bases of the two trapezoids by one centimeter. We roll the rectangles into tubes and glue their edges.

7. Glue the wings to the sides of the white fuselage. At the bottom, using glue, we secure the pipes.
8. We only have green paper left. Let's cut out eight circles from it. They will be the airplane's windows.

9. Now we glue four windows on each side of the plane.
10. Our “air machine” is almost ready. All that remains is to cut out the dark green propeller. It is shaped like a bow. Cut a large hole in the middle of the propeller. So that the propeller can be put on the neck. And we push the neck of the bottle through the hole so that the propeller is next to the plastic ring on the neck. Now we tighten the plug.

The tone of the cork and the main colors of the aircraft must match. In this case, a green cap is suitable. If the shade of the cork is different, we advise you to match the aircraft with other paper tones.
11. And finally, from the remnants of green paper we cut out two small wings of the tail of the plane. We bend the base and attach it to the white tail using glue.

Our gift for Defender of the Fatherland Day is ready.
But the idea is more complicated, here you need to cover the plane with paper and decorate it, but it also turns out very cool

Here, for example, is a simple version of a pirate ship that even kids can handle:

You can even make a rocket:

Or this beautiful ship that you can take with your dad on a long voyage, if, of course, there is a body of water nearby.

And look at these binoculars, you just need to cut off the bottom of 2 bottles and connect them with electrical tape and tie a rope:

But this is how you can build a helicopter:

To make such a helicopter you need 1 PET bottle with a capacity of 0.5 liters. 1 ping pong ball, 3 straws, hairpin. stapler and scissors, here's the whole simple set:

I will not describe how to make such a helicopter, and everything is clearly visible in the picture.
These are the kind of crafts you can make with your children and present them to your dad and grandfather. They will be touched by such a gift, because they were made by little beloved hands.
Making a gift for dad from paper and cardboard
The easiest thing you can make from paper and cardboard is a postcard. But we will not dwell on this, but will offer you to build such a tank.

We will need:
- sheet of brown cardboard;
- colored double-sided paper: green and red;
- ruler;
- simple pencil;
- scissors;
- PVA glue.
Stages of work:
1. Cut out two strips of green paper. Size: length - 20 cm, width - 2 cm. Such strips will serve as tank tracks. Glue the ends of the strips together. As a result, we get two rings.
2. For the main part of the tank, cut out a rectangle. Size: length - 12 cm, width - 7 cm. We measure 5 mm from the shorter sides and draw lines. Next, count another 2.5 cm from each edge. And we also draw two lines.

3. Now we bend the paper along the lines. As it shown on the picture.

4. Let's start making the tank turret. It is similar to the main part, but smaller in size. Let's cut out a rectangle. Size: length - 8 cm, width - 6 cm. Also measure from the edges: 5 mm. - at both sides. We draw lines. And another 2 cm - draw lines. After that, we bend the lines exactly as we did with the bends on the tank body.

5. Now let's make the barrel. Cut out a small rectangle. Size: length - 8 cm, width - 4 cm. Bend the resulting figure in half. This must be done along the length of the rectangle. As a result, we get a paper quadrangle consisting of four parts. The width of each is 1 cm, respectively the length is 8 cm.

6. Glue the two edges of this sheet together to create a triangular barrel. Before this, we make three small cuts. In the picture they are shown with green lines. We bend the strips a little. This will be needed so that we can glue the future barrel to the tower.
7. Now we connect all the parts of the tank: glue the barrel to the tank turret, as shown in the picture.

8. We install the tower on the hull. Glue will also help with this. Now we glue all the parts to the sheet and add a red star to its body.
The festive tank is ready.
It is worth noting that such a tank can also be made from non-solid cardboard.
- You can make a fake in the form of a car and glue the face of dad and son, in my opinion it’s very original:

- Frame

- Cap made of colored cardboard

Crafts for school from plasticine for Defender of the Fatherland Day
This is not a complicated craft that fits perfectly with the holiday theme. The only materials we need are plasticine. In our case: blue, red and green shades. But, you can take other, matching colors.

Stages of work:
We make a sausage from blue plasticine. One side will be much thicker than the other. We attach the tail of the airplane to the thin end of the sausage.

Now we sculpt the wings and attach them to the main part of our “flying machine”.

We decorate the front part of the plane with green plasticine. And the wings are red stars.
Our plane is ready.
You can also make a tank from plasticine, here are several options:


And now you can make a submarine, it’s not difficult at all:

Either fighter:

And here’s a beautiful photo frame made from plastic plasticine:

Master class on making figurines from salt dough
Maybe some people may find sculpting with salt dough difficult, but this is not the case at all. Try it at least once and see how easy the craft is.

We will need:
- frame;
- glue moment;
- salty dough;
- gouache or watercolor and brush;
- a rectangle of white paper (the size of the inside of the frame) and a file.
To start modeling, we need to knead the dough. Mix a glass of flour and a tablespoon of salt. For elasticity, add a tablespoon of vegetable oil and hot water. Mix everything to a homogeneous plastic consistency.
If the dough comes out a little liquid, add flour and mix the mixture again.
Now put the dough in the refrigerator for three hours. After which, you can start making a cat soldier. Place a paper rectangle on the table and cover it with a file.
Let's start making the body of the cat. From a piece of suitable size, roll into a ball.

Let's make a drop out of it. And flatten it between your palms. Place the cat's body on the file in the right place. Press the top of the droplet with your finger. This is where we will place the bottom of our cat's head.

For the head we will need a piece of a slightly larger size than we used on the body. We roll the ball in the same way, but now we flatten it right away. The approximate thickness of the head is 7-8 mm. We make ears on the sides: stretch the dough out a little and press it with your fingers.

We put the remaining dough in a plastic bag each time, otherwise it will simply dry out. A plastic container with a lid will also work.
We wet the pressed part of the droplet body with water. For this you will need a brush. Glue the head to the body. Using a plasticine knife, we make indentations in the ears. We draw the fur of the cat along the edges of the craft - using scratching movements.

Using our fingers we determine the location of the future eyes. We will get two indentations in the middle of the face.

Mark the nose with a knife.
Twist a small ball for the spout. Now we make a drop out of it and flatten it a little. This is exactly how we did the torso. Next, flatten the droplet from below. We get a real cat nose.
We wet with a brush the place where our nose will be located. And glue it on.

For the mouth, visually divide the head into two equal parts - with a horizontal line. We put two lines, almost near the edges of the cheeks. And cut the dough from the bottom of the nose to each of the cheeks.

Open the mouth and draw the lower lip.

Now let's add some brightness to the cat.
Both watercolor and gouache are suitable for coloring. If you use acrylic paints, it is better to wait until the work dries.
We completely color the cat orange (don’t touch only his nose). Using white watercolors we paint the cheeks, tips of the ears, lower lip and the middle of the tummy. We tint the cat's nose with a soft pink shade.

Roll a small piece of dough into a sausage. Use a knife to separate the edge and cut off two small (equal in size) pieces.

From each plate we form a ball (slightly oval in shape). These will be the eyes.
If the paint has dried, moisten the eye holes with water. But usually, the watercolor does not have time to dry yet. Next, glue the eyes and slightly flatten them on top.
Let's start making the cat's eyebrows. To do this, take a small piece of salt dough. Roll into an oval ball and cut in the middle. We get two even halves. Roll each into small balls. We make elongated droplets out of them.
Glue the eyebrows just above the eyes. The wide side is inward and the narrow side is outward.

Now let's make a cap. To do this, we need to roll a ball from a small piece of dough. After that, we make a drop out of it and flatten it. Cut a small triangle into the base of the droplet. We shape the cap with our fingers and glue it between the ears of our “mustachioed soldier.” The narrow side of the drop will be between the eyebrows, and the cut out triangle will be on top.
From the top of the triangle, use a knife to press a small groove in the form of a continuation of the top of the triangle.

Next we make an army belt with a large buckle. We will need a small piece of dough. Roll it into a ball and flatten it into a thin pancake (about 3 mm thick). We spread the resulting layer on the table and cut out a strip 1 cm wide in the middle. We attach the belt to the cat’s belly. We cut off the excess edges of the strip.
Now let's color the new parts of the cat. Draw the eyes with dark green color. For the cap, mix green and yellow-brown colors. As a result, we get a swamp shade or khaki color. We paint their cap. Paint the eyebrows white. Paint the belt with black paint.
We make a buckle from a small piece of dough. Roll into a ball and flatten with your fingers. Place the plastic on the table and cut out a rectangle. Glue the buckle to the belt and press through a small star.

Now color the buckle yellow.
Let's start making the cat's paws. Roll the dough into a sausage as thick as your index finger. Cut off the rounded ends and divide it into two equal parts. Roll each piece into a ball. Then we bring it into an elongated drop-shaped shape. Using a knife, we form three fingers. We push through one claw on each one.

When one paw of the soldier cat is ready, try it on. If it turns out to be too big, separate a small part of the dough from it and roll a new one.
You can check whether the paws are similar in size by rolling each piece into a ball and visually comparing them.
We wet the foot with water and glue it to the body. We do the same with the second paw. The only difference is their location. One lies on the belt, the second is raised to the head.
We make boots. Roll a piece of dough into a ball. Then we bring it into an oval shape. Divide with a knife into two equal parts. Roll each into a ball. We bring it into the shape of a droplet. We press the bottom of the drop - this will be the sole of the boot. Squeeze it a little on the sides and glue it to the right place. We also make the second one. As a result, the boots turn out to be glued to the cat’s belly and to each other.

Press the boots well, otherwise they will simply fall off when the picture is in a vertical position.
Now let's start painting the new parts. The paws are orange, like the body, and the boots are black. We also draw black pupils and dots for the mustache. Draw a star in red on the belt buckle and cap. Use brown paint to highlight the mouth, the inside of the ears, the folds between the fingers and the claws.
When the black paint dries on the pupils, paint small highlights on the eyes, the buckle and the middle of the cap. We will also draw two white stripes on the paws and white fur at the bottom of the face. Without removing the cat from the cardboard, place it on the radiator and let it dry completely.
If desired, you can decorate the main background of the picture. We are waiting for the paint to dry.
When everything is dry, insert the background into the frame (under the glass). And we will glue the cat to the glass with Moment glue. Apply glue to the back side of the “mustachioed defender”. Gently press it against the glass. The mother can help with this so that the child does not get glue on his hands.

At the beginning and end of the craft we showed different backgrounds for our gift. Which is better? You decide.
Here are some more interesting ideas from this material:
- Painting

- Star

- Figures

- Portrait

Learn how to make a gift from matches with your own hands
We can make a wonderful panel from matches.

We will need:
- holiday themed postcard;
- matches - several boxes;
- thick cardboard;
- universal transparent glue “Moment-Gel”;
- clear nail polish;
- PVA glue;
- scissors.
Stages of work:
We make the base of the gift panel. Apply PVA glue to cardboard. Now we glue the matches vertically. Starting from the corner. The first will be positioned with the cerumen head up, and the second - down. We continue this way until we get a square. It will take about 17-18 matches.
Nearby we make the same square from horizontally arranged matches. This is how we alternate vertical and horizontal squares. As a result, we will have an applique measuring 3 by 3 squares. To make the parquet made of matches dense, we lubricate it again with PVA glue. We are waiting for the base of the panel to dry completely.
Then we cover the matches with colorless nail polish. We also wait until everything is completely dry.
If there is excess cardboard left, carefully trim the edges.
Now let's get to the decor. We cut out the necessary details of an old postcard for Defender of the Fatherland Day. And glue them to the matches with “Moment” universal glue.
Our holiday applique is ready!
What do you think of this craft option?

Look at this wonderful helicopter, I think it’s very original...

Interesting ideas from napkins and cotton pads for kindergarten
You can make a good craft from such simple materials.
- in the younger group:
Let's make a card from napkin balls.

We will need:
- sheet of colored cardboard A4;
- PVA glue;
- scissors;
- napkins of different colors.
Stages of work:
Let's draw a boat. All its parts must be large.
Cut the napkins into small squares (about 2 by 2 cm). Take a square and roll it into a ball with your fingers. I think all kids will enjoy this activity. In addition, it develops hand motor skills well.
Apply PVA glue to the design and glue each ball.
If desired, you can make the inscription “To your beloved dad.” The holiday card is ready.
Here are a few more examples:


- in the senior group:
With older children we will make a bouquet like this.

We will need:
- three cotton pads;
- a sheet of green and blue paper;
- PVA glue;
- scissors;
- two cotton swabs;
- yellow felt-tip pen.
Stages of work:
We make a square from a rectangular blue sheet. To do this, bend the sheet diagonally.

We get a triangle, an unnecessary rectangle on the left side, cut it off. We expand the triangle and we get a square.
We place the sheet on the table surface - in the form of a diamond. And we make an envelope from the bottom sides. First we bend the right edge, then the left. We bend the corners of the front side of the envelope.

Now coat the left edge with PVA glue. The envelope is ready.
Let's start making flowers. To do this, color three cotton heads with a yellow felt-tip pen. Cut the sticks in half. The half with the white cotton head is thrown away.
We bend the cotton pad, just like an envelope for flowers. Insert a cotton swab into the middle. We glue the front part of the flower. We do the same with the remaining disks and sticks.
Next we make the leaves. Cut out a rectangle of green paper (6 cm wide, about 5 cm long). Fold the rectangle in half and cut out an oval edge. We unfold the paper and get a leaf for the koala. We will need three of these.
We attach all the details to the blue envelope. There we will see which arrangement of flowers and leaves will look best. Now we glue everything with PVA glue.
You should not glue all the details completely, this will make the card more voluminous and more beautiful.
What do you think of this greeting card idea?

A few more ideas:
- Fish


Video on how to make a postcard for Defender of the Fatherland Day using quilling technique
I suggest you learn the basics of quilling and make a postcard for your beloved fathers and grandfathers; even preschoolers can handle this technique, and the craft will come out beautiful and original.
These are some interesting gift ideas for February 23rd for fathers and grandfathers, choose a craft and make it with your children.
If you liked the ideas, bookmark the article, share it on social networks and write in the comments which craft did you choose?
And I wish you creative inspiration and perseverance for your children!