Weave carpets with your own hands using a needle. Carpet technique needle pattern
Message quote
Master class: DIY carpet embroidery needle. FORD rug.
Nothing complicated...

To do this, you will need to purchase a system (dropper), a 5 ml syringe and a gasket.
In fact, any dropper has a needle with a hole on the side. I came across droppers with the tip cut obliquely, both in a regular needle for injections and sealed. I didn’t like the ones that were sealed, because... the holes are made very roughly and the metal burrs inside the needle catch the thread. But the cut ones are what you need.

As you can see in the photo, the distance from the hole to the tip of the needle is very large. We don't need this, because... then when pulling the needle out of the fabric you will have to pull out a lot of thread. We need to leave a distance there of no more than 2-3mm. To do this, take pliers (or wire cutters) and, stepping back 3mm from the hole, bite off the excess.

This is what we got.

Now, lightly squeezing our cut with pliers from the two sharp ends, we round off our needle. But that's not all. We dig through our cosmetic bag and find a nail file (one that we don’t mind, although it shouldn’t suffer much). And we polish our needle until we have a cut, like with ordinary needles for injections.

This is what we should get.

Now we work with the syringe. There are different types of 5ml syringes. Some have a nose for inserting a needle in the center, others have a nose on the side. We need the one with the spout in the center (it's on the left in the photo).

We cut the nose in half (with a stationery knife or a regular knife). Now let's take the gasket. By the way, this can be found in almost any plumbing store. They come in silicone and rubber. I have a silicone one lying around at home.

This is the gasket we need to squeeze into the bottom of the syringe body. To do this, use a knife or scissors to cut it along the edge on all sides, literally in millimeters. Let's try it on. I repeat. The gasket must fit into the syringe with force. I didn’t succeed the first time (I cut off a lot), I had to run for a new gasket. So I advise you to stock up on two or three.
Having squeezed the gasket into the upper part, we take the plunger from the syringe and push it to the very bottom. Like this.

Now insert the needle. Advice. To quickly get into the gasket hole, insert a knitting needle from the other end (blunt) of the needle. It will help you more accurately guide the needle and insert it into the gasket. Like this.

But that's not all. Using the same piston, we push the needle even deeper so that its plastic part fits into the gasket hole and thus becomes clamped.

You can check how stationary the needle is by pressing on it with force. If it’s not tight enough, then you should pull everything out and change the gasket, cutting it smaller than before. If everything is in order, our tool is ready.

The needle diameter is slightly less than 2mm. Length - 2.4 cm. If we had left the spout uncut, it would have been the standard 2cm and you could easily put a cap on it. But I decided to cut it off, because... I also plan to put a stopper on the needle to regulate the length of the needle. The truth is from what... I haven’t figured it out yet. I only have an eraser in mind for now.
The cost of the needle will also pleasantly surprise you. I paid 6 UAH for the syringe and system, and 1 UAH for four pads.
The threader is done the same way - it couldn’t be easier. We cut off 20 cm of fishing line from my husband’s (preferably no thicker than 0.4 mm), fold it in half and press the fold well with a fingernail. All. Ready.
The needle threader is inserted with a fold into the hole on the needle, from where the thread will come out, and pushed to the very end. Those. it should come out all the way from the syringe body. We thread a thread into the loop that appears, pull the free ends of the fishing line (from the opposite end) and pull the thread through the hole. Fsyo... We can embroider.
Author: Svetlaya
I use a Gamma needle. ![]()
The handle has a scale and a screw for adjusting the length of the loop ![]()
Rug using the pulling technique
I really wanted to do something using the tugging carpet embroidery technique and, after looking at a bunch of sites, I settled on this MK. As a result, this is what happened:

So, what I needed (by clicking on the active word, you can read more about the subject):
1. Tools: carpet embroidery needle, scissors, threader, knitting needle, fine marker or carbon paper.
2. Equipment: frame for embroidery.
3. Materials: sketch of the work, threads of 3 colors, fabric 50*50cm.
Progress.
1 . Transfer the selected image to the fabric.

How to do this is an individual question. You can do it through carbon paper (pin the fabric-carbon copy-drawing together), or you can do it on the window (pin the fabric-drawing-fabric together with pins and attach it to the window). How to circle the same question of experiments. Because I translated on glass, but my pen didn’t write. But I found a thin marker that was able to clearly and clearly outline everything.
I want to draw your attention.
A) Always remember that the side you are drawing on and which you will be working with in the threading technique is ALWAYS the wrong side. This means that either the sketch must be made in a mirror image, or it must be applied to the fabric, taking into account the fact that the letters will be embossed in reverse. Those. like this

B) As you know, fabric tends to stretch: less along the warp thread, more along the weft thread. My rug was supposed to be 45*45cm in size, but it turned out to be 45.5*46.5cm. What happened? The design was not applied to fabric stretched over a frame, but rather in a free position, so to speak. Accordingly, when I pinned the fabric onto the frame and it stretched, the drawing began to flow. Those. if you have small details in the drawing or you really need to strictly maintain the proportions, then it is better to apply the drawing to the fabric ALREADY stretched on the frame.
2. Having stretched the fabric onto the frame, we begin the main work with a needle and thread. I noted the following “conveniences”:
It’s best to start pulling the pattern from the center to the edge, i.e., if you look at the photo above, first fill it with white, then the dark blue outline, and then the finishing with the main blue thread;
Much has been said about the fact that the needle must be held strictly perpendicular to the fabric, but even when tilted to the side, the quality of the work, in my opinion, does not suffer;
Puncture density. Here it is better for the craftswoman to choose a more convenient stitch size for herself, making a sample of 5*5cm or a little less. The main influencing factors are thread, buttonhole size and fabric. For me, stitches and an inter-row distance of 2-3mm were sufficient. It could be tighter, but then the thread consumption and, accordingly, the execution time would be longer. By the way, I’ll also note that the smaller the detail (for example, the outline of the letter in some places was only one line), the thicker the loops need to be made. This will make this color more noticeable and clearer among other colors;
Loop height. Initially, I conceived the loops to be 1cm long, which means the needle length was adjusted to 2cm;
Stitch direction. It is advisable to observe it especially on large parts. Below in the photo you can see how the changed direction (from top to bottom to left to right) becomes noticeable in the finished product;

Turn the loop. Of course it looks beautiful when all the loops point in the same direction. But nothing bad will happen if on “winding paths” you twist the frame and accordingly pull it in the way that is most convenient for you.

Rotate the needle. Personally, I noticed for myself that it is easier to prick a needle and thread along the diagonal of the intersecting threads of the fabric (as shown in the photo below on the right side), but then the pattern turns out to be like a herringbone. If you place the needle clearly in the direction of travel, parallel to the threads of the fabric, as in the photo below on the left, then the puncture will be more difficult, but the pattern will not be so “harmonious”.

I don’t know how it is when working with twisted threads, but when working with manually folded ones, I personally could not avoid punching neighboring loops. This is what it looks like in the end.

When A we have an elongated thread, in case B- white threads are threaded into loops of blue threads.
When A We simply use scissors to carefully trim the knocked-out thread to the level of the main mass of threads. When B the work is much more painstaking. Of course, you can leave everything like that and not bother anymore. But in the case of contrasting threads and when we want to achieve “clear boundaries” we will have to work a little with a knitting needle. This is done by using a knitting needle to “pull apart” the blue loops to the right and the white ones to the left. Threads of different colors threaded into each other are carefully released (pulled out) from each other.

As a result, we have a clear boundary.


3. So, we have completed all the work to complete the drawing. Now you can do the inside out. Personally, I cut all the ends of the threads to a length of 1-1.5 cm. I didn’t have time to glue the fabric from the inside out with glue, so I used regular dublin. Having previously moistened it in water, squeezed it well and smoothed it out by shaking it from different edges, put the adhesive side on the wrong side and ironed it. Don't press too hard! With this processing, creasing of the thread on the front side cannot be avoided, but the more we press with the iron, the larger it is. Well, make sure that the thread does not melt (this can be checked on a separate piece of thread).
4. Next we process the edge. Unfortunately, I don’t have photos of the process itself and the final result, but I did everything the same way as described on the Kovrodelkin website. True, on the train it turned out that such a bunch of threads simply did not fit into the needle I took, so I had to sew everything with one thread, and not two, as shown.
Well, that seems to be all. What was my thread consumption? No more than 150g. Even the cornflower blue threads remained a little, almost the entire skein was dark blue, and about a third of the white ones were gone, no more.
If you estimate the cost without taking into account tools and equipment, you will get: threads - 20 UAH. (if you take used ones), base fabric 50*50cm - 7.5 UAH, dublerin 50*80cm - 9 UAH. Total - 36.50 UAH. In a store, this would cost from 60 to 100 UAH.
Carpet equipment: main types
There are two main types of embroidery in carpet technology:
- looped. This is carpet embroidery using a special needle for carpet weaving, when a pattern is created from a series of loops based on the selected pattern. Thick fabric is used as the basis for carpet embroidery. This technique is also called “non-woven tapestry”;
- nodular. A special hook for carpet equipment is used here. Vinyl canvas is used as the basis for knotted carpet embroidery. Knots of short threads are tied on the weaves of the warp, hence the name of the technique.
Now about each type of carpet technology in more detail.
Carpet technique: loop embroidery
Our grandmothers also used this technique of carpet embroidery. Huge carpets were embroidered on cold winter evenings. Then this technique remained forgotten a little, but now it is coming back to life again.
To work you will need:
- thick fabric;
- yarn. Absolutely any yarn will do, but it all depends on what patterns are chosen. It is advisable to take yarn of the same thickness and structure;
- special needle for carpet embroidery;
- pencil for drawing a design on fabric;
- scissors.
Selecting and drawing a picture
You can choose any drawings or patterns for embroidery using carpet techniques that you like. Carpet embroidery will be done from the reverse side, so we will apply the contours of the design to it.
The fabric does not stretch much on the hoop, which it is advisable to choose in such a size that you can see the entire design. After the fabric is stretched, you can apply the design.
A special needle is the main working tool

The carpet pulling technique involves the use of a special needle for carpet embroidery. Its tip seems to be cut at an angle, and inside the needle and handle there is a hole where the thread will be pulled. The cut side will be the front side of the needle, and the straight side, on which there is an eyelet for the thread, will be the back side.
For beginners, it is better to use an automatic needle, where the length of the needle is adjusted and, accordingly, the loops will be the same. As a rule, the kit comes with three replacement needles to easily match different thicknesses of yarn.
During carpet embroidery, the needle is held strictly at the front or side in the direction of embroidering. But the direction of the embroidery itself has absolutely no meaning, the main thing is that the direction of movement of the needle is in the direction of the stitches.
Where does carpet embroidery begin?
After stretching the fabric onto the hoop and applying the design according to the chosen pattern, we begin embroidering.

It is very important to keep the needle perpendicular to the fabric. The thread that comes out of the upper hole in the needle handle should follow your hand so as not to get tangled and create knots.
After watching the video with the master class, you can understand exactly how to thread the needle through the fabric.
After this, the needle is carefully lifted above the surface of the fabric until its tip comes to the surface. We retreat just a couple of millimeters from the already finished stitch and thread the needle into the fabric again. Here it is important to strictly follow the chosen pattern and monitor the position of the needle (strictly perpendicular).
After 5-6 stitches, the protruding tip of the thread, from which the work began, can be carefully trimmed so that it does not interfere. But this must be done very carefully, otherwise all the embroidery will simply unravel.
As the work progresses, stitches will be formed on the side where the carpet embroidery is going on (the wrong side), and loops will be formed on the front side, which will create the pattern.
When the thread runs out or you need to change the color
The thread is running out, and its end is already hidden in the needle handle. In this case, you need to do the following:
- make a few more stitches, then pull the thread out of the needle, pressing the last stitch tightly with your finger;
- cut the thread very close to the fabric, but so that the stitch does not unravel;
- secure the end of the thread with textile glue.
If you need to move to another section of embroidery, even one adjacent to it, you do not need to make a large stitch. We cut the thread and start a new section from the beginning.
Filling in areas of the picture

It is best to start embroidery with large elements, then move on to small details and other elements of carpet coloring with threads.
We select one element, first embroider its outline with a needle stitch by stitch, and then begin to gradually fill the entire area, like coloring pages. To do this, you can use a circular direction of movement, or you can go in lines, or you can combine the technique of making stitches. In the video master class you can look at the embroidery process in more detail.
When embroidering straight lines with a needle, you need to go through two rows of stitches to make the line more even and clear.
As you can see, embroidering with such a carpet technique using a special needle does not contain absolutely any difficulties. To avoid difficulties while embroidering, take note of some recommendations:

The final stage
That's all, our carpet embroidery is ready, all that remains is to put it in order.
Add a little shampoo to warm water and rinse the finished work in it. Strong detergents can have a negative effect on threads.
After this, lay the product on a flat surface and leave it until completely dry.
If during work the fabric becomes crooked from the hoop, you need to smooth it out a little with a slightly heated iron from the wrong side of the work.
Video: carpet needle embroidery technique
Knot embroidery in carpet technique - master class
Nowadays there are entire kits for embroidery using carpet techniques on sale. This set is suitable for beginners, and will also be an excellent gift for those who are interested in needlework. Carpet technique kits allow you to make an original rug, tapestry or pillow with your own hands. As a rule, the kits already include:
- base fabric,
- cut pieces of yarn of the required length, sorted by color;
- special hook (but not always);
- drawing-scheme.
All that remains is to start embroidering as quickly as possible.

But such sets also have one drawback - high cost. You can save money if you buy canvas and yarn separately. In this case, you will need to perform a number of preparatory work (cutting and selecting yarn colors, selecting and applying a pattern to the base). Of course, this will take some time, but it is not that difficult to do. Which method to choose is up to you to decide, just as the result will depend only on your imagination and diligence.
To work you will need:
- a ready-made kit for embroidery using carpet technique or canvas with a large cell or Stramin;
- leftover yarn. Even the smallest balls will do here. The yarn will need to be cut into strips up to 10 cm long, depending on the length of the pile you want;
- hook for carpet embroidery. It is fashionable to use a regular hook, but it is not entirely convenient. The hook, which is used in carpet technology, has a special shape that simplifies the process of tying a knot from the thread after it has been pulled through the canvas;
- embroidery pattern. Here you can use absolutely any pattern for cross stitch, and a cell of carpet canvas should be equated to a cell of regular canvas. When calculating the number of cells, you should take into account that you need to leave a couple of centimeters at the edges for processing.
Preparing for embroidery

First of all, choose the design you like, or you can come up with it yourself. It is advisable that the diagram does not contain too small elements, because they will be practically invisible.
As a basis for embroidery, you need to take a special mesh called stramin. It is sold both in handicraft stores and in construction stores. Stramin is a dense canvas with large cells, which is widely used for making tapestry (in the video you will see what it looks like).
We draw the base into squares, with sides 10 by 10 cells.
The main tool for embroidering carpets using the knotted method is a special curved hook, which can also be purchased at craft stores.
The yarn needs to be cut into pieces from 3 to 10 cm, depending on what kind of pile the future rug should have. You can use absolutely any yarn. The best option is acrylic yarn of medium thread thickness.
Operating procedure

The work will be done on the reverse side of the work, on which the diagram is applied. Watch the video before starting work.
Let's get started:

The result is a wonderful fluffy rug that is indistinguishable from a store-bought Persian rug. You can choose absolutely any shape and size.
Video: master class on embroidery using carpet techniques
Other methods of embroidery using carpet techniques

Carpet cross stitch
In addition to these basic carpet techniques, a carpet can be simply embroidered, in the same way as tablecloths, shirts, towels, napkins, and tapestries are embroidered.
Important points:
- For embroidery in carpet technology, special canvas needles are used, which are blunt at the tip and have a large eye;
- The thickness of the needle should correspond to the thickness of the thread;
- Threads for carpet technology can be very diverse in thickness and characteristics: wool, silk, acrylic, etc.;
- The main rule when selecting threads: they should lie in an even layer, filling the background;
- The thread tension when embroidering should be uniform.
Basic stitches of carpet embroidery
Cross stitch
Long cross stitch
Half cross stitch
Perhaps the most famous seam is the “cross stitch”. By the way, this seam is the basis for other seams in carpet technology.
First of all, in the direction from left to right, you need to make an even row of stitches, like half a cross. The second half of the cross will be performed in the opposite direction in the same way.
The next type of carpet seam is the “extended cross”. Pass the working thread at an angle through one vertical and two horizontal threads of the canvas. The order of work, in this case, is as follows: the working thread is laid in the direction of the seam from right to left, then it is covered in the indicated manner with stitches in the direction from left to right, and after that there is a second row of stitches, but in the opposite direction.
When making a half-cross stitch, you need to choose a working thread slightly thinner than the warp thread. The working thread is drawn horizontally from right to left, and then stitches are laid on top of it in the opposite direction.
Oblique tapestry stitch (first method)
Oblique tapestry seam (second method method)
Extended bias tapestry stitch
“Oblique tapestry stitch" can be done in different ways:
- an oblique stitch is made through two threads of canvas in width, and one in height, which passes between two other horizontal threads, but without overlapping them;
- The stitches are laid diagonally through one vertical and one horizontal thread of the canvas, overlapping the first.
By the way, it is the tapestry stitch in various designs that is very similar to ancient carpet embroidery.
A little advice: when sewing with a tapestry stitch on a hoop, the thread needs to be transferred to the front side from the back. And if you embroider without using a hoop, you need to turn the work over when each row ends and bring the needle out after the last stitch.
To perform an “oblique and elongated tapestry seam”, you need to proceed in the same way as when embroidering a regular one, but take three threads vertically.
It takes just a little effort and patience to create a soft and fluffy rug yourself using carpet techniques. Such an exclusive product will be a wonderful gift for loved ones or will delight you for many years. In addition, the carpet embroidery technique makes it possible to get rid of a huge amount of leftover yarn, which is probably stored in the bins of every needlewoman without use.
Use your maximum imagination, and then you will get a unique masterpiece created with your own hands.
Video: tapestry stitch embroidery
Do you think that only experienced craftsmen can create carpets? Not at all. Recently, carpet needle embroidery for beginners has gained immense popularity. Different techniques, creative patterns and handmade work will make your carpet extraordinary. Inexperienced needlewomen can start by embroidering small paintings or pillowcases.
Beginning needlewoman's kit
If you have just decided to master the technique of carpet embroidery, you need to start with the basics. The easiest way is to buy a ready-made kit, which includes the following tools and materials:
- special canvas with a printed pattern;
- multi-colored yarn;
- needle or hook.
There are two ways to embroider using the carpet making technique:
- needle;
- crochet

The do-it-yourself carpet embroidery needle is not like a regular needle. Its end has a beveled point, and the handle resembles an awl holder. As for crochet embroidery, this technique is more complicated. Some needlewomen often call an embroidery hook a needle in relation to this technique.
Before starting work, you need to learn some features, for example, types of stitches and methods of embroidering pictures. On the front side they always turn out voluminous and fluffy. Now that you understand what rug techniques are, it's time to choose rug patterns.
In the vastness of the global network you will find many schemes for every taste. These can be children's drawings, exquisite paintings or geometric shapes. Such patterns resemble the usual cross stitch pattern. Experienced needlewomen will not notice the difference and can easily calculate the number of stitches.

The first pancake almost always turns out lumpy, so don’t despair. Purchase a special set from a specialty store. It contains tools and materials for work. All you have to do is embroider a small rug.
If you decide to make an exclusive designer product, you need to apply designs for carpet embroidery. You can use carbon paper.
On a note! Carpet embroidery with a needle is done from the inside out, so the design must be applied to the reverse side of the canvas.
Before you get started, review the following tips:
- the stitch should be no more than 3-4 mm;
- on the front side the embroidery should be voluminous;
- when embroidering with crochet, tighten the loops by hand;
- It’s easier for beginners to work with ready-made sets;
- It is better to embroider from left to right, moving from the bottom edge of the product upward;
- Under no circumstances should you skip a single cell of the outline.
The first stitches in your creativity
Let's study the basic technique of carpet embroidery - needle stitch. Everything is very simple. Step by step you will get better at it, and over time it will seem to you that you have been doing this type of creativity all your life.

- special needle;
- embroidery fabric;
- multi-colored yarn;
- scheme.
Step-by-step description of the process:
Advice! First, it is better to embroider the outline of the design, and then gradually fill the inside in rows.

Second option: advanced level
For those who want to make a real carpet, embroidery with a special crochet is suitable. Skilled craftswomen use a device for knitting with yarn. But it is best to take a special tool. In appearance it resembles a crochet hook equipped with a tongue. When pulling the strand, the tongue snaps into place. As a result, a nodule is formed.
On a note! Using this technique, voluminous fleecy products are created.
Required materials and tools:
- canvas with a printed pattern;
- multi-colored yarn;
- special hook.
Attention! The raw edges of the canvas may unravel when working with the fabric. Pre-treat the cut with a basting stitch or machine stitch.
Step-by-step description of the process:

The carpet embroidery technique came to us from the East, where this decorative and applied skill was mastered even before our era. Today, many needlewomen have mastered it at home and embroider stunningly beautiful rugs, panels, sofa cushions, and also decorate bags, accessories and household items.
Features of this embroidery technique
If you want to start embroidering a carpet for the first time, we recommend that you purchase a ready-made kit that will contain everything you need.

And for those who want to show their creativity and realize their own idea for creating embroidery in carpet technology, we recommend preparing the following:
- Special rigid canvas (stramin) with large fibers for embroidering carpets.

- Wool or synthetic threads. For embroidery with loops using a needle, threads are needed in skeins, and for crochet embroidery, ready-made cut threads of the same length, usually no more than 5 cm.

- A diagram of a drawing or a sketch of a drawing.
- Loop embroidery needle or hook.

- Ideally, it is better to have a special embroidery machine, but you can get by with a simpler frame. Some people find it convenient to embroider without special tools.

- You also need to prepare a ruler, scissors, and a pencil for marking.
There are two main carpet embroidery techniques:

You can easily make a needle for carpet embroidery with your own hands from a medical system, a metal tube or a hollow knitting needle, and how to do it, the diagrams in the photo will help you
Scheme for making a needle

Scheme for threading a needle

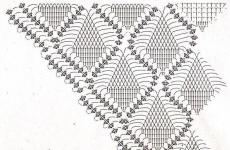
Ideas for such embroidery with patterns
We would like to offer you a selection of patterns for embroidering carpets with a needle or crochet, with which you can make small rugs for your home with your own hands.
- This pattern will allow you to embroider a beautiful rug that will decorate the bathroom, porch and area near the dressing table or chest of drawers. Calculate the scale based on the fiber size of the canvas on which you will embroider.

- Another option for a rug that can be made using a type of embroidery with a needle or crochet. You can also experiment with color by choosing your own threads.

- This carpet pattern will look great in your home, and you can choose the shades to match the furniture, or, conversely, focus on contrast. You can also adjust the length of the pile to get a fluffier and softer carpet, or vice versa, a thinner one. A rug like this, embroidered with small loops, would look good.

- This pattern is definitely better to use for the crochet embroidery technique and focus on the length of the pile. Don't forget, the larger the canvas structure, the larger your finished carpet will be. Try to do the markings in advance, and not “by eye”.

- This is a rather complex multi-color pattern that will help you make a cute bedside rug for your child's room. You can also use this pattern for embroidery on clothing or textile interior items.

- This cute dog will look great on your front door rug and lift your spirits. In this case, we recommend choosing not wool, but synthetic threads for embroidery, because they are more wear-resistant. This pattern can also be used for embroidery on knitted items, for example, to decorate a knitted blanket.

- This shepherd can decorate not only a rug, but also a sofa cushion, and choose the background based on the shades of the interior.

- Little children will enjoy playing on a soft rug with such a wonderful bear, and it is better to embroider it with thick woolen threads using the crochet technique.

- This pattern can be an idea for creating a bedside rug in a baby’s nursery or for a wall panel. You can take similar patterns from cross stitch kits and use them for carpet embroidery on pillows.

- This delicate pattern on a handmade rug will decorate your bedroom or bathroom. It can also be used as a basis for embroidering other interior items or home clothing. For example, a homemade robe with hand-made embroidery will look very nice.

Video with master class lessons of such embroidery for beginners
We offer you a selection of videos with master classes that will help you master the technique of carpet embroidery.
- Carpet needle embroidery technique with loops for beginners.
- A video in which you will learn how to crochet carpet embroidery.
- Video demonstrating machine embroidery of carpets.
- A video for beginners showing carpet embroidery with a needle and forming loops.
- Review of a ready-made kit with a pattern for carpet embroidery.
- Demonstration of using a carpet embroidery kit.
- Video with a master class for beginners on embroidery using carpet techniques.
- Video tutorial on how to perform crochet carpet embroidery for beginners.
- A video with a lesson for beginners that will demonstrate all the stages of embroidery using carpet techniques using canvas for carpet embroidery.
- A video for beginners with a selection of photos and a demonstration of carpet needle embroidery.
We hope we have inspired you to learn this interesting technique. We recommend using the proposed schemes or using. Tell us in the comments what you did and where else you were able to use the carpet embroidery technique.
This calculation is done as follows.
We embroider a square with a side of 1 cm x 1 cm, counting the number of needle punctures and stitches. We take the length of the stitch to be 2 mm or 0.2 cm (we take this value with some margin), the length of the thread consumed for the puncture is 2 cm with a length of the resulting pile of 1 cm.
I got the following numbers: 30 punctures per 1 square. cm x 2 cm = 60 cm thread.
The number of stitches is always 1 less, in this case there are 29.
29 x 0.2 cm = 5.8 cm
Total per 1 sq. cm of embroidery I use 65.8 cm of thread.
Next, you can take a transparent film or tracing paper, lined up into square centimeters, and, applying it to the design you need, calculate the area of the elements you need, and then calculate the length of the threads, multiplying the resulting square centimeters by the length of the thread being used you per 1 sq. centimeter.
To be honest, I have never done these calculations, because I always have a supply of consumables. I recommend using this technique when you have already mastered the technique of carpet embroidery and your stitch length has stabilized.
Textile printed flax size 1m x 50 cm for the bottom of the cover
Sintepon size 50 cm x 50 cm for the bottom of the cover
Contact Velcro tape or Velcro tape, 66 cm long, with which the cover is attached under the seat of the stool.
Since this will be a cover for a stool, I decided that the image of the lips should be there :)
The ZIP archive contains 2 versions of the diagram - color and in contours without filling, which is convenient to print on a black and white printer for redrawing on fabric. You can use any drawing you like, you just need to copy it or redraw it along the contours.
Working hours: I spent on making the case 20 hours. Beginners will need much more time, so if you picked up a needle for the first time, you don’t need to focus on this indicator at all.
The production of the cover is divided into several stages.
I. Making the upper part of the cover (embroidery in the style of needle punch, needle punch)
1. Fabric preparation.
We examine the edges of the linen fabric. For cutting the top part, like any other, it is very important that the fabric has straight edges to avoid skew, uneven cutting and other annoying mistakes. To align the edge of the fabric, you need to select the warp or weft thread along which we will align, carefully separate it from the rest of the threads and remove it from the fabric, gently pulling it in the desired direction.

Let's move on to the next point.
2. Creating a pattern for the upper part of the case.
The pattern is very simple to make. Using a measuring tape, measure the length and width of the stool seat. In my case, the dimensions of the seat are: 31 cm by 31 cm, that is, this is the size of the top part of the finished cover.
The edges of the upper part of the cover will be finished with a 0.5 cm wide loop stitch, which forms a kind of border. We add 1 cm from each edge to make it. In total, we get a square with a side of 33 cm. We draw out the fabric: a square 33x33, step back inside the square 1 centimeter from the edges, draw a square 31x31, getting the size of the upper part of the cover in its finished form; we retreat another 0.5 cm inward from the edges, drawing a square with a side of 30 cm. 0.5 cm is exactly the indentation for the border. All squares naturally have a common center.


The seat of my stool has rounded edges, which in drafting are called fillets. But studying the question of how to build them correctly in this case is devoid of practical meaning, therefore, if your stool also has a rounded edge, I advise you to do the following: take a piece of paper, turn the stool over with the seat down, and trace the rounded corner on the paper with a pencil, aligning the sides of the sheet with stool seat sides. Then round the corner of the sheet, cutting off the unnecessary part along the drawn line with scissors. Then we place this sheet on the fabric and trace the resulting rounded corner, alternately aligning its sides with the sides of the drawn squares. Be careful when moving the paper template: you need to round the corners of each of the three squares, each time using the sides of one square as guides, and not the adjacent sides of other squares!


3. Applying an embroidery design to the fabric.
We select a drawing (in this case it is “Kiss”), outline it with parallel lines at the outermost points so that the drawing is inscribed in a rectangle. We draw diagonals in this rectangle. The point of intersection of these diagonals is the center of the drawing.


As a rule, despite the pressure, the design is not clearly printed on the fabric, so we outline it with a thin marker. I use a disc marker.


4. Tensioning the fabric.
I use a frame loom to stretch the fabric. You can use an embroidery machine that is convenient for you. The fabric should be stretched evenly, without distortions or sagging. This is a very important point. Working with incorrectly stretched fabric leads to rapid hand fatigue and distortions in the embroidery pattern.

5. Preparing the carpet needle for work.
Select the length of the pile for future embroidery. The length of the pile is determined by dividing the distance from the center of the oblique cut of the needle to the plastic handle in half. I decided that the cover would have a centimeter pile, so by unscrewing the clamping screw, I set the desired distance to 2 cm.


6. Insert the thread into the needle.
To embroider lips you need a dark red thread. Take a thread threader. Instead, you can use fishing line or wire, folded in half and freely passing through the needle tube. I use fishing line for this purpose. We put the thread into the threader.


Then we pull the threader through the hole opposite the bias cut.

Thread inserted

7. Embroidery process.
We pierce the fabric with a needle, lowering the needle all the way. Always keep the needle along the trajectory of movement with an oblique cut to the left.


Carefully remove the needle from the fabric and, retreating 1-2 millimeters, make the next puncture. When making reverse movements, always keep the needle close to the surface of the fabric. A common mistake in this technique is raising the needle high above the surface of the fabric during reverse movements, as a result of which the length of the pile is different, and sometimes this can even lead to unraveling of the embroidery.


When making carpet embroidery, first the contours of the drawing are outlined. This allows you to strictly delimit areas of certain colors, so as not to accidentally pierce areas of other shades with a needle. Tracing contours is one of the little secrets, thanks to which your embroidery will always look neat.
Outline the lips. We remember that the oblique cut of the needle should always be directed to the left relative to the trajectory of the hand along the contour of the pattern.
This is what happened on the wrong side.


Then fill the outlined outline with stitches of the desired color. We alternately move the needle between the boundaries of the contour, first up and then down. The trajectory of filling the embroidery element is from right to left.

We embroider the elements (closed contours) of the lips.


Another little secret. When embroidering the background you need to make separate and frequent lines of stitches protruding from the overall embroidered block. I call them speakers lines. When embroidering, I direct them up and down respectively. They ensure that the embroidered background blocks are seamlessly connected.

These stitches also have another purpose: sometimes I use them to create a smooth color transition between shades of thread according to the pattern.
Gradually fill the background with the fabric bounded by the inner square.


Making a 2-color pattern without any tricks allows you to master the initial skills of carpet embroidery.

The border is formed when the edge of the product is sewn with a buttonhole stitch. The edge of the product must be folded twice by 5 mm: the first time the edge is folded half the distance from the outer contour of the product to the contour of the next square. The second time the edge is folded directly to the border of the carpet embroidery.
How to bend rounded corners?
Cutting the fabric everyone angle to the outline of the next square (do not cut the fabric to the border of the carpet embroidery!!! This would be a mistake!) 5 times: twice where the fillets begin, once in the center of the fillet, and then cut the center of each piece of fabric we have already cut.


Next, cut the thread of the required thickness, 2 times the length required for embroidery. I use a thin thread in 6 folds. Fold the thread in half. We insert the thread into a needle with a wide eye using the edges of the thread, not the fold. We make a puncture with a needle at the border with the carpet embroidery, and insert the needle into the resulting loop. This technique of threading a needle is used to secure the thread without knots, so called knotless method of securing thread to fabric.

We pierce the fabric with a needle from the wrong side, pull the needle to the front side, pass it through the formed loop and tighten it. This way we trim the edge buttonhole stitch.


When the thread ends, we fasten the end of the thread again without knots, making a few basting stitches into the area not yet bordered. When the entire upper part of the cover is trimmed with a border, we secure the end of the thread with the same basting stitches, only it must be pulled under the loops of the border on the wrong side.

5.9 Processing the wrong side of the product.
After the border is completed, we proceed to processing the wrong side of the cover. (using the example of another product).
We take PVA glue and dilute it in a plastic glass with water in a ratio of 2:1 (2 parts glue to one part water) on the basis that the finished solution should be 1/3 of the total volume of the glass. If the solution you prepared is not enough for processing, make more.
Using a hard and wide glue brush, paint the underside of the upper part of the cover. Under it you need to put unnecessary fabric in several folds (rags) and several layers of paper (for example, newspaper). The glue solution should not be very liquid, that is, it should not be allowed to flow out from the front side. Apply the solution with a brush very quickly, immediately spreading it over the surface of the back side to prevent complete absorption. Treating the reverse side with a glue solution is a procedure for protecting the embroidery from unraveling, moths and all kinds of mites that do not like glue at all)). This treatment increases the durability of the product significantly.

After the solution is applied, we cover the wrong side with a polymer film (you can use an unnecessary T-shirt bag, cut along one of the sides, with the handles and bottom cut off) and place a load on top, for example, stacks of books. Make sure the weight of the books is distributed evenly by product area. We leave the product in this condition for 2 days. After removing the load after this period, open the product, remove the newspapers and fabric, which will be slightly damp, place it on a dry surface open and wait several hours until the reverse side is completely dry. If you did everything correctly, then the wrong side should be smooth to the touch, the threads should not be felt.
After drying, we glue the back side with non-woven fabric to give it an aesthetic appearance and to have additional protection for the threads from unraveling.

II Making the lower part of the cover
6.1 Creating a pattern
We draw the fabric for the lower part of the cover along the wrong side, having previously folded the edges of the fabric to be cut with the right sides facing each other. We draw 2 squares with a common center: the first with a side of 33 cm, the second with a side of 31 cm. It is obtained if you indent from the outer square inward by 1 cm. These will be seam allowances. To round the corner we use the template obtained earlier. On one side of the pattern, I advise you to leave a seam allowance of another 1 cm: through this side we will turn the bottom part of the cover right side out and carefully stitch it. It is better to have extra seam allowances to avoid unexpected problems.
The sequence of basted parts is as follows: the bottom one is a padding polyester square, then one fabric half of the lower part of the cover lies with the wrong side facing it, then the corresponding parts of the adhesive tape are basted, then the other fabric half of the cover lies with the right side facing them.

6.3 Assembling the lower part of the cover
We sew the properly folded parts of the lower part of the cover along the contour, along three parties. The side where you left an extra centimeter of seam allowance does not need to be stitched - through it the cover is turned right side out. The bottommost layer when sewing is a padding polyester square. To prevent the padding polyester from clinging to the protruding parts of the sewing machine (foot mechanism, etc.), place a larger paper square under it. Sew the parts together with it. After stitching, the paper is easily separated from the cover.
As a result, you should sew 3 sides of the bottom of the cover, sewing three pieces of adhesive tape. We have one piece of Velcro tape basted to the fourth side, which we have not yet stitched.
Turn the stitched part right side out. Check that the adhesive tapes are connected correctly. Baste the open edges of the fourth side, tucking the fabric inward on each side an inch. Stitch them together with the remaining piece of adhesive tape, retreating 2-3 mm from the edge. Iron the resulting part. Quilt it by laying 4-5 lines along one of the sides at approximately equal distances from each other. Sew along the contour of the part at a distance of 3-4 mm from the edge. The end result should look something like this:

6.4 Product assembly.
Since our border is red, take a thin sewing needle and insert a red thread. Carefully sew the top part of the cover to the bottom, hiding the hand seams, that is, laying them between the parts.
You can do it another way: sew small pieces of Velcro contact tape on the corners of both parts, with which they will be attached to each other.
The result of our efforts should look like this: