Knitting elastic bands with a selection of patterns and descriptions. Knitting elastic bands with knitting needles with a selection of patterns and descriptions Rubber band hats with oblique loops with knitting needles
We knit a beautiful hat with kosapi using photos and videos from MK
Knitted hats are the most popular theme for needlewomen. A warm model with your favorite color and pattern will fit perfectly into a fashionable look. A hat with braids is always popular, which is suitable for a girl or girl, as well as for women of any age.
The most important thing is that braids are a universal knitting pattern that goes well with a man’s wardrobe. To get a warm, cozy item, it’s good to watch a video, a master class, or find a description of knitting technology. If pattern
for the first time, we offer a master class on how to correctly perform this drawing. 


Knitting a “braid”
To master this knitting pattern, you should stock up on additional tools. To make the “braid” or “braid” patterns look neat, purchase a special knitting needle. 
With its help you can significantly reduce your work time and get a beautiful pattern. Another nuance - the additional knitting needle is taken one number less than the main ones. If this is not possible, then do not be upset. An ordinary pin will help even a novice knitter handle braids. Especially when you decide to knit a hat with narrow braids. An excellent result will be ensured by:

There are many types of braids. They are:
- simple;
- double;
- triple;
- decorative.
Each of them has its own advantages. For a girl, it is good to knit a hat that is not too bulky. But a women's knitted model with knitting needles will be very impressive with decorative or triple braids. An original solution would be to knit a hat with a gradient. This is the name given to the smooth transition of a knitted fabric from one color to another shade. 
There is a detailed description for each type of pattern. Experienced knitters post their own videos or master classes to help beginners master the basics of knitting and popular patterns. Let's start knitting.
Examples of patterns for knitting braids and plaits 


Video: Argentine wool hat with braid pattern
A simple master class on knitting a hat with braids
The first step is to take the main measurement - head circumference. Considering that the pattern tightens the canvas a little, add a couple of centimeters to the result.
The number of loops is calculated using the usual method.
Cast on the loops on the knitting needles and knit an elastic band. 
Having knitted the required length, move on to the pattern. Divide the loops into knit stitches (for braiding) and purl stitches (for dividing). Continue knitting the length required for the height of the hat. 
The next step is to make decreases. In order not to disturb the pattern, you need to decrease the purl loops. In this case, our “braids” will converge. 
When there are no more than 10-12 loops left on the knitting needles, they need to be pulled together. Now all that remains is to make and sew on the pompom. If making this element is difficult, watch the corresponding video or master class. 
Video: Hat with a braid pattern
We knit a beautiful hat with braids according to the video tutorial
The sequence of work will be the same. Measurements are taken - head circumference and length of the product. For knitting take
and yarn of appropriate thickness. 
Knit a sample with the selected pattern and calculate the knitting density. Cast on the required number of stitches with knitting needles and knit in the round with an elastic band. Having knitted the required length, move on to the pattern. Knit according to the pattern or take a description that indicates one fragment (rapport).
The first decreases are made on the purl stitches when the knitted hat is almost the desired height. Then they continue to decrease on knit stitches, and in the last row you need to knit all the loops in twos. The loops remaining on the knitting needle are pulled together and the thread is secured on the wrong side.
Women's hats are also decorated with pompoms. This fur element looks original.
The next master class will be devoted to knitting a hat for a girl. To give the knitted hat a beautiful texture, add pearl knitting to the chosen type of braid.
The model for women is knitted in the round using knitting needles on fishing line or flagellum. 
First, the head circumference is measured and the required knitting density is calculated.
After knitting, the elastic bands are transferred to the pattern. Calculate the number of braids that fit on the canvas and make adjustments. If necessary, add or reduce the number of loops (it is better to add).
Knit the required height of the hat and begin decreasing as in the classic version. For the baby, you can additionally knit a bottom cap, which is sewn on from the bottom. This is done after the loops on the top are completely closed. The bottom hat is made in stocking stitch, then sewn to the main one and the product is decorated with braids with a fluffy pompom.
A very useful video for beginners will help you knit a hat with a “braid” pattern.
Knitting a hat from MK photo with description


Comments
Related posts:
 Booties on two knitting needles: step-by-step master class in photos and videos
 Knitting a hat with earflaps using photo and video master class
Almost every job involves the use of a so-called “rubber band.” It is convenient for processing the edges of sweaters, sleeves, dresses, making voluminous and warm collars, hats and scarves. Surely, you are already familiar with the simple options 1 x 1 and 2 x 2, so today we will master an unusual knitting pattern with elastic bands and a description of which is given below. So, how to knit elastic bands with beautiful patterns for beginners for all occasions?
Knitting French rib for beginners
This elastic band is reminiscent of the “corrugated” technique and, despite its simplicity, is quite different from the 1 x 1 and 2 x 2 we are used to. It can be used when finishing skirts and dresses.
Schematic illustration
The number of loops is a multiple of 4 + 1 for symmetry.
For the sample, we cast on with knitting needles the number of stitches, cr. 4 + 1 + 2 cr. p. (in our case, 31 p.).
1 p.: *2 l.p., 2 i.p.*, from * to *, 1 l. P..
2 p.: *2 i. p., 2 l. p.*, from * to *, 1 and. P..
3 p.: start repeating from the 1st p..
Unusual elastic band with oblique loops

This treatment not only has a decorative effect, it is quite practical - elastic and springy, such an elastic band is suitable for processing the edge of a hat, sweater, jacket or dress.
We use knitting needles to cast on a number of stitches that are a multiple of 5 (in addition to the edge stitches).
Important! Our pattern consists of an odd number of groups of 5 loops. If you decide to knit a product with an even number of “fives”, make a shift by 1 stitch.
First cr. We remove the p., we knit the last one and. P..
1-2 pp.: *1 l. p., 1 i. p.*, from * to *.
3 p.: *skipping l. n., put in sp. into the hole below and. p., pull out the thread, yarn over, 2 p. on the left sp. we knit behind the back wall *, from * to *, l. P..
Repeat 3-4 pp. for the pattern.
Oblique elastic band 3 x 3

This double-sided pattern is universal and is also suitable for finishing the edges of products.
For the sample, we use knitting needles to cast on a number of stitches that is a multiple of 3 + 2 edge stitches, then follow the description.
1 rub.: *3 l. p., 3 i. p.*, from * to *.
2 r. and all even lines: according to the pattern - l. p. over l. p., i. n. over i. P..
3 r.: r.: 1 i. p., *3 l. p., 3 i. p.*, 3 l. p., 2 i. P..
5 rubles: 2 i. p., *3 l. p., 3 i. p.*, 3 l. p., 1 i. P..
7 rubles: *3 i. p., 3 l. P.*.
9 rubles: 1 l. p., *3 i. p., 3 l. n.*, 3 i. p., 2 l. P..
11 rubles: 2 l. p., *3 i. p., 3 l. n.*, 3 i. p., 1 l. P..
RUR 13: repeat from RUR 1..
Converging elastic band for beginners

It is rather an elastic, well-stretchable fabric, suitable for knitting hats and scarves.
Schematic illustration

1-2 pp.: regular rubber band.
3-4 pp.: shift the pattern by 1 p. (see diagram), continue as usual.
5 p.: again shift by 1 p. and continue in the same way until the desired length of the product.
Depending on which direction you shift the drawing, the diagonal will go in that direction. If you need to knit a pattern like in the picture, combine both patterns..
Bamboo

Diluted with garter stitch, this elastic band turns out to be quite elastic. It is used for knitting hats, scarves and sweaters.
Schematic illustration

1 p.: *2 i. p., 2 l. p.*, from * to *, finish 2 and. P..
2 rubles: 2 l. p., 2 i. p.*, from * to *, finish 2 l. P..
We alternate these two rows to create the desired pattern.
Elastic band for beginners

The pattern repeat is 5 points: 2 and. p. and 3 l. p.. To get a symmetrical pattern, we should use knitting needles to cast on a number of stitches that is a multiple of 5 + 2 symmetry stitches + 2 edge stitches..
1 rub.: 1 cr. p., *2 i. p., 3 l. n.*, 2 i. p., 1 cr. n. as i. P..
2 r. and all even pp.: according to the pattern, 1 cr. p., *2 l. p., 3 i. p.*, 2 l. p., 1 cr. n. as i. P..
3 rubles: 1 cr. p., *2 i. p., right sp. add between 2 and 3 liters. p., pick up the working thread and pull out a new p., 1 yarn over, knit 3 l. p.vm. behind the back wall*, 2 i. p., 1 cr. n. as i. P..
4 rubles: 1 cr. p., *2 l. p., 3 i. p.*, 2 l. p., 1 cr. n. as i. P..
Repeat 3-4 pp. for drawing.
Three out of three

This rubber band is very similar to the previous one, it differs in that in the 3rd p. 3 l. We knit together. Rapport is 5 + 2 symmetries + 2 cr. P..
“Three out of three”: enter sp. immediately in 3 liters. p., pick up the working thread with knitting needles and pull out 1 stitch as k.. Then pick up the working thread on the other side, creating a yarn over on the sp., near the stitch already received..
Scheme 1, 2 and 4 pp. like the rubber band “spike”.
3 rubles: 1 cr. p., * 2 i. p., 3 l. p. we knit them three *, 2 and. p., 1 cr. P..
Repeat 3-4 pp. to the required length.
Norwegian gum

It is slightly different from the 1 x 1 we are used to: in this case we use the “under the eyelet” technique, which makes the knitted fabric more fluffy and elastic. This knitting is suitable for fluffy scarves and snoods.
Number of p. cr. 2 + 1 p. symmetry + 2 cr. P..
1 rub.: 1 cr. n., *1 l. p., 1 i. p.*, 1 l. p., 1 cr. n. as i. P..
2 rubles: 1 cr. p., 1 i. n., *1 l. p., 1 i. p.*, 1 cr. n. as i. P..
3 r. and all further pp. we knit “under a loop”: L. p. – “under a loop”, and. p. - in the usual way. For knitting l. p., right sp. we start not in the point on the left sp., but in the point located under it (the point of the previous row).
Corrugated


This two-color knitting pattern turns out to be quite soft and elastic, so it is ideal for any winter clothes and accessories. It is knitted only on circular sp., since during the work we will move the knitting, and not turn it, as on regular sp..
Scheme

Important! This description assumes that cr. p. at the beginning of the river It is not removed, as usual, but is knitted, as the diagram shows.
For the sample, we cast on an even number of stitches with knitting needles..
1 rub. (green): l. P..
2 r. (grey)? 1 l. p., *knit 1 l. p. for 1 rub. below, 1 l. p.*, do not turn, but move the p. to the other side of the sp..
3 r. (green): 1 and. n., *1 i. p., 1 i. p. we knit for 1 r. below*, 2 and. p., turn the knitting.
4 rub. (gray): *1 and. p., knit 1 and. p. for 1 rub. below*, 1 and. n., move n. to the other side of the back..
5 rub. (green): 2 l. p., *knit 1 l. p. for 1 rub. below, 1 l. p.*, knit 1 l. p. for 1 rub. below, 2 l. p., turn.
For the drawing, repeat from the 2nd row..
Fantasy

Scheme

1 p.: * 2 i. p., 2 p. sn. (thread before work)*, from * to *.
2 p.: * 2 i. p., 2 l. n.*, from * to*.
We alternate 1-2 pp..
With tourniquet

Scheme

1, 3, 5, 13, 15 and 17 pp.: 1 i. n., *1 l. p., 2 i. p.*, from * to *, 1 and. P..
2 r. and all even pp.: along the loops - l. p. over l. p., i. n. over i. p., yarn over = i. P..
7 rubles: 1 i. n., *1 i. p., 2 l. p. change place from 1 and. n. to the left, slave. n. behind, knitting 1 and. p., 2 l. p., 1 i. p. swap places with 2 l. n. to the right, slave. n. behind, 2 l. p., 1 i. p., 1 i. p.*, from * to *, 1 and. P..
9 rubles: 1 i. n., *1 i. p., change 2 l. p. for 2 l. p. to the right, knitting all p. knits., 1 and. p.*, from * to *, 1 and. P..
11 r.: 1 i. n., *1 i. p., 2 l. p. swap places with 1 and. n. to the right, slave. n. behind, prov. 1 i. p., 2 l. p., 1 i. p. swap places with 2 l. n. to the left, slave. n. behind, prov. 2 l. p., 1 i. p., 1 i. p.*, from * to *, 1 and. P..
Flagella

Scheme

1st row: *1 st. with N out., 1 l. p.*, from * to *.
2, 4, 6, 8 and 10 pp.: *2 p.m. l. crossed, 1 st. with N out.*, from * to *.
3, 5, 7 and 9 pp: *1 st. with N out., 2 p. inm. persons cross.*, from * to *.
11 r.:* 1 st. with N out., 2 p. inm. persons., 1 p. sn. with N out., 2 p. inm. persons., 1 p. sn. with N out., (2 p. vm. l., p. together with N we remove on the auxiliary sp. before work, we transfer the next st. to another auxiliary sp. for work, the next st. together with N wire . as l. p., p. from the 2nd sp. together with N, as p., knit from the 1st sp. n. with N and., 2 p. vm. l., 1 p. sn. with N and., 2 p. vm. l.*, from * to *.
Elastic band with medallions

2 r. and all even rows: according to the paragraph of the previous row, above the l. p. – l. n., above i. p. – i. p., N = i. P..
7 rubles: 1 i. n., *1 i. p., 2 l. p., change 4 p. 2 to 2 to the right, 2 and. p., replace 4 p. vl. 2 by 2, 2 l. p.*, from * to *, 1 and. P..
9 rubles: 1 i. p., *replace 4 p. 2 with 2 vm., 2 p. vm. ex., 1 N, 2 i. p., 2 p. vm. vl., replace 4 p. 2 with 2 vl., 1 i. p.*, from * to *, 1 and. P..
11 r.: 1 i. n., *1 i. p., 2 l. p., 2 i. p., 1 N, 2 p. vm. ow., 2 i. p., 2 p. vm. ex., 1 N, 2 i. p., 2 l. p., 1 i. p.*, from * to *, 1 and. P..
13 rubles: 1 i. n., *1 i. p., 2 l. p., 2 i. p., 2 p. vm. ex., 1 N, 2 i. p., 2 p. vm. ow., 1 N, 2 i. p., 2 l. p., 1 i. p.*, from * to *, 1 and. P..
15 rubles: 1 i. n., *1 i. p., replace 4 p. 2 with 2 vl., 1 N, 2 p. vm. ex., 2 i. p., 2 p. vm. vl., 1 N, replace 4 p. 2 with 2 vr., 1 i. p.*, from * to *, 1 and. P..
17 rubles: 1 i. n., *1 i. p., 2 l. p., replace 4 p. 2 with 2 vl., 2 i. p., replace 4 p. 2 with 2 vpr., 2 l. p., 1 i. p.*, from * to *, 1 and. P..
A selection of rubber bands patterns


The elastic band described is good not only for hats. It can also be used as a finishing material for various outdoor knitwear.
Technique for knitting a beautiful elastic band.
We cast on loops in multiples of 5 (except for edge loops). It should be taken into account that the sample contains an odd number of “fives”, and the entire description is focused on this number. If you have an even number of such groups, then you will need to shift by one loop.
Therefore, it is better to first knit a sample (there are 17 loops in the example) to understand the pattern, and then perform it on your product. We remove the first edge without knitting, we knit the last one purl.
Progress
1. The first and second rows are elastic *l, i*.
2. Having skipped the front stitch, we thread the knitting needle into the hole below the purl loop,

 pull out the thread.
 3. Yarn over.
4. Knit two loops on the left needle.


5. We continue the pattern from point 2 to point 4 for each pair of loops, the last one is knitted.

6. Turn and knit rapport *2 knit purls together, knit 1*,

 1 purl.
7. Continue with step 2.

8. The entire sample looks like this:
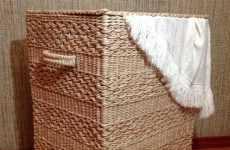
When knitting a beautiful elastic band for a headdress, the hat itself can be knitted in any way; here the main decoration is the elastic band. The rim can be made even wider than in the example. The hat does not need to be overloaded with details, so it is better if its fabric is even, then the charm of the elastic itself, which turns out to be voluminous and quite thick, is not lost. And here is a video MK from YouTube by master Lina Yartseva.
Braids are very popular this winter! Hats with braids, snoods, scarves, even mittens: everything with braids and arans! And color! If you like a gradient, then for the hat you need to take yarn as thin as possible in 3 colors in order to make a smooth transition from one color to another. We knit in several threads. The transition is carried out by gradually replacing a thread of one color with a thread of another color.
We will need circular or sock knitting needles No. 3 (for the elastic, it should be knitted more tightly) and No. 4, a marker to indicate the beginning of the row.
The thicker the yarn and knitting needles, the fewer braids there will be in the hat. In my opinion, a hat looks more interesting when there are more braids.
How to knit a braid.
This hat is knitted with braids according to this pattern. The braid consists of 12 loops. The number of purl loops before and after the braids can be adjusted. You can knit without any purl stitches between the braids. This pattern is called differently: royal braid, braid with shadow, braid.

Hat with braids, description of knitting.
Knit a sample. It must be said that the braids greatly tighten the fabric, so for the elastic we will cast on a smaller number of loops, and then we will add loops for the braids. The sample was knitted, washed, and dried flat. Now we count how many loops you need to cast on. Measure your head circumference. If you knit a hat that fits tightly to the head, then subtract 3 cm; if it is looser or you knit a spandex thread, then there is no need to subtract.
Decided on the number of loops. Remember that the number of loops must be even if we knit with an elastic band of 1*1, and divided by 4 if we knit with an elastic band of 2*2. We cast on 1 more loop so that. We knit an elastic band, knit 1, purl 1. or k2, p2 6-7 cm or 12-15 cm if the hat has a lapel. A hat with braids will be warmer if you knit the lapel.
Next we will knit the pattern. To do this, we make increases and switch to larger knitting needles. If I cast on 96 loops on the elastic band, that’s 8 braid repeats, then I’ll add 1 more repeat (12 loops) and between the braids 1 purl loop on both sides (more is possible) +18 loops. Total: 96+12+18=126 loops. Now we knit according to a pattern of approximately 20 cm.
We make decreases in the crown.
Row 1: *P1, knit 2 together, knit 1, knit 2 together, knit 1, knit 2 together, knit 1, knit 2 together, knit 1, purl 1* Repeat ** 9 times
2nd row: knit 2 purl stitches together, knit knit stitches
3rd row: We knit a braid from 9 loops: where there were 4 loops, there will be 3 loops
Row 4: knit according to the pattern (all knits)
Row 5: *2 together, knit 1, k2 together, k1, k2 together, k1.* Repeat ** 9 times
Row 6: knit according to the pattern (all knits)
Row 7: braid of 6 loops (2 loops each)
Rows 8 and 9: knit according to the pattern (all knits)
Row 10: 2 stitches together until the end of the row
Row 11: braid of 3 loops
Row 12: 2 stitches together
Row 13: knit 1, knit 2 together until the end of the row
We tighten the remaining loops on the needle, cut the thread, and hide the tip. We send it to the WTO.
You can shape the crown in another way: We close each braid with wedges on both sides (you will have 9 wedges). We decrease as follows: we knit 2 loops together with a slant to the left, 10 knit stitches, then again 2 knit loops with a slant to the right, and so on until the end of the row. In the next row we decrease again in the same way until 2 stitches remain from each wedge. We tighten it with a thread and the braided hat is ready.
Sew on the pompom. To prevent it from dangling, we sew its ends at a distance of about 5 cm from each other.
Braided hat and snood.

Size: 53-55
Yarn: BBB full in two threads
Color: 409
Knitted in the round, without seams.
Knitting needles: hat - No. 6.5; snood - No. 8
I cast on 60 loops for the hat, after 14 rows with a 1x1 elastic band I added 4 loops (every 15 loops), for multiplicity - 4 reports of 16 loops. Knit to the required length (mine is 21 cm). Next, form the crown (4 cm), and close the loops.
Hat height 25 cm.
For the snood I cast on 76 stitches, 2 rows with 1x1 rib, and then stockinette stitch with elements of the hat pattern.
I finished with 2 rows of 1x1 ribbing and closed the edge with a needle.
Snood dimensions: width 28 cm (folded), height 38 cm.
Consumption: approximately 7 skeins
Pattern:

Option No. 3

An original hat with seven braids.
To knit it, you will need NAKO Nakolen yarn 100 g / 210 m, No. 5 circular knitting needles with a shortened fishing line.
Description
We will knit without a seam from the bottom up.
We cast on 81 loops, close. There are 80 loops on the knitting needles. We knit with an elastic band * 1 knit crossed, 1 purl * 7 rows (a different number is possible).
In the next row we add loops for braids. We will knit all the braids, starting with the front one, in the middle we will knit 2 from one loop. That is, the first braid of 4 loops: the front one, no longer crossed, 2 knit ones from the purl loop, the front one. The second braid of 6 loops: 2 knit, 2 knit from one, 2 knit. Next we knit according to the pattern for 40 rows.
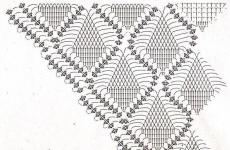
How to knit braids with knitting needles diagram

Now we form the top of the head. Decrease 6 stitches evenly in each row. First, one at a time in intervals of 5 purl loops and in garter stitch, then in wide braids, loops in the middle, then in narrow braids. Pull the remaining 6 loops, cut the thread and hide the tip inside the hat.