Getting ready for Easter with your own hands. DIY Easter crafts: a guide to master classes. Decorative Easter egg decorated with paper
Easter is coming very soon, and children love it very much. Firstly, because this holiday is very tasty and bright. On this day, the tables are always full of various delicacies - these are soft buns that melt in your mouth, sunny cheesecakes, and much more. And of course, we haven’t forgotten about, which you can use to fight and win tournaments in this simple activity.
This holiday also becomes memorable because many people want to do and make some kind of holiday craft with their own hands. And once you get the hang of it, even a few. These include baskets for eggs, eggs themselves, various stands, cute figurines of chickens and Easter bunnies. And also postcards.
Kids love to make different things from paper and various scrap materials. If their mother, grandmother, or older sister, or maybe even their father or older brother helps them, then they can do this for hours.
Crafts are now made in kindergartens and schools. And if in the garden, kids take their first steps under the guidance of a teacher, then in schools they even give homework assignments to create something for the holiday with their own hands. And then mothers begin to look for something interesting and original to do.
In today's article we will look at various ways to make various cute little things that can be made quickly and easily. Just a little perseverance, and your hands will make a cute craft that you can give to your family and friends, as well as congratulate teachers and educators with its help.
It will take no more than 5 minutes to make such a simple and at the same time necessary and beautiful egg basket. It will be made in the origami style beloved by many.
Any student can cope with this task. It just takes a little effort and perseverance. But what a great holiday gift you can make.

We will need:
- sheet of double-sided colored paper
- stripe in contrasting color
- scissors
Manufacturing:
1. From a rectangular sheet of paper, we need to cut a square. To do this, fold the sheet diagonally, connecting the two edges. It looks like two triangles are formed, folded together.

2. Cut off the excess piece of paper.

3. Expand the square. Now we will need to tuck all the corners to the center. There is no need to rush; all newly obtained triangles should be the same size and accurately connected at the central point.

Each internal figure folded into a triangle, and the overall result was a double square. We turn it over to the other side, that is, with the curved ends down.

4. The next step is to fold the edges up again, connecting them in the center.

You should end up with triangles, but with a cut in the middle.

5. Form the bottom of the paper basket. To do this, bend each corner to the opposite edge. Iron the fold line very well.

You should get a figure like this.

6. Turn the workpiece over again.

Roll each of the 4 squares into a triangle.

7. Now let’s give the workpiece the appearance of a basket. To do this, lift each corner up and bend it to form a three-dimensional shape. Then slightly lift the edges to form a box inside.

We iron the inner seam along the perimeter of the square with our finger to more clearly define the shape.

8. Now we need to make a handle. To do this, take a prepared strip of contrasting paper and cut a strip 1 cm thick. To make the handle stand out, it can be carved. To do this, you will need to cut the strip not with ordinary scissors, but with curly scissors.

9. Coat one side with glue and stick it onto the remaining red paper on one of the long edges. Cut a long strip with a total thickness of approximately 1.5 - 2 cm.

10. Inside the basket, or rather on its wall, there is a slot where you can insert the handles from the basket. And to create a more durable fastening, it is better to lubricate the edges with glue.

This will make it easier and stronger to hold on. After all, we will put an egg in the basket.

11. The basket can be further decorated. To do this, cut out small oval circles and paint them, just like you paint eggs. Glue on the bases of the handles and on the sides.

This is such a beautiful craft that resulted. You can put a painted egg in it, or something else, such as candy or cookies.
Easter craft from cotton pads for kindergarten children - easy and quick
Any child who knows how to hold scissors in their hands and draw faces can make this craft as a gift for their parents. The craft is original, very beautiful and uplifting.

And it’s very, very simple to do.
We will need:
- cotton pads
- a piece of bright fabric
- bow
- small plastic spoon
- felt-tip pen
Manufacturing:
1. Draw a perky face on the convex side of a regular white plastic spoon.
2. Cut long ears from cotton pads or pieces of white felt. Glue liners of a bright contrasting color into the middle, cutting them out of fabric.
3. Glue cotton pads on both sides of the spoon handle, thereby forming a body. Glue on the bow.
That's it, our bunny is ready.
To decorate a gift, plant grass in a bowl in advance. In a week she will grow up so beautiful and green. Stick the end of the handle into the ground, and the gift is ready!

It looks absolutely amazing. I can’t even believe that a small child could make such a craft.
Original craft made from felt and thread “Easter Bunny” (for students of grades 2 and 3)
You can make such a cute rabbit from threads and felt.

After reading the description, you will be surprised how easily this can be done. So get your materials and tools ready and let’s get started. And if you encounter difficulties, then ask your mother for help.
We will need:
- bright thick threads for knitting
- chenille wire
- eyes
- scissors
- hot melt adhesive
- cardboard
Manufacturing:
The technique for making such a cute toy is based on the ability to make pom-poms for hats. And if you know how to do this, you can do it without difficulty. And if you don’t know how, then learn to do two things at once.
1. To make a pompom, we need a piece of cardboard. From it you will need to cut out a round shape like this with a notch. To make the shape more durable and not bend, you can make it double by cutting out two templates. Their size should be 11 cm in diameter, with an inner circle of 3 cm.

2. Prepare thick, bright threads for knitting. Starting from the middle of the mold, wind the threads around it.

3. Cut them into two equal parts along the cardboard line.

The result will be such a fluffy preparation.

4. Then cut a piece of thread 30 centimeters in length, and insert it between the cardboard blanks and tie it tightly. Then remove the cardboards.

5. Trim the resulting pompom by aligning the threads to the same size. Cut off any remaining tail.

6. Cut out the paw parts from felt. To do this, we will need two pieces of material measuring 4x6 cm. Cut two ovals from them. Glue them with hot glue.

7. For the ears we will need more felt, two pieces measuring 6x2 and one strip of another, lighter color, 7x1.5.

From two strips of dark color, cut out two pointed ovals, giving them the shape of ears.

Fold the white strip in half and cut out the inside of the ears from it.

Apply glue to one of the ends and fasten both parts to make the ear voluminous.

8. Spread the threads on the pompom and glue the prepared parts. Use glue to glue on the eyes. They are purchased from us.

9. Cut the chenille wire into three equal parts.
Chenille wire is wire wrapped in lint. It is fluffy and bends perfectly.
We will make antennae from it. After cutting it into pieces, connect it in the center and twist it relative to each other so that it holds. Glue onto the pompom.

10. Cut out a round piece from felt that will be the spout. Glue it.

Let the toy dry. Everything is ready and very beautiful!
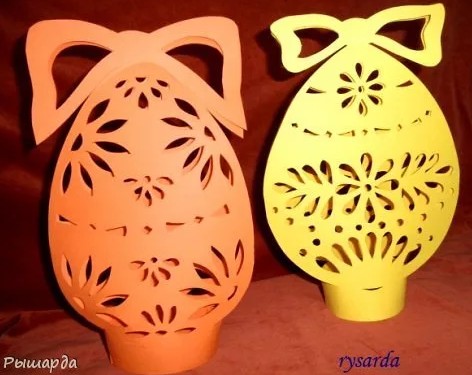
Easter egg using paper quilling technique for a school competition (master class)
And such a chic egg can be made using the quilling technique. With its bright and colorful appearance, it will certainly attract the attention of a strict jury, and they will linger near it for a long time, admiring its beauty. And maybe they will be awarded first place for this work.

This work requires accuracy, attention and a desire to achieve results. And then everything will certainly work out.
We will need:
- quilling paper
- PVA glue
- glue brush
- scissors
- pen refill
Manufacturing:
1. First, we need to stock up on eggs. This may be a product made of plastic or other material. But if this is not the case, then you can use just a hard-boiled egg for the mold.

You need to stick a thin strip of paper on it in the center, wrapping it around the egg twice. Glue the edges with glue.
In order for the glue to better hold the elements together, pour a small part of it into a mold, or simply onto a piece of cardboard. It will thicken slightly and will glue faster and better.
2. Also prepare paper. Ready-made quilling kits are sold. Today we have prepared a set of 3 mm thickness. This size will be ideal for a small egg, and the craft will look neater.

If you can’t find a set, you can buy double-sided colored printer paper and cut it into thin strips of the desired width and the same length.
3. First, you need to twist the blanks from strips of paper. To do this, take one of the strips and coat one edge with glue, then carefully screw it onto the rod. At the same time, try to ensure that the loops do not fall off and are positioned strictly one above the other. The more accurate the workpieces are, the more accurate the final result will be.

For one workpiece, wind one strip of paper.

4. Then remove the curl, put it on the table, and let it unwind a little to make it look more beautiful. It will also be easier to make leaves and petals from such a blank.

Place each subsequent workpiece on the table next to the previous one and allow it to unwind to an equal size. When this happens, fix it with glue, covering the edges.

Think over the design and colors. That is, how and in what color scheme you will get the craft.
5. We begin to decorate the egg from the center, namely from the base that we have already glued earlier. You can glue the blanks in the form we prepared them. Or you can give them the shape of a leaf. To do this, take the workpiece from both sides, stretch it to the sides and lightly press the edges to form a corner. You will get a figure like this.

Glue the first one onto the green strip of the base, then apply glue to the area next to it and the side of the first piece, glue the second one next to it, then the third one, and so on in a circle until the very end.

Let the first row dry thoroughly. To dry, it is better to place the egg on a stand. A cap from any plastic bottle will do for this.

6. Then move on to the second row. And while the first one is drying, we begin to twist the blanks for it. Choose a different contrasting color for this. We also give them the shape of a petal. To do this, squeeze the edge of the circle only on one side.

7. Place the second layer not in a row, but through one green leaf. Glue to the side of the leaves. Align so that the egg shape is maintained. And let it dry completely again.

8. In the meantime, while our beauty dries, roll up blanks of a different color. And give them the shape of leaves again, pressing them on both edges. Then fill in the empty spaces between the pink petals.
Then twist more circles and stick them next row. Give each row the opportunity to dry. And you can also fix them with rubber bands.

9. For the top, take a different color, and twisting the rounds, fill the empty surface with them.

Let the glue dry completely. Then carefully remove half of the craft from the egg.
10. But first you need to draw the tops of the lower half on the egg with a felt-tip pen. So that we do not make a mistake with joining the parts at the last stage.

While the first half was drying for the second, we had already prepared leaves, petals and circles. And by analogy with the first part, we repeat the same thing. You can use the same colors, or you can make them different and in a different order.

11. After drying, remove this half and glue both parts.

12. Then we make a stand and place our beauty on it.

But really, look how beautiful the egg turned out! “Live” it looks even more attractive.

Don't be afraid that you won't be able to repeat the result. The most important thing is to have patience. If it doesn’t work the first time, then go back to the stage where the error occurred. Fix it and everything will go swimmingly.
And there is one more small piece of advice. If you are making a quilling-style craft for the first time, then wrap the egg in cling film. And when you make the first part and fix it with glue, the film can be removed. The same can be done with the second part.
This will make fixing the parts easier.
Video on how to make a foamiran basket for decorated eggs
Working with a material such as foamiran requires accuracy and perseverance, especially when you make any small parts from this material. These are usually flowers and leaves. If you want to make them look like real ones, then in addition to careful cutting, you also need to diligently decorate every small element. Then combine them all into one composition.
And today’s craft is much easier to do. Although it also requires diligence and accuracy. This video shows how to make an Easter basket from foamiran. A beautiful pattern and accuracy in cutting out the pattern - and success will be guaranteed to you.
And if you also decoupage eggs using napkins and place them in a basket, it will be so beautiful that it will be difficult to look away.
If you make such baskets a little smaller, and put 2-3 decorated ones in each, or , then it will be nice to go on a visit with such a gift and present it. The recipient will be delighted with such beauty.
And the main thing is that even children in grades 2-3 can make such a craft, not to mention older children. Of course, younger children can make such a basket with the help of their mother or someone older.
DIY holiday card is easy and simple
This card is also easy to make yourself. Especially if you have a couple of ready-made felt figures. Or they can be replaced with cut out paper figures on the appropriate theme.

A postcard with good wishes will be a welcome gift for Easter.
We will need:
- double-sided colored cardboard
- contrast colored paper
- ribbon
- two felt figures
- double sided tape
Manufacturing:
You can choose the size and shape of the postcard yourself. And we will make it in the shape of an egg.
1. Cut out a folding egg shape from double-sided colored cardboard so that you get two halves on the spread. Subsequently, you can write a congratulatory text inside.

2. Then cut out a slightly smaller egg shape from contrasting paper.

3. Wrap it with ribbon crosswise.

Tie a beautiful bow on the front side. It is desirable that the color also differs from the main color of the postcard.

4. Attach double-sided tape to the wrong side of this part on four sides.

And glue the detail to the top of the future postcard.

5. Now all that remains is to glue the felt figures and the card is ready.

She turned out so beautiful!

Inside you can write a congratulation for the person to whom it is intended.
DIY Easter crafts made from pasta
If you want to make a beautiful and original thing for the holiday, you can make it from ordinary pasta. You get true pleasure and satisfaction from the very process of making this or that craft. Because the end result always amazes with its exquisite beauty.

Recently, some works have already been elevated to the rank of art. They make tea sets, luxurious vases, and formal candlesticks.
However, children do not lag behind, and also make simple, beautiful vases, coasters and decorate eggs for Easter.
To make any product, different execution techniques are used. Balloons are widely used. They are inflated to the desired size and then decorated with pasta using glue. After the glue has dried, the ball is pierced and removed. But the shape given from the pasta remains.

The second way is when using dishes. For example, a cup, saucer, or bucket. It all depends on what shape you would like to get in the end. The dishes are wrapped in cling film, and the future product is formed on it.

Then, when the product is completely dry, it can be removed from the used dishes.
Sometimes the product is left in the same form as it was made, but most often it is painted in various colors. Gold and silver colors are especially welcome in coloring.
Flour products of different formats, sizes and patterns are often used.

This allows you to create simply gorgeous masterpieces.

It's very nice to make such a beautiful thing. It would seem that what is wrong, some ordinary pasta?! But look how beautiful it turns out. It will be a pleasure to decorate your home for the Bright Holiday with such souvenirs, as well as make a present to your friends or loved ones.
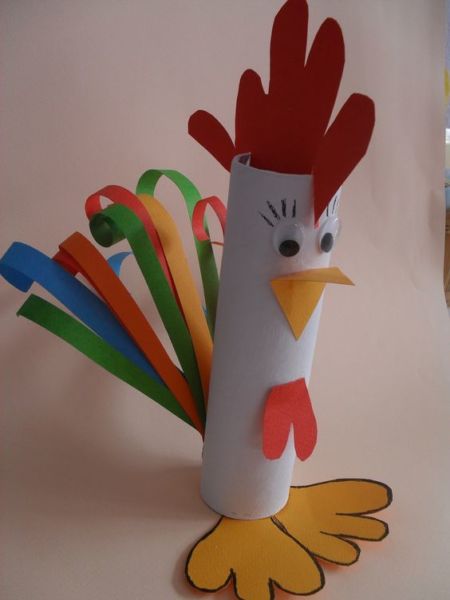
Video on how to make a craft from scrap materials in the form of Easter cockerels
Skill and dexterity, wonderful ethnic music and just a little time, and these are the results of such beautiful Easter toys. And agree, everyone can repeat it. All you need is a little free time and desire.
Very beautiful, bright, colorful and positive cockerels can be used as an egg stand.
It may be a bit difficult to make these for small children, but they will undoubtedly want to take part in coloring them. And older children, of course, can handle it on their own.
In today's article, I tried to collect simple ideas for making various holiday cards and cute little things. Children can do all of them. And if at any stage they may have difficulties, then adults will always be able to help them. It’s even better that children do all the work together with their parents or older brothers or sisters.
Such joint work brings souls together, and what could be more important. Especially on such a wonderful spring holiday as
Happy Holy Resurrection to you. Give each other love and warmth, and at the same time little pleasant signs of attention in the form of cute gifts.
All the best!
Chicken eggs without internal contents are painted with nail polish in two colors and secured on skewers. They are decorated with dry leaves. Natural materials are used in the composition - willow branches, dead wood. The bouquet is in a jar. which is decorated with wrapping paper and tied with a ribbon.
Head: Vera Olegovna Ivanova.


64. “Stand for Easter eggs made of felt “Lukoshko”“ Natalia Shcheblykina. .

65. Easter card “Little miracle”. .

Submitted the following works Ilyina Yulia Vladimirovna, teacher of additional education, Kyzyl.
“I congratulate everyone on the holidays and I hasten to send you photographs of Easter crafts made by children who study in my creative association “Souvenir Workshop.” The works were performed using different techniques and from all kinds of materials.
66. Easter bouquet. Zabrodina Anna, 12 years old.

67. Easter goose. Sedova Katya, 13 years old.

68. Rainbow egg. Spirina Katya, 13 years old.

69. Easter card. Baigildina Angelica, 10 years.

70. Easter basket. Malygina Katya, 12 years old.

71. “My name is Yakovleva Arina, I am in 1st grade, I am 7 years old. I really love making crafts from salt dough. My craft is dedicated to Easter. As people prepare for Easter, they are filled with joy and faith. Maundy Thursday marks the beginning of our favorite activity - coloring and painting eggs. The lush greenery and bright colors of the Easter eggs created a festive mood. I also want to give you a small piece of this holiday.

72. Easter composition “Easter Bunny”. Kochetova Nadezhda Ivanovna, Gubkin. Teacher of additional education at the MBU DO “Station of Young Naturalists”.

73. " Here I am". Rogacheva Alina.
The painting was made using the plasticine painting technique.
Teacher Borovchenko Nadezhda Khisamutdinovna.
Club of children with disabilities “We are special”.

74.Fedorov Maxim. The egg is made using the papier-mâché technique, decorated with colored threads, flowers, sequins, and beads. Plate made using papier-mâché technique. Teacher Borovchenko Nadezhda Khisamutdinovna. Club of children with disabilities “We are special”, Mikhailovka village.

75.Sorokin Alexey.

76.Utesheva Nastya. The chicken is made of fabric, decorated with bows and beads. The basket is woven from paper tubes, the eggs are made from salt dough. Teacher Borovchenko Nadezhda Khisamutdinovna. Club of children with disabilities “We are special”.

77. Work Shlykova Anna, 12 years old. Easter egg painting.

78. Lashko Anastasia, 12 years old. Municipal educational institution lyceum "MOK No. 2" in Dzhankoy, Republic of Crimea. Club "Home Design", led by. Khavedzhi Venera Alekseevna.
“I have been studying in the Home Design club for 2 years, where we make home interior decoration items. Yours panel "Bear" I'll give it to my niece for Easter. She will wake up in the morning, look at the little girl and smile.”

79. Maksimova Valeria, 12 years old. Municipal educational institution lyceum "MOK No. 2" in Dzhankoy, Republic of Crimea. Circle "Interior Design", led by. Khavedzhi Venera Alekseevna.
“I really love giving gifts to everyone. For Easter I designed several cheerful panels using the carpet thread technique. This job " Cheerful goat“I’ll give it to Grandma.”

80. "Easter Egg"- application. I did Lyudmila Shmeleva 8 years old, Tver city, 2/2 grade, Municipal Educational Institution Secondary School of Tver. 83. Easter topiarchs.


85. Panel “Ready for EASTER...”

86. Raisa Denisova.
We wrapped an egg-shaped balloon with half-woolen thread dipped in PVA glue. When the thread was dry, a hole was cut out on the front part. A nest (tow and strips of colored paper and willow branches) was placed inside the egg, and a bright, cute chicken cut out of colored velvet paper was placed in the nest. Similar Master Class
Kosykh Egor and Lydia won!
We will email the winners about how to receive their prizes. I will send certificates to the competition participants within a week.
Thank you all very much! So many great ideas!
Now we begin the last stage of the competition -. 🙂
This review article from Krestik is dedicated to everyone who loves Easter and wants to prepare for it in advance. In recent years, we have written and published more than 20 master classes on creating DIY Easter crafts. To make it easier for you to navigate the variety of ideas and choose the crafts you want to make for Easter this year, we offer you a list of all our Easter articles and master classes.
We must start, of course, with the largest and most complete article about, which contains about 64 great ideas! Here you will learn about the history of the holiday, as well as how to make Easter eggs (we analyze in detail all existing preparations for creating decorative eggs) and bunnies, baskets and candles, napkins and cards for Easter. The article includes photo and video master classes, as well as many photographs of finished crafts that will inspire you to get creative. 
Perhaps, after looking at the above article, you will already decide on the choice of crafts. But don’t rush, maybe new master classes will inspire you even more!))
Decorating Easter eggs
Let's start with handmade Easter eggs. The easiest way to decorate an egg is decoupage. You can decoupage boiled eggs and bless them in a church; you can use empty eggshells or wooden blanks. The choice depends on whether you want to keep the souvenirs you made or simply decorate the eggs directly for the holiday table. The article Decoupage an Easter egg with your own hands will answer all your questions regarding this technique.

The next way to decorate an egg is also quite simple. You can take any egg-shaped blank as a basis (whether wooden, plastic, or foam), but the author offers his own unique way of creating a blank - from polyurethane foam!

The next master class combines both decoupage and gluing the workpiece with decorative cord, but the result is strikingly different from the previous ones! See for yourself by looking at MK Easter egg decorated with napkins and jute.


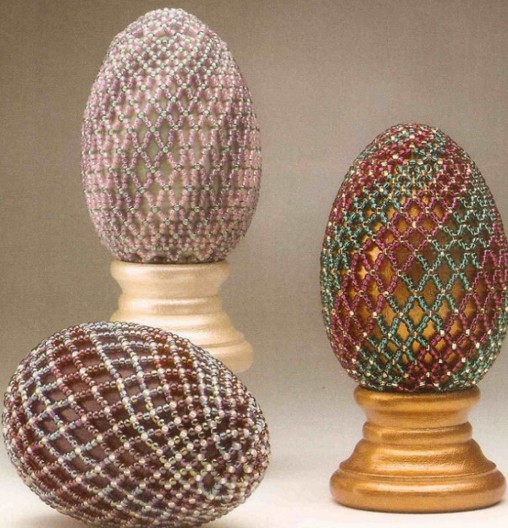
One of the most difficult ways is to braid an Easter egg with beads. But he is also one of the most beautiful, your efforts will not be in vain!

And since we’re talking about Easter eggs, it’s worth paying attention to another very interesting idea - an Easter wreath for the door, made from eggshells and natural materials. They can decorate the front door or any other door in the house, or you can simply hang it in the kitchen, for example, next to the holiday table.

Easter bunnies
It has become commonplace that rabbits, along with eggs, are also considered Easter souvenirs. There are also many techniques for making Easter bunnies. In the article Easter bunnies that bring good luck! you will find out where the tradition of making rabbits for Easter came from, and also watch master classes on creating rabbits using different handicraft techniques.


Easter vytynanki and silhouette cutting for Easter


For those who crochet, master class Easter egg case in the shape of a chicken.

We give a second life to the most ordinary things 🙂 here.

Nest with Easter eggs made of polymer clay - this craft will take a little more time, but it's worth it! The magnet will take its rightful place on the refrigerator, it turns out very cute)

And the most original, most unpredictable souvenir you can make for Easter is jelly soap in the shape of an Easter egg. Not everyone will definitely do this, so your souvenir will definitely stand out from the crowd!

Crafts AFTER Easter (crafts made from eggshells)
Yes, yes, I was not mistaken in the title) It is after Easter, when eggshells accumulate in abundance in every house, that you can also get creative! very original (photos and video master classes can be found at the link).


This is how I came up with an Easter guide to Krestik’s articles and master classes. I really hope that you find what you were looking for or something that will inspire you to create. Happy Easter to you!
Good morning everyone! Just a little more and another Orthodox holiday will come, which will be celebrated by all residents of Russia, and not only. We are talking about Easter, namely about what crafts can be done together with children of preschool and school age for this day.
You can make such wonderful souvenirs and creations with your children right at home, because all you need is your desire and desire. Therefore, I suggest you think about this topic now and choose what you would like to do, and then give it to someone or simply decorate your home.

If you want to find a more complex thing, then perhaps you will like this version made from salt dough.

I also love compositions that have a lot of toys and are bright and eye-catching.

Master class on making eggs from foamiran
Are you familiar with this fabric material? I think yes, how cool it is, just like felt, I’m in love with it. I suggest making this craft in the form of a refrigerator magnet. You can, in principle, hang it on a string like a pendant.
We will need:
- Styrofoam egg - 1 pc.
- scissors
- cutter
- foamiran (1 mm) 2 colors - yellow and white
- magnet
- glue gun
- factory eyes

Stages of work:
1. Take a hairdryer and heat the fabric, and you need to do this quickly, and stretch it over the egg.

2. They pulled it like this, and then applied a hairdryer, held it for 11 seconds and that’s it, turned it off, waited until the fabric cooled down.

3. These are the blanks you will get.

4. Now, using a cutter or utility knife, cut the stencil in half.

5. First put the egg into the yellow foamiran.

6. And then cut off the excess fabric into white.

7. Then cut the white one in half, you can imitate cracks as if by cutting them in a zigzag, there are also special wavy scissors.

8. Then prepare the eyes, make the legs and beak themselves.

9. Well, now the most important thing is the assembly. Carefully glue the yellow template first.

10. Then move on to the white.

11. After starting to design the legs, eyes and mouth, glue the parts with a glue gun.

12. What a wonderful baby he turned out to be, pee-pee-pee.

13. Glue a magnet on the other side, you can take a vinyl one.

14. You get two young weirdos, you can make a boy and a girl, and pin on more bows or other patterns to your taste.

As an option, you can do something else, for example, such a charm in the form of a flower with a handle.

Original crafts for Easter for a school competition
Any student approaches this issue quite responsibly and he really wants his work to become the best. You can come up with a whole lot of options. But, of course, it will be better if you make Easter symbols. For example, these funny chickens, which are made from ordinary woolen knitting threads.
You can use this step-by-step instructions as a basis.

You can use another option. In any case, the result should please you. Here they even made a mother chicken, and also wove a stand in the form of a plate from the same threads.

You can also make Easter eggs from threads, are you surprised? But I don’t, after watching this video you will learn how to make things.
For elementary school children, you can make a mischievous cockerel, which is made from a paper cylinder.
Or I was still hooked by such a brilliant idea, to make chicks out of what they say was. And I had cases for Kinder Surprise. This is such a funny little family that turned out to be yellow))).


You can also make something like this in the form of chicks from cardboard and thread.

And if you want to make a splash on everyone, then make a product from plaster. I think that the commission and jury will definitely appreciate such a cool souvenir and reward it with a gift.

There are also ideas for souvenirs and gifts made of beads, but I will say this too, a lot of work and skill, I remember as a child I was fond of this type of activity, now I don’t have enough hands to sit down. But just for you, I found an easy way of weaving, or rather, it will be specifically for beginners, you just have to put beads or beads on a thread, and then glue the eggs onto the surface.
Of course, this will make your actions much easier. After all, you can also weave, but to do this you need to understand the diagrams and all the symbols. And here, any beginner can handle it, so catch it.

The main thing is to take a very good glue, for example PVA, and one more thought, you can not put it on the thread, but simply glue each bead separately, but this is more difficult.

As for the patterns themselves, in case you are a master and know how to weave, I suggest making a grid like this.

It turns out just great, class!
Or do you like the mosaic technique? I have a diagram from her).

How do you like this work? Wow, it’s breathtaking.

But if you still have any questions, then it’s better to take this model and do the work together with this author of this master class.
Of course, if you are interested in needlework or knitting, then you can also make a souvenir, for example this one. If you need a diagram, I will be happy to send it to you, it was taken from one magazine. What cute and cheerful little beadies they turned out to be, or little Easter cakes for needles.

But, by the way, you can also make knitted lilies of the valley, because it already smells like spring!

If you are good at drawing, then make a picture out of paints.

Or with the help of glue and cardboard, as well as all kinds of cereals, such an Easter masterpiece.

And here’s another thought for you: if you have multi-colored pasta lying around the house, then you can also make this kind of work out of them. What a delight, isn't it?!

How to make quick and easy Easter gifts from paper
In my opinion, these are the types of works that are most popular, because these are the materials everyone has in their home. The first thing that comes to my mind is egg cups. Well, they drew it, cut it out, then gave it to the kids to color and another children’s miracle masterpiece is ready.


Make these oddballs yourself, cut out the details and paint them, if you need templates, please ask, I will send them by email for free. Not really funny little animals.


Well, as always, you can’t do without my favorite vytynanki. This is just a custom or tradition. See what Easter bunnies can come out, plus decorate them with satin ribbons, if you need a template, write at the bottom of the article, I’ll send it for free.

In general, it will be cool and cute.

You can also take any sheet, fold it and glue it into a cone and the result will be something that resembles a bird.

With our youngest kindergarten representatives, I suggest making a paper craft using a base in the form of circles.

And those who are older will like the hatched chick.

The work is also good in the form of an applique; you can do one in a labor lesson with elementary school students.


You can, of course, combine two types of activities: Art and Technology.

By the way, you can just take regular colored pencils and do this, I also have a template for this stand in my piggy bank, so if anyone needs it, write to me.


You can make a product in a very original way without using glue, but instead take a stapler and fasten the parts together, see what comes out.

What do you think of this idea for a stand? It looks really cool, and can you imagine how much pleasure your kids will have making it?

I can also suggest printing out such a blank template.


Or this black and white version on your printer.

A great option would be a souvenir on a stick.


Or this green meadow with birds.

I also liked such a simple idea as a refrigerator magnet that can be decorated with rhinestones or scrapbooking materials.

Well, in conclusion, I would like to show the stages of work of a three-dimensional craft.

Step-by-step instructions for creating crafts from cotton pads and sticks for Easter for children
We'll probably start creating right away a small and very charming little yellow naughty boy called Tsypa. We will need a bunch of cotton swabs, or rather their tips. You will need to paint some yellow by dipping it in gouache, and leave some white. Make this craft, that is, make the base from plasticine, and then simply stick the sticks into it.
Important! You can draw the eyes yourself or find a picture and print them out.

For the next job you will need your good mood and, of course, materials.
We will need:
- cotton pad
- disposable spoon
- colored paper
- felt-tip pen
Stages of work:
1. First of all, make the blanks, that is, cut out the beak and scallop from colored paper. In this photo everything is visible and shown.

2. Next, draw the wings and then glue them onto a cotton pad. Place a spoon in the center and cover with a second cotton pad. Draw a face and voila, such a beauty can sit in your pot with your favorite flowers and crow).
What other interesting things can you do? I had ice cream sticks lying around, so I connected them together and glued on the eyes and beak, it turned out to be a wonderful animal. By the way, don’t forget about the paws either.

The easiest option would probably be this product, which can also be made with a child of any age; you need to paint the discs with gouache or watercolors, and then build such beauty.

You can design this in the form of an applique, and using cereals, it also looks great, and it resembles the painting A bird pecking at grains.

In general, choose according to your taste and color, and do not forget to write your reviews and wishes.


Look what a baby chicken it turned out to be, though it’s white.

You can also make a picture, together with willows and also from cotton pads. Doesn't it really look cool? Yes, it’s unusual and beautiful!

Beautiful crafts for Holy Sunday for kindergarten
Of course, preschoolers need ideas for what is easier. so that the kids themselves can cope with the task and can amaze everyone.
What could be easier and faster if you teach them this funny toy, also called a walker. Once, by the way, we did it with you, remember? When it came to puppet theater, I gave you ready-made templates.


Ha, and when I saw this face, I actually blossomed, I never cease to be amazed that so many crafts have been invented from the ordinary little hands of our kids, it’s simply too many to count.
You can, together with the children in the preparatory or senior group, engage in visual arts and make just such a chicken (cockerel) that will have multi-colored wings.

And for children of the second junior and middle group, here is such a simple masterpiece. In just one thing, you can repeat what kind of bird this is, and where its eyes and other parts of the body are.

Or this funny design made from a baby’s leg and paints.

You can also make applique on regular paper plates.

Here's another unusual pencil holder.

You can even make it using the origami technique, although you only have to fold the sheet once. Just right for young talents.
And finally, this type of work such as felting or dipping anything, for example, a dish sponge or soft balls. Moreover, this can be done with an ordinary clothespin. It looks bright and stylish, simply beautiful and original.
I also liked the idea of a fun family activity that you can do with your kids as a group.

By the way, you can combine paper products with threads, or use cereals instead of threads.

I was also captivated by this work, so simple and at the same time original.

And I propose to make this beauty a common or joint activity at school or kindergarten.

Easter crafts made from felt
In general, felt toys have become in demand not only among children, but also among adults, because sewing such a gift is always easier than taking any other material; felt in this regard is an unpretentious material that is easy to work with because it does not crumble. And even beginners can make patterns.
I had a separate one on this topic, from it, if you are interested in this type of activity, you will find a lot of useful information, I am sure it will be useful to you.
In this post I will show you finished products. How do you like this family?

But, I still want to show you one master class that may be useful to you someday.
We will need:
- scissors
- needle and thread
- buttons and rhinestones
- cotton wool or padding polyester
- lace
- vinyl magnet
Stages of work:
1. Draw a sample egg, or you can print it out on a printer.

2. Then attach the stencil to the felt and outline with a pencil. Cut out the resulting parts with scissors; you need to make two eggs.

3. Then take and cut the template into three parts, as shown in this picture.

4. Place the center on the green felt and trace it, then cut it out.

5. Sew this green decoration onto the egg.

6. Sew and decorate, one might say decorate with lace or some other decor. It looks amazing right away.

7. Then draw the letters with a pencil and embroider the inscription, you can probably guess what it is, of course ХВ.

8. Then sew on buttons, sequins, or you can take beads for scrapbooking, basically whatever you have.

9. Go through the edges with a seam, but you can also put padding polyester or cotton wool inside, and then proceed to the next step.

10. Take Moment glue and glue a vinyl magnet, this will be a gift for you or your friends on the refrigerator.

Of course you can do it on sticks.
And also in the form of a pendant or keychain.

In general, such beauty will not leave anyone indifferent, that’s for sure.

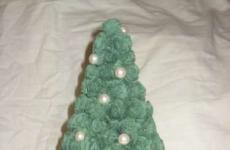
Master class using improvised materials Easter tree at home
I want to tell you right away that you can make such a craft quite quickly if you use these step-by-step instructions.
In fact, the work will be quite creative and your children will also not be able to resist this task.
Just don’t forget to wash the eggs well with water and soda. For 1 liter of water, take 2 tablespoons of baking soda.

Use a toothpick for piercing and acrylic paints for coloring.
Prepare everything you need for work:

Then place the napkin in front of you and twist it into a rope in this way. Secure the middle with threads.
And then turn the product over to the opposite side.
And voila, crumple it in half.

A couple more touches and hand movements:
And you will see an animal that resembles a bunny.
Give him eyes and a tail.


And needlewomen can still sew carrots quite well.

Video on how to make an egg from pasta for a competition
I’ll tell you honestly, I was shocked when I saw this awesome video, can you imagine it’s really true, such a miracle, it’s just amazing and out of ordinary noodles. Cool! Share this information on social networks, just click on the button at the bottom of this article.
Well, in conclusion, I was about to say goodbye to you and came across such a masterpiece, which is made of papier-mâché, I was very interested in this design, I’m showing it to you.
Still, sometimes you are surprised how something like this comes out of almost nothing.

DIY egg stand made of paper and sisal
You will get a very wonderful and cute little thing if you use this MK, which is presented in pictures with a description and sequence of actions.


That's all for me, I'm ending this post. See you in the next articles. Write reviews, comment, come visit more often, a lot more interesting and completely new things await you that you have no idea about. Goodbye everybody!
Sincerely, Ekaterina Mantsurova
In a month we will have a big Orthodox holiday - Easter, this year it is celebrated on April 8th. And we have time to prepare for it - to create Easter souvenirs with our own hands, which will be presented to our loved ones on this bright holiday.
After all, we know that the best gift is a gift made with your own hands, and we also present ideas for Easter symbols that will serve as interior decor. I suggest you immediately decide what is considered this holiday symbol?
In our country, painted eggs are an invariable attribute; they are also called painted eggs, and in the USA and Europe, in addition to painted eggs, there are Easter baskets and wreaths. A rabbit that children love very much, because if they are obedient, the bunny brings them chocolate eggs, as well as chicks and hens.
We described in detail how to create these Easter symbols in the article, so I suggest not to waste time, but to start choosing the most beautiful craft. You can also create a giant one, put an Easter-themed surprise in it and give it to your children, they will be absolutely delighted! Don't forget to write in the comments which idea did you like best?
The custom of presenting beautiful Easter eggs made of beads has been known for a long time. If you have not yet created such beauty, we suggest that you definitely try to make such an Easter decoration.

We will need:
- thermal sticker or paper image;
- white egg blank (made of plastic or foam);
- a thread;
- hook;
- decorative elements for decoration;
- fishing line or special monofilament for beading;
- beads of different colors or bead thread;
- a piece of foam;
- scissors;
- glue;
- needle;
- a piece of felt.
Stages of work:
We cut out an oval from felt; the face will be placed on it. Apply it to the iron-on sticker and cut out the image to the required size.
We apply the face to the felt and trim the sides with a strip of beads, which you will make in advance.


If possible, purchase ready-made bead threads.
Now we crochet the egg. Below is a detailed description:

If you don't know how to crochet, just wrap the egg with ribbon:

Coat the felt side of the face with glue. Carefully attach to the egg.

We decorate the craft with a thin ribbon. Along the egg.

Attach a crown to the top; it can be purchased at craft stores. If you don't have one, use a beautiful bow made of thin ribbon.

Let's start decorating the egg stand. We attach a large wooden bead to a piece of foam plastic at each corner. These will be four legs. Decorate the edges with braid. On the other side of the stand we glue four leaves, and in the middle there is an egg.

We finish decorating the craft with flowers.

Here are some more beautiful options:

This is the easiest option. You can also draw the desired design of the egg blank and cover it with beads. PVA glue and a toothpick will help with this.
Before doing this, do not forget to paint the egg in the desired color.

You can also wrap an egg, previously coated with glue, with a thread of beads.

As you can see, there are many options. Here are interesting patterns for braiding eggs with beads.


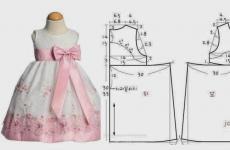
We make beautiful eggs for Easter from satin ribbons using the kanzashi technique
In Europe, the word “kanzashi” means a needlework technique based on folding small pieces of fabric in a special way.

We will need:
- green and white satin ribbon (width 2.5 cm);
- foam circle;
- a piece of white felt;
- green and orange ribbon (width 0.6 cm);
- preparing an egg the size of a chicken;
- hot glue;
- candle or lighter;
- forceps;
- beads.
Stages of work:
Wrap the egg with ribbon. We glue its edge to the top part. So we continue to wrap the egg, gluing the ribbon to the top and bottom of the egg.

We wrap the ribbon crosswise, otherwise the whole structure will fall apart.

We get this bright polka dot egg.

Let's start making flowers. To do this, cut out a 2.5 by 2.5 cm square from white tape.
Don't forget to singe the cut edges of the tape. Otherwise it will simply crumble.
Let's fold the square diagonally. We bring the edges of the resulting triangle to the middle.

Now we fold the resulting petal again and clamp it with tongs. We singe the lower part of the petal over the candles.

We cut off the edge of the back of the petal and also singe it. We have these petals coming out. You will need 18 of them. There are 6 pieces for each flower.

We glue them together. Glue a bead in the middle.

Let's make petals from a shiny green ribbon. Let's make three green loops and cut the ribbon. Let's burn the bottom of the loops over the candles.

attach the flower to the leaves. In this way we make two more flowers.

For the stand, cut a circle out of felt. Its diameter is 5.5 cm. We paste a 2.5 cm green tape along its edges.

We glue another “skirt” inside, but its diameter is slightly smaller.

Cut a circle out of foam plastic so that you can put an egg in it. We wrap it with green ribbon, from which we made leaves.
Don't forget to attach everything with glue.
Glue the ring to the middle of the stand.
We place an egg in the ring and decorate it with flowers and stamens.
These are some interesting ideas you can get if you use your imagination a little:

Video on how to crochet an amigurumi style Easter cake?
Is it really a great craft?
Crocheted Easter chickens
And of course we couldn’t forget about the cute knitted chickens. If you are good at crocheting, we offer this craft for Easter.

We will need:
- hook No. 1.75;
- suitable yarn in two colors and a little red for the comb and beak;
- scissors;
- needle;
- black thread for eyes.
Stages of work:
If you want to make a chicken as an Easter egg stand, use a slightly larger yarn and hook.
1st row: make an amigurumi ring from a yellow thread. We fix it with an air loop.

We knit 8 single crochets inside the ring. We tighten the ring so that it closes.

Row 2: we need to make 8 increases. To do this, in each single crochet (previous row) we knit 2 single crochets. As a result, we get 16 loops.

Rows 3-8: knit 16 single crochets, without increments.

Row 9: make 16 increases. To do this, in each column (of the previous row) we make 2 single crochets. We get 32 loops.
Now we make 1 connecting post. This will help smooth out the rows. 1 air loop for lifting. This will be the center of the chicken's tail. This is where we will add loops.

Row 10: 2 increases, 28 single crochets, 2 increases, connecting stitch. Total: 36 columns.
11th row: 1 air loop, 1 single crochet at its base. In the next column - increase, 32 single crochets, 2 increases in the last 2 loops.
Using red thread we make a connecting column.

There are 48 single crochets in total.
Row 12: We also knit a single crochet at the base of the air loop. Next are 39 single crochets, the connecting stitch is yellow.
Let's start knitting the tail.
Row 13: 8 increases in double crochets, 24 single crochets, 8 increases in double crochets, connecting red stitch. Total: 56 columns.

Row 14: for the tail pattern, between each pair of double crochets you need to knit 2 double crochets. To do this, we move the connecting column to the middle between the columns. In the same place we knit 2 more double crochets. We also do this 7 more times. There are eight pairs of double crochets in total.

Row 15: just like at the beginning of the last row, we move to the middle between the columns. Between each pair of stitches we knit: a stitch with 1 crochet, 1 chain stitch, a stitch with 1 crochet. We knit this way only 8 times. Next, 24 single crochet stitches, 8 pairs of stitches, a connecting stitch in red.
Row 16: Using a connecting column, we pass to the air loop between the rows. From the same loop we knit 4 double crochets. There are 8 such patterns in total. Next, 24 single crochets, 8 patterns, a yellow connecting stitch.
Row 17: we knit in the middle of each feather: 1 connecting stitch for the back wall of the work, 1 double crochet for both walls.

Let's move on to finishing the chicken's tail.
Row 18: hide the yellow thread under the red one. We knit 3 air loops. Insert a hook between each two rows of the previous row and knit a single crochet. So we tie the entire half of the tail.
Cut the yellow thread.
Then we carry out 11 decreases in a row. This is done in this way: we knit two loops from the previous two columns. From the resulting three loops on the hook we make one.
We crochet the red thread inside.
We got the main part of the Easter chicken.

Now let's move on to knitting the stand.
Attach a red thread to the last column of the chicken's body. We knit a chain of 15 chain stitches. We attach the chain to the opposite edge of the body.

Along the edge of the body we knit: 2 double crochets, 1 double crochet (in each previous single crochet). And so on until the end of the body. We also knit along a chain of air loops. We complete the row with a connecting column.


This will help keep the egg rim in place.
Unfold the knitting. We knit a double crochet into each stitch of the previous row. We complete the row with a connecting column in the red row of the tail. Fasten and cut the thread. This is the kind of stand we got.

Decorate the chicken with a scallop. To do this, we will make an amigurumi ring. Next we knit into a ring: single crochet, chain stitch, double crochet. Only 6 times.
We tighten the loop. Fold the resulting flower in half. We get 3 double scallops. We tie them on top, together. Sew the comb to the head.
We take out the remaining thread in the place of the beak and make a loop. We knit four air loops from it. Turn the hook. We skip one air loop. In the remaining three we knit one single crochet. We attach the second side of the beak to the muzzle. In this way we knit the lower part of the beak. Cut the thread. We hide its end inside.
We embroider the eyes. We got this chicken.

Here are some more interesting ideas:


Scheme of a cockerel-cup stand:


Master class: DIY Easter wreaths
This wreath can decorate your front door for Easter. Are they really very original and beautiful? Would you like this decor for Easter, write in the comments?

We will need:
- birch branches;
- willow branches;
- pruner;
- wire or twine;
- decorative elements for decoration.
Stages of work:
Branches need to be chosen flexible and fresh. Otherwise, the wreath will simply break.
We make a ring from several branches and secure it with wire.

Then we increase the volume of the wreath by weaving all the branches into it.

We weave willow branches into the wreath. We decorate it according to your wishes. This is how we do it.

We hang the wreath by branches or using a hook.
But this simple wreath can be made with children. It consists of a cardboard base covered with burlap, and the eggs are made of felt.

Here is a version of the base.

As you can see, it all depends on your desire and available materials.
The most beautiful decor ideas for Easter 2019
If you are wondering how to decorate your home for Easter.
We have 5 interesting Easter decor ideas:

- Table decoration.

How do you like the nest on the table? I think it’s original?

- Easter tree.

But the branches with green leaves are also very beautiful

- Easter curtains.

- Holiday-themed sweets.

Easter gingerbread cookies look great on the holiday table

- Cute egg crafts.
Cool and funny minions, kids will be very happy with this Easter egg

And the smiley faces in hats are just super!

And the bunnies captivated my daughter: “Mom, they are so cute!” But they really are cuties!

These are the original and cool ideas for the bright holiday of Easter that we have selected for you, I really hope that you liked them and you will create crafts and souvenirs based on them!
Write in the comments which idea you liked the most, add the article to bookmarks so as not to accidentally lose it and, of course, share it with your friends by clicking the social network buttons, what if Easter decor is also relevant for them?
And I heartily congratulate you all on the Resurrection of our Savior Jesus Christ!