Knitting lessons for booties for beginners. Knitting lessons: booties on two knitting needles for beginners. Baby booties-slippers, diagram
Any mother really wants her baby’s clothes to be comfortable and warm. And if many people cannot knit something grandiose, for example, a jumpsuit or a dress, then making original and beautiful booties yourself will not be difficult. Well, we agreed, let’s knit booties with knitting needles? There are many simple models that are distinguished by style and sophistication, and some of them will be described below. One option is for boys, the other is for girls.
In order to knit the option for little gentlemen, you will need one skein of yarn, which contains no more than 50% wool, so that there is no discomfort when wearing. For the summer variety, you can choose any cotton yarn, just not very thin.
The described model can be modified and be universal by using different shades of yarn, patterns, or additional decoration in the form of flounces, frills or other accessories.
The standard version for newborns is as follows.
These shoes are made in one piece, and work begins from the top edge of the cuff. We put 37 loops on the knitting needles, after which we knit 48 rows. Next, leave 13 loops unknitted on both sides of the fabric and continue working with the remaining 11 loops located in the center. In this way, it is necessary to knit 18 rows, periodically decreasing from each edge, starting from the 12th row, and then in each even row. As a result, there should be only 3 loops left on the knitting needle that need to be closed. Now you need to return to the remaining 13 loops not knitted. You need to cast on another 33 loops to them, and then continue knitting 13 loops set aside from the other edge. You should get 59 stitches on your knitting needles, knitting them for another 14 rows in stockinette stitch. After that, 24 loops are closed on each edge and the 11 central loops continue to be knitted. You need to complete 36 rows - this will be the sole. Having completed the required amount, bind off all the loops. All that remains is to fasten the sole and base along the entire length of the cuff. The bootie is ready, the second one is knitted similarly to the first one. For decoration, you can insert a satin ribbon or tie shuttlecocks along the upper edge of the cuff and sew buttons. You can see some of the design options for such booties in the photo.

knitting needles Scheme for girls
For little princesses, booties in the form of sandals are suitable. Decorative buttons are used as decoration. Just like in the first case, you will need only one skein of yarn, knitting needles and two buttons.
Start knitting from the sole. Unlike the first option, our booties will consist of several parts knitted separately. For the sole, we cast on 7 loops on the knitting needles, knit with stockinette stitch, adding 1 loop on each side (in 1,2,4,6 rows). There will be a total of 15 stitches on the knitting needles. Start decreasing from row 40 in rows 42, 44, 45, one loop from each edge. The remaining 7 loops need to be closed. The sole part is ready.
To encircle the foot, you need to cast on 60 stitches and knit 14 rows in stockinette stitch, then cast off all of them. Next, we knit the booties with knitting needles as follows.
Making the upper part of the bootie begins with a cast on of 15 loops. We knit 26 rows. During the work, decrease 1 loop on each side in 20, 22, 24, 25 rows. The remaining 7 loops on the knitting needle need to be closed off.
Next we perform the assembly. To do this, we connect the circumference of the foot in a circle and with the sole. After that, we sew the top part and decorate it with a button. Instead, you can use a crocheted flower and thread it along the top edge of the bootie.

Benefits of hand-knitted booties
Firstly, these cute shoes will warm the baby’s feet in a special way, because they contain the care and warmth of mother’s hands. You can also accurately select the right size and model, you also use the best yarn, all this will certainly affect the quality and aesthetic appearance of the booties. And if we knit booties with knitting needles ourselves, then no one will have second ones like them. And how many compliments and delight you will hear addressed to you. Agree that this is very pleasant and perfectly improves your mood.
The cutest socks for our babies are booties. They are the first and necessary shoes that warm the feet and protect them from various mechanical damage. Beginning handicraft mothers will definitely want to give their baby a pair of warm socks. So let's talk about something for newborns. The schemes and sequence of work here are so simple that no complications will arise.
Preparing for work: choosing yarn and tools
You need to approach the choice of threads in order to make baby booties with knitting needles very seriously, since any product for a baby must be made from high-quality and non-prickly (important!) yarn of optimal thickness.
When selecting yarn for children's socks, preference is usually given to acrylic or mixed fibers. A good material for knitting children's clothes is domestic acrylic from different manufacturers, for example from the “Baby” or “Krokha” series; “Children's whim” (“Pekhorka”) with a wool to acrylic ratio of 60/40% is well suited.

We will not delve into the question of choosing the color of socks, since it is very individual. The traditional colors of clothes for girls all over the world are considered to be all shades of pink, purple and red, for boys - blue, indigo and turquoise. Neutral tones - white, orange, yellow, beige or green - are successfully combined in the clothes of children of both sexes.
To knit simple booties with knitting needles, take a thread of medium thickness, focusing on the length in a hundred-gram skein. The optimal thread thickness is 300-350 m/100 g. Knitting needles are matched to the yarn: knitting needles No. 2.5-3 are excellent for the specified threads.
Knitted products are of normal density, moderately stretchable and soft. In addition, the requirements for children's clothing are very strict. Booties are no exception. They should not be too tight, too thick or restrict the baby’s movements. The products should be sewn carefully, grabbing the broaches of the outer loops of each row and not tightening the seam. Rough and poorly executed seams will cause inconvenience to the child and worry to the mother. After all, it is not difficult to knit booties with knitting needles for newborns, patterns for which are attached in many sources; it is important that the results of the work please everyone.

For beginning needlewomen, after choosing the material and tools, the question arises about the need to calculate the required number of loops for the job.
Knitting booties: description of settlement operations
Since we are knitting for a newborn, we can use the average leg sizes. The approximate length of the baby's foot is 6-7 cm. Add 1-2 cm to the freedom of fit, and the child's height should also be taken into account. By the 3rd month of the baby’s life, the length of the foot increases to 9 cm. Therefore, we will proceed from the size of 8 cm and try to knit booties for newborns. The diagrams that will guide us in the process of work are given below.
The second measurement needed to get started is the girth of the leg. It's easy to measure. Usually it does not exceed 10-12 cm. Before starting work, many craftsmen make a loop test sample in order to calculate the required number of loops, but in the case of knitting socks or booties, you can not waste time, but take conditional averages. For example, in 1 cm of knitted fabric made from yarn of medium thickness (300 m/100g) there are approximately 2.4-2.5 loops. Let’s make simple calculations, taking the largest number as a basis, since we must not forget that it is impossible to pull the child’s lower leg with socks:
12 cm * 2.4 = 28 loops.
Let's start knitting with 28 loops.
Knitted booties for beginners step by step
The easiest classic way to knit booties is on 2 sock needles. We start knitting from the top. For the convenience of assembling a ready-made sock, when casting on loops, leave a thread of such length that it is enough to complete the seam.
Let's get started: knit the top part
Step 1. We cast on 30 loops (28+2 edge stitches) and knit 20 rows with a 2x2 elastic band. We knit as usual, following the rule: the edge stitches are not knitted from the beginning of the row, but are knitted with purl loops at the end. This is necessary to obtain beautiful, even edges, the subsequent stitching of which will result in an invisible seam. When distributing the loops, it is better to make sure that there are 2 front loops in the center of the work - this way the product will turn out more beautiful and harmonious.

In our example, the elastic band will be wrapped like a cuff. But if you are planning a small elastic band, then you need to knit it to the desired length, reducing the number of rows. By the way, the upper part can be tied not with an elastic band, but with some other pattern you like, for example, like this:

Making holes for ties
Step 2. Booties with knitting needles, the description of which is presented, after knitting the elastic, continue like this: in the 21st row we make holes for a fixing lace or ribbon. According to the elastic pattern, we knit *2 knits, and knit 2 purls together with one loop, 1 yarn over*, etc.
Forming the upper part of the sock
Step 3. From the 23rd row, select 10 central loops and begin to form the upper part of the bootie, knitting only them. You can take 2 additional knitting needles or knit on the main needles, remembering to turn the work. We knit 12 rows.
We knit the side parts and toe
Step 4. Having finished forming the top of the sock, we proceed to the final part of the knitting - we knit the side parts and the toe, which has already been formed by the upper part of our sock.
To do this, we cast on one needle all the open loops and edge loops formed on the edges of the knitted upper part of the bootie. You will get 42 loops (40 + 2 edge loops). We knit them with garter stitch for 12-14 rows and close them on 2 needles.

All that remains is to sew the sock neatly along the back. The pair is knitted in exactly the same way.
Assembly and decoration
Our simple example shows that it is not at all difficult to knit booties for newborns. The schemes are simple and clear. Having knitted and sewn a pair, we begin to decorate the booties. The main thing here is not to overdo it with decorations. Newborns absolutely do not need beads and other small decorative elements, since they are potentially dangerous, because babies often pull their feet into their mouths. Therefore, in our example, a lace of a contrasting color will play a decorative and functional role. You can crochet it, fasten the end loops and insert it into booties, tying knots at the ends. If desired, you can use tips, but they must be fastened to the lace properly so that they cannot slip off it.

We offered to learn how to knit simple booties. Any novice craftswoman will do this work quickly and easily. Knitting items of clothing for children is an exciting activity, and after a successful start you want to improve the skills you have acquired. Knitted step by step and completed in stages, this is just the beginning in the wonderful world of creating clothes for your beloved children.
Parents are really looking forward to the arrival of their first child in the family, so mothers who are on maternity leave begin to learn how to knit new socks and hats for their baby. There are a large number of other things that can be knitted for a child, but one of the simplest and most necessary is booties.
There are many ways to knit booties with knitting needles for children from 0 to 1 year old with a description for beginners with your own hands, you can read the diagram and study the necessary loops in order to knit booties for a baby. In fact, to knit such a warm thing, it will not take much time at all; for beginners it can take several hours, but skilled craftswomen create beautiful booties in just one hour.
It is the booties that will serve as the child’s first shoes, since the socks are quite soft, while the booties are tougher and somewhat reminiscent of children’s shoes. In them, the baby can begin to crawl, learn to stand up and take his first steps. But even a baby who has just been born needs warm clothes, and since the baby’s legs and arms are cold, they need additional insulation. Also, such socks help prepare the child for the first step in real shoes with hard soles.

Knitting booties: step-by-step instructions
Many women during pregnancy try to occupy themselves with interesting and useful activities. Some are reading books, while others are already thinking about what their baby will wear. Of course, in the first days the newborn will not need any super fashionable clothes. The only outfits the babies wear are diapers and open shirts. But as soon as the cold weather sets in, mothers begin to think about what socks to buy for their little ones so that their tiny feet don’t freeze. Knitted booties are an excellent option for these purposes. They will be an especially nice gift for a child if the mother knitted them herself. How to do it? Step-by-step instructions will be presented below.
The first thing before starting work is to choose the threads for the yarn to suit your taste. All newborns are born at different weights, so it is impossible to say exactly what size their feet will be. This means you should take the approximate length. Usually it is 7 cm. But do not forget to add a couple of centimeters for allowances. The girth of the leg will require approximately 12 cm. Knitting starts with 29 loops. Leave the thread as long as possible!
Step-by-step instruction:
How to choose the right material for booties?
To create booties with knitting needles for children from 0 to 1 year old with descriptions and diagrams, first of all, buy knitting needles, and, of course, buy yarn, but you need to choose it correctly so that the baby does not develop allergies or irritation. Some mothers prefer only natural materials, so they can be advised to buy natural wool yarn or pure cotton threads, but if there is not enough money for such yarn, then you can take acrylic threads or mixed types of yarn (wool 40%, acrylic 60%; cotton 60%, acrylic 40%).
If the booties will be put on the child’s feet when he is wearing tights, then it is not so important what yarn will be selected for knitting the booties. But when putting such socks on a baby’s bare feet, you will have to choose a soft and delicate yarn that will not rub the feet or prick the skin. If the thread pricks or rubs, the baby will develop irritation or a rash, which will undoubtedly bother him.
If you have the opportunity to purchase expensive yarn, then you should choose high-quality threads from an expensive company. Often, such companies use high-quality and harmless dyes, so if a child puts his feet in his mouth, the dyes will not have a harmful effect on the baby’s body.

How to knit baby booties according to the pattern
By knitting something with your own hands, you can save money on your purchase.
Knitting booties for children from 0 to 1 year old with the description for boys is no different from knitting the same socks for girls, the only difference between such booties will be in the decoration and color of the yarn used. For example, blue, cyan, green, lilac and white yarn is perfect for boys, but for girls it is better to choose red, raspberry, soft pink or yellow yarn. If we talk about universal colors, then you can take green and yellow yarn, white is also suitable. These shades are suitable for both boys and girls. To make the booties look more elegant, they are decorated with special accessories, these can be large beads, various embroideries and appliqués of cartoon characters, ribbons and knitted flowers.


To choose the right size of booties, you need to know the exact age of the baby, or even better, measure his foot and after that knit the baby’s first booties. Skilled needlewomen were able to create a table that will help make the size of the booties approximate according to the baby’s age. For example, if a child is under three months old, then the booties should be about 90 mm in length, from three to six months the booties should be 100 mm long, from six months to eight months the length of the socks is 110 mm, from eight to ten months - 120 mm, from ten to one year old the booties will have a size of 130 mm.
Next, one of the options for knitting booties with knitting needles for children from 0 to 1 year will be presented with a description with a photo for those craftswomen who have just started knitting. Such products will have a round sole and only one seam.


 To start knitting, first prepare everything you need. First of all, take knitting needles of the third size; you will also need thin but warm yarn, approximately 100-150 grams. This number of threads is enough to knit the first booties for a child who is only one month old. To make larger booties, you will need a little more yarn, you can also take thicker and denser threads.
Knitting soles of booties
To start knitting booties for children from 0 to 1 year old with a description, you can download the pattern and print it on a printer. This will make it much easier to follow the diagram. And so, it’s time to start knitting booties. To do this, cast on 33 stitches on needles number three; the set should also include two edge stitches. When all the loops have been cast on, you can start knitting rows.
To begin with, one edge loop is removed from the knitting needle; there is no need to knit it, since it will be the edge, but the next thirty-three loops need to be knitted in regular stockinette stitch. After this, the last edge loop is knitted with a purl stitch. Thus, the first row will be completed and you can begin the second. To do this, the first loop is removed again, after which one yarn over is made and fifteen knit stitches are knitted, then there will be another yarn over, after which three more knit stitches are knitted. When three loops are knitted, yarn over the loops, knit fifteen stitches, yarn over the loops and complete the row with the last purl loop.

Since several yarn overs are made in each row, more loops are obtained, then you can proceed to knitting the third row. To knit the third row, you don’t need to remember anything for a long time; this row is knitted just as simply as the first. The first edge stitch is simply removed and then thirty-seven stitches are worked in stockinette stitch. Finish the third row by knitting an edge loop using a purl stitch. The third row is completed and you can knit the fourth, to do this, remove the edge loop again, then yarn over, knit another 16 stitches in knit stitch, yarn over again, knit five loops in knit stitch, yarn over again and knit sixteen stitches. When the last sixteen stitches have been knitted, yarn over once over the needles, and the row is completed by knitting the edge stitch in a purl stitch.
They start the fifth row, to do this they remove the edge loop without knitting it, knit another forty-one loops in knit stitch and finish it all with one edge loop, which is knitted in purl stitch. The sixth row will again be more difficult; to knit it, remove one stitch again and immediately yarn over, knit seventeen loops in knit stitch and make an additional yarn over, add seven more loops in knit stitch, then add one yarn over and knit seventeen loops in knit stitch. To complete the sixth row, make a yarn over loop and finish it by knitting an edge loop in a purl stitch. The seventh row is knitted simply - the colorful one is removed, another forty-five stitches are knitted in knit stitch and the whole thing ends with an edge loop.
You can watch about knitting booties with knitting needles for children from 0 to 1 year old with a video description, where needlewomen will more accurately show how to knit certain loops correctly. And now it’s time to start knitting the eighth row; to do this, remove the edge and yarn over, then knit another eighteen stitches in stockinette stitch and yarn over again. After the cape there are nine stitches in knit stitch, another yarn over, after which eighteen knit stitches are knitted and the whole thing is completed with a yarn over and knitting the last edge stitch in purl stitch. They begin knitting the ninth row, for this they leave the edge again, knit another twenty-five stitches in knit stitch, yarn over and knit another twenty-six knit stitches per row. This way, the sole of our baby booties will be obtained, and then you can start knitting the instep.

Knitting instep booties

When the sole is ready, you can start knitting ten more rows, all these rows will be knitted the same way, so from rows 10 to 20 only one edge loop is knitted, all other loops are knitted in knit stitch and the rows are finished with one edge loop in purl stitch. In this way, the lifting of the booties is achieved, but in addition to the lifting, you will also need the upper part of these socks.
Knitting the top of baby booties
If it is not entirely clear how to correctly knit booties with knitting needles for children from 0 to 1 year old with a description, the video will help you learn new loops and consider knitting in more detail. Now you can start knitting the upper part of the baby booties, to do this, remove one edge stitch again, twenty-nine loops are knitted in knit stitch, and then you need to make a decrease, for this two loops are knitted together in knit stitch to make one loop, after which the whole knitting is turned over to start the next row.
 Now the first stitch is simply removed again without tying it, but the next eight are knitted with a purl stitch, then the two stitches are knitted together again with a purl stitch. When a loop is formed, the product is turned again to knit another row of booties. The first stitch is removed, another eight stitches are knitted in knit stitch, and the entire knitting of two loops is completed in knit stitch. After this, you can proceed to the next row, simply remove the first loop, then knit eight loops in a purl stitch, and finish everything off by knitting two loops together, also in a purl stitch. To get the top of the booties, you need to repeat rows 23 and 24 until the 36th row of booties is knitted.
To get the correct knitting of booties for children from 0 to 1 year old with a description, the diagram will be an excellent assistant for beginners in this matter. It is in the diagram that the smallest details are shown, and if you follow it, you will get a good product. We follow the pattern further, to do this, finish the 36th row and begin knitting the next one. As usual, you just need to slip the first stitch, and then knit nine stitches in knit stitch, then knit twelve more loops using knit stitch and finish everything off with an edge stitch. Today on the Internet there are not only patterns for knitting booties with knitting needles for children from 0 to 1 year with a description, but also videos.
Photo gallery of bootie knitting patterns
Knitting elastic bands for booties
The elastic band will be the end of knitting booties; as soon as it is knitted, you can measure the finished socks for the baby. To finish knitting the booties, you need to knit one more row. To do this, one edge loop is knitted, after that there are 34 more knit stitches and everything is completed with a knitted edge loop. After this, you can start knitting an elastic band, these will be rows from 39 to 58. To get an elastic band, you need to knit one row with the front one, and the other with the wrong one, alternating these rows, you will get a beautiful and neat elastic band. And when all these rows are knitted, you can close the loops. In fact, there is nothing complicated about this, you just need to knit two loops at once with knitting to get just one loop, then this loop is put on the knitting needle again and knitted in the same way with the next loop. All stitches are knitted using this method until only one stitch remains.
After this, you can start sewing the finished sock; to do this, you need to sew it so that the seam remains on the heel, so it will not interfere with the baby’s movement. When both socks are ready, you can start decorating them.

Knitting booties using a crochet hook
Knitting booties for children from 0 to 1 year old with a description of crochet is much easier for many than knitting. There is also a big advantage of crocheting booties - they come out without seams and you don’t have to sew the finished product. The booties that are crocheted are quite dense and look very beautiful. And they knit them practically according to the same principle as booties on knitting needles, first of all they create the sole of the product, after which they begin to knit the instep of the toe, and after that you can make an elastic band, or you can knit the booties in the form of a sandal. In addition, using a hook, they create embroidery directly on the finished sock, or knit a beautiful flower to decorate baby’s booties.
How to crochet booties
One of the fun things to do is make things for babies and newborns with your own hands. As a result, you will only be touched, and these things will give you positive emotions. And when you see your efforts on little children, you definitely want to do more and more. For example, you can make booties for babies yourself.
When you first see them, you may think that this is a very difficult task, but in reality it is not so. You just need to know basic hand-crafting skills, of course, be patient, be careful when working and practice a little, and also know how to disassemble circuits.
For all beginners, before you start knitting booties, you need to know a few things:
- If you are just starting to knit booties, then you need a light sample. If you prefer knitting needles, then choose garter or stockinette stitch,
- If this is a hook, then there may be single crochets.
- threads for knitting must be taken from special or natural children's yarn. This is necessary to prevent irritation or allergic reactions in the child.
- the product is made exactly according to the child’s leg, they must be of the correct shape. The future fabric should not be tight on the foot, but at the same time not very loose, because otherwise the shoes will simply fall off.
- It is best to make shoes without seams and one-piece, or you can make external seams, but they should not rub the feet.
- the product itself should not have too many decorations. If you want to make beads or bows, they must be well secured. Do not forget. Even if your baby is still small, he is very curious.
- if the shoes need to be warm, then buy thicker threads, such as acrylic or baby wool. If the booties are summer, then you need to take thin cotton yarn.
- Before you start working, you need to measure the child’s leg, and then count the number of loops needed to start knitting.
Learning to knit booties with knitting needles
Many girls believe that it is easier to knit booties with knitting needles than with crochet. This is suitable even for beginners. There are several different ways: using additional knitting needles or taking only two, because this fabric will be very small. Below you will find several instructions for knitting baby booties.
How to knit booties with knitting needles instructions for beginners
This fabric that you are knitting is intended for a one-year-old baby. So take 40 or 50 g of baby acrylic thread and knitting needle number 3.
Cuff

Cuff
You need to start knitting from the top of the future bootie, which is called a cuff. For such a part, 1x1 is best, because thanks to it, it is fashionable to put the shoe on the foot freely, and at the same time the shoe will stay well on the foot. But if you want, you can also choose garter stitch, which works just as well. Cast on 39 stitches on the needles plus two edge stitches. If you knit with an elastic band, then in the front rows you need to do the front knitting, then purl, and in the purl rows do it as per the drawing. Only use knit stitches to make garter stitch. Depending on the height of the future canvas, the number of loops cast on will also be. You need to make 18-19 rows for average height.
Holes for lanyard

Holes for laces
After you have made the desired height of the cuff, you are allowed to proceed to the row on which you will make holes for the future ribbon or lace. You need to do it this way: knit two loops in the front row together with the front loop behind the back wall, then put a thread on the second knitting needle and make a yarn over, after which the rest of the row is knitted in exactly the same way. Future loops must be secured in the purl row, knitting with purl loops.
- the next stage is that you divide all the loops into three even parts. This is necessary in order to make the sides of the booties and fronts. So take the third knitting needle and place 13 stitches on it, the other two knitting needles should have the same number. Next, using the fourth knitting needle, you begin to knit the front of the shoe. The beauty of your masterpiece will depend on this, namely on the chosen pattern. But if you are just a beginner in this matter, then you need to choose a simple pattern.
- For example, you can make a front by doing a cool tangle stitch, which is very easy to do and looks really cute when it's done. Make it mono in this way: knit the first row like a regular elastic band, while alternating the purl and front loops. Second row - the front loop is knitted under the purl loop, and under the front loop - purl. Knit the pattern to the end of the row. You need to make 15 rows in order to lift the toe.
Connection of side parts and toe

In this tap you need to connect the toe and one of the side parts. So, along the left edge of the rise of the middle part, you need to pull out 8 new lifting loops (for easier work, you need to do this with a hook, and then throw the resulting loops back onto the knitting needle). Knit the knit stitches that are on the closest side in the direction of knitting to the knitting needle with the stitches set aside on the same medium needle. Next, unfold the knitting, take circular knitting needles and knit the knit stitches that are on the knitting needle with the toe. Next, the second side panel with the toe is also attached. So eight loops need to be knitted along the lifting edge of the front and knitted with the front loops of the loops that were left for the other barrel.
Side part

Sidewall
The sides are knitted from rows 1 to 6 on the front side with knit stitches, and purl stitches on the back side. In the 7th row there are purl loops, in the 8th row there are knit stitches, and from the 9th to the 14th row you need to knit the same as the first six.
Sole

In order to form the sole, it is necessary to divide all the loops into three parts again. Leave 21 loops on the sides, 13 loops on the middle knitting needle in order to knit the toe, as in the beginning. Next, with garter stitch, knitting begins with the loops of the middle part. Knit up to 12 loops in the first row, and the 13th loop is knitted with the first side loop. And the front loop must be knitted when it goes on the front side, or on the wrong side. Next, you need to unroll the knitting and continue with facial loops, reaching the last loop of the row. The same loop must be knitted together with the first loop of the other barrel. Until there are 6 loops on the side knitting needles, knitting must be continued.
Heel. Secure the remaining loops with a gypsy needle or crochet hook.
Product assembly

You need to sew the fabric with the seam facing outward using your own hands using a needle. Next, take a ready-made lace, ribbon or lace that you made yourself from simple chains and loops, and thread it into the special holes left. Well, the first shoe is ready.

Ready booties
The second product is made independently according to the same scheme.
How to knit booties on two knitting needles
If you make booties on two knitting needles, then this is also not a difficult job, and maybe even much easier than when you use additional knitting needles, because nothing else will get in the way. So you can try to make a more colorful product with your own hands and experiment a little. To do this, you must take circular knitting needles and acrylic baby thread in blue or white colors. You also need an embroidery needle and a strip of cardboard for the future pompom. Once you have completed all the preparations, you can look at the diagram:
Knitting the sole
- Take white yarn and cast on 33 stitches. The middle - seventeenth loop is marked with a thread of a different shade, so that you do not get confused and know throughout the knitting where the middle of the product is.
- 1-2 rows go with facial loops.
- in the third row, discard the edge stitch, then there is one yarn over, 15 stitches go with knit stitches, then the following pattern follows: yarn over, knit stitch, 15 knit stitches, yarn over, edge loop.
- 4 rows of all received loops are made with facial stitches.
- From rows 5 to 8, you repeat knitting as from 1 to 4. Next, you will get 45 loops on the knitting needle and a finished sole.

Booties on knitting needles
We knit the cloves

We knit a bootie front
Before making a toe, you must first visually divide your product twice, to begin with there are 45 loops that already exist into three parts: left, middle and right 15 loops each, 5 loops for three times the middle part. You need to continue with white:
- remove the edge and knit 19 stitches of the row, then two purl stitches (21 and 22 loops), two knit stitches (23-), and then knit stitches (25,26).
- turn the knitting and knit the next rows of the toe like this: purl two loops, two loops together, then turn the fabric again. You must knit the front of the booties until the middle loops are reduced to 5, but the number of loops that you left at the edges should remain unchanged, 15 pieces each.
- when you have made the toe, knit the 15 side loops that you did not touch, unfold the product and knit all the loops again with knit stitches. At the end there should be 25 stitches on the knitting needles.

The front of the bootie
Making holes for the lace
One row must be made according to the pattern with your own hands: two loops together with a knit stitch, one yarn over until the end of the row.

Holes for laces
The next eight rows are knit stitches. Next is another row with teeth, but this time you don’t need to change the white thread to blue. There is no need to leave the first edge in the row where the teeth are attached, but you need to start throwing the loops from there, you also need to pull out additional loops from the blue dotted line, which is located directly under the white color, and not from the white one. The product must be sewn along the sole and back side; the seam should only be soft or external. After this you knit the second shoe.
When you have made both shoes, you need to make two laces in the form of a chain of air loops or a braided braid. We thread the laces into the holes that you specially prepared.
If desired, the fabric can be decorated with pom-poms, which are attached to the edges of the lace, or you can sew them in the middle of the front. The pompom is made using the following scheme:
- take a thick cardboard or cardboard box, for example, toothpaste or cream. The size of the box should be equal to the size of the future pompom.
- Wind the thread around the box yourself; the more turns, the fluffier the product.
- if you want bells on the laces, then you need to take a needle with a strong thread, which is similar in color to a pompom, and fasten it at one end of the lace. Next, remove the threads carefully wound around the box, do not tangle them, then pull them tightly in the middle with the thread that is attached to the lace several times. Next, the thread is secured and torn off.
- At this stage you need to cut the turns of thread on the sides. Then straighten the threads and shape the product, make it voluminous and fluffy.
- the second canvas does exactly the same. The finished pompom looks something like this:

Knitted booties
How to knit booties and boots with knitting needles
Below is another video with instructions on how to knit booties:
How to crochet booties
Some people still continue to say that crocheting booties with your own hands is much more difficult than knitting. You can also make very beautiful types of products with crochet, which do not require spending a lot of time and effort; you can find a huge number of patterns such as boots, small sneakers or booties. So don’t immediately say that it’s difficult and refuse to work. Below you will see several different simple instructions on how to knit booties for newborns and older children.
How to crochet booties description for beginners
The following diagram, which describes the description step by step, is suitable for those who are just starting to make booties for little ones:


How to crochet booties - sneakers
If you are a lover of unusual things, then here you can knit booties - sneakers that look very cute and interesting. In this scheme, the booties are designed for a child from 3 to 6 months, but if you want. Then you can calculate the size of your child’s feet and simply reduce or increase the loops.

Booties
To start knitting, you need to take iris in blue, white, red shades and hook No. 2. You need to start your work from the sole, and specifically from the center. The diagram below will show you how to crochet sneakers correctly:

Booties scheme
Let's look in a little more detail at how we can do all this:
Sole
- at the beginning of the work, you need to make 20 air loops plus one loop to raise the row using white yarn.
- 1 row. Knit sequentially into each loop, starting from the second main chain stitch: 9 stitches b\n, 9 stitches c\n, 7 stitches c\n in the last stitch of the row. Turn the product and continue knitting in the circle on the other side of the cast-on braid, while following the sequence: 9 single stitches, 9 double stitches, 6 double stitches in the final stitch of the row. Make a connecting post at the end of each row.
- 2nd row. Knit three lifting loops, then there are 19 stitches with\n, five times increase, in each loop we knit a loop of 2 stitches with\n, then there are 20 stitches with\n, five times there is an increase at the end of the row - two stitches with\n n in each of the 5 remaining stitches.
- 3rd row. Three lifting loops, 19 stitches with \n, 2 stitches with\n in one loop and 1 stitch with\n - repeat twice, 2 stitches with\n in one loop - repeat twice, 1 stitch with\n, 2 stitches s\n - twice, 20 stitches s\n, 2 stitches in one loop and 1 stitch s\n - repeat twice, 2 stitches in one loop - repeat twice, 1 stitch s\n and 2 stitches s\n in one loop - repeat twice.
- 4-6 rows. Three lifting loops, 72 columns with \n behind the back wall of the loops. Connecting half-column at the end of the sixth row with red thread.
- 7 row. The sole must be turned inside out, shaping and straightening it. After 3 lifting stitches, all the loops of the row are again made with a red thread using s\n columns, then the connecting half-column is white.
- 8 row last. It is knitted in the same way as the previous one, starting with 1 rise and white thread.
Top part
Change to blue, white thread. Find the center of the sole and count the seventh loop on one side of the center, then mark it with a thread of a different color, and do the same on the other side.
- 9 row. Start making the top part from the next one after the marked one, this is 8 from the center loop. There are three rises, then columns with \n in each loop of the mark.
- 10 row. Turn the product, one loop for lifting and knit stitches with\n to the first mark.
- 11 row. Turn the fabric, make 4 air loops, starting from 4, make stitches with\n, while the last three loops are not knitted. Work a double crochet stitch into the last stitch of the row. The resulting holes will be needed for the future laces in the sneakers.
- 12,14,16 and 18 rows. They are made like row 10, and 12,15,17 and 19 like 11r.
Tongue bootie sneaker

Bootie tongue
- 1 row. Knit 6 double stitches into the first stitch of a chain of 4 stitches.
- 2nd row. 3 lifting loops, 1 stitch with \n in the first loop, 2 stitches with\n in the second and all other loops to the end.
- 3rd row. Loop for lifting, column s\n to the end of the row-arc.
- 4 row. Lifting loop, 11 columns with\n along the straight part of the tongue, which is its top. Fasten the white thread and cut it.
- 5th row. The thread is blue, there are three lifting loops and 11 stitches are knitted along the top of the tongue.
- 6th row. Air loop, 11 columns b\n.
- From 7 to 19 rows. Odd rows go like the fifth row, and even rows go like the sixth.
After you have made all the parts, you need to sew the tongue to the front of the sneaker with white threads with the convex part on the wrong side. Tie the sole with a crochet hook and sew the holes with white thread using a needle. From 190 air loops, make a lace in which there are single crochets, and then thread the lace into special holes. Using the same scheme, you need to make a second bootie-shoe.
It’s not such a difficult job to make booties for little kids. After all, when you start working, you will understand that it is fun and interesting, especially since it is always nice to make things for your cute little one. Now you can easily knit or crochet booties for your little one.
Evgenia Smirnova
To send light into the depths of the human heart - this is the purpose of the artist
Content
You always want to dress up your kids, wearing beautiful clothes, paying attention to even the smallest details. Elegant dresses, trousers, bodysuits and much more can be bought in the store. But for your beloved child, you want to create something with your own hands, putting a piece of your soul into the product, making everything as perfect and neat as possible. You can make beautiful things yourself, for example, vests and socks. How to knit such accessories, what yarn to choose, where to find a pattern - read about it below.
What are booties
Booties are warm shoes for babies from birth to one year. They can be made from different materials using several methods: sewn from fabric or soft leather, crocheted using fine yarn or knitted to create warm shoes. The knitted version has obvious advantages: a wide selection of yarn patterns for weaving, such booties will be very warm, light, and comfortable for the legs. To add originality, such clothing items are often decorated with decorative details: bows, beads, figurines, etc.

How to knit booties with knitting needles: master class
To knit booties for babies from birth to six months you will need:
- knitting needles with a small diameter (focus on the thickness of the yarn);
- yarn for knitting;
- sewing needle with a large eye for connecting seams;
- safety pin;
- beautiful buttons - 2 pieces.

Legend:
- Facial loop - LP.
- Purl loop - IP.
- Yarn over - NK.
We start knitting from the left bootie; to do this, cast on 41 loops on the knitting needles. Next, let's look at the step-by-step execution of work in rows:
- 1 – knit all the loops.
- 2 - remove the first loop - edge loop, then 1 LP, 1 NK, 18 knit loops, 1 NK, 1 LP - repeat according to the pattern again, finish with an edge loop.
- Row 3 and all further odd rows are knitted with knit stitches.
- 4 – we remove the edge stitch, 2 RS, 1 yarn over, 18 knit stitches, 1 NK, 3 RS, yarn over, 18 knit stitches, 1 NK, 2 PL, the last edge loop, purl.
- By analogy, we knit the required number of rows, adding four loops in each even row until there are 57 stitches on the knitting needles.
- 10 – purl all loops.
- 11 – we attach a thread of a different color to create a pattern, and we knit the entire row with purl loops.
- 12 - remove the edge stitch, then knit according to the pattern - knit 2 loops together, 1 NK - so on until the end of the row, the last loop is the edge loop.
- 13 – we return to the thread of the main color. We knit this and the next 2 rows with purl stitches.
- 16 – edge, 19 LP, 2 loops are swapped and knitted together, 13 LP, 2 LP knitted together, 19 knit, 1 edge.
- Odd rows up to 25 are knitted with purl stitches.
- 18 – edge, 18 LP, 2 knit stitches together (after shifting them), 5 LP, 3 loops knit together so that the middle one is on top, 5 LP, 2 knit stitches together, 18 LP, edge purl.
- 20,22,24 – by analogy with row 18, we make decreases. As a result, 39 loops will remain on the knitting needles.
- We close all the loops on the front side with a thread of a different color, knitting everything with facial loops.
- We make a backdrop and a strap: we cast on ten loops from each edge so that the result is 20, move it onto 1 knitting needle, and knit four rows with knit stitches. In the 4th row, add 22 loops to create a strap and knit another 8 rows. At the end of the strap, during the knitting process, you need to make a hole - a loop for a button.
- We close the loops, sew the product as carefully as possible, placing everything evenly, without making convex seams so that they do not cause discomfort to the child. Charming knitted booties are ready.

A variety of patterns can be used for knitting, depending on your weaving skills and the desire to get a unique, original work. It is not difficult to understand the patterns, the main thing is to understand the symbols, monitor the number of loops, and the correct sequence of the pattern. Some booties are knitted whole and then sewn together. For older children, it is worth choosing models where the sole is knitted separately so that while standing, the seam does not put pressure on the leg. Look at the photo for an interesting knitting pattern for booties:

Tutorial for knitting booties
In order to knit booties with knitting needles (any model), perform the steps in a certain sequence, focusing on the basic guide to the steps:
- We choose a knitting pattern; for simplicity, it’s worth finding a master class or description for it. It all depends on personal wishes, knitting skills, the desire to create a simple thing or an exquisite product. When choosing, it is important to pay attention to the size that will be obtained as a result, recommendations for choosing yarn.
- Choosing yarn. Be as careful as possible - it is better to give preference to natural threads without synthetic fibers. They should be soft and pleasant to the touch. If you are a beginner and have little understanding of the nuances, ask for help from a consultant in the store - he will help you make a choice. The color of the yarn plays an important role - if the booties are monochromatic, this will make the choice much easier, and if the pattern provides for a pattern or edging, then you need to make sure that the threads match well and look harmonious.

- According to the yarn, select knitting needles of the required diameter.
- Determine the size. Basically, booties are divided into 3 age groups - from birth to 3 months, from 3 to 6 months, from 6 to one year. For older children, it is recommended to choose models where the sole is knitted separately and sewn on. For kids, patterns of weaving a solid fabric with further stitching on the sides and on the sole are suitable.
- Weave a small, even fabric to determine the knitting density with these threads and knitting needles.
- Proceed directly to knitting booties with knitting needles, follow the sequence of work. Don’t be lazy about counting the stitches, especially if there have been increases or decreases in a particular row - this can lead to disruption of the design or pattern and the work will not look neat.
- You should sew the finished work carefully so that the seams are barely noticeable and, most importantly, do not cause discomfort.
- In order to give the work a complete, beautiful look, you need to decorate the product. For this, a variety of decorative elements can be used: buttons, bows, animal figures, butterflies, ribbons, lace, pom-poms. Often, booties knitted with knitting needles are decorated - this makes the product more elegant, beautiful and original.
Knitting the simplest booties with a pattern
To knit original booties with a pattern, you don’t need any special skills, the main thing is to master the basic skills and learn the techniques for weaving purl and knit stitches. To create unique products for babies from birth to several months, you will need a little: threads of two colors - the main one and for the pattern (it is advisable to choose a bright, contrasting one) and knitting needles that match the chosen yarn. The weaving pattern is very simple and even beginner needlewomen can do it. This video tutorial will help you understand how to knit and assemble booties with a beautiful pattern:
Cool knitted Adidas booties
Knitted booties for children can be not only warm, comfortable, beautiful, but also stylish. To create fashionable products, a suitable knitting pattern for sneakers is “Adidas”. To make these booties, you will need threads of the main color and white to create branded stripes, laces and a logo. These shoes are suitable for children from six months to a year, even for those who are already starting to take their first independent steps. Below is a video with a step-by-step description of the actions that will help you learn how to knit cool booties:
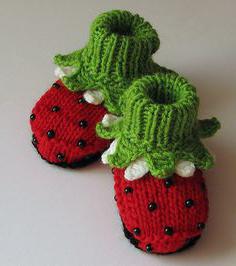
How to knit marshmallow booties
Booties knitted using the marshmallow technique are ideal for little princesses. This is an original pattern, according to which the toe of the product is knitted in relief, but with a combination of two colors. The first sample, which was knitted using this technique, was made of soft pink and white threads. Different colors can be used in the work; it is important that they combine harmoniously and look beautiful. Watch the video with a detailed description if you are interested in this option of weaving booties with knitting needles:
Found an error in the text? Select it, press Ctrl + Enter and we will fix everything!