How to make leather bracelets with your own hands (MK and video). How to make a leather bracelet with your own hands: interesting ideas for trendy jewelry Leather-look bracelet made of paper
DIY leather bracelets are another type of jewelry that occupies a popular position in modern women's and men's fashion. Let's talk about examples and ideas of such bracelets today. In the master class we will assemble a stylish bracelet from thin leather cords and decorative connecting rings.
Leather bracelets are very diverse in their assembly. Craftsmen use both thin and dense leather in their work; leather cords; stripes; flaps, etc. Leather elements can play a major role in decoration, acting as the only base or some separate decorative fragment decorated with beads, beads or pendants. Let's look at a few examples of leather bracelets.
Leather bracelets in the form of one or more stripes or cords, decorated with a decorative lock, separator beads or pendant:


Braided bracelets made of leather cords, decorated with beads.

Leather bracelets with printed or embossed inscriptions or patterns.


Curly bracelets made of leather, using cutting.

Men's leather bracelets decorated with studded beads or metal links.


Leather bracelets decorated with embroidery.


Voluminous leather bracelets with a textured texture, decorated with elements of jewelry fittings.


Bracelets made of thin leather in the form of a gathered accordion.

Bracelet made of thick leather, with a decorative three-dimensional element in the form of a leather flower, with a toning effect.

Leather bracelet on a metal blank.

Master class on a bracelet made of leather cords and decorative connecting rings.
Accessories:
Leather cord 1 meter
End clamps pcs
Decorative connecting rings 3 pcs
Carabiner lock 1 piece
Small connecting rings 2pcs
Tools: Scissors, pliers.

Assembly:
We cut 6 leather cords, place them in the end clamp and clamp the end teeth with pliers. For reliability, before clamping, you can apply a few drops of glue to the end cap.

We lay out the cords on the desktop as shown in the photo below. We retreat approximately 5 cm from the edge of the bracelet. We draw a decorative ring into the central two cords.

Under the ring, we place side cords on the central cords, as if braiding a simple braid, and then bring the central two cords back up so that they are on top of the decorative ring.

We again draw a decorative ring through the central cords.

We braid the braid under the ring and bring the central cords up again.

We repeat the steps one more time.

We fix the remaining edge of the bracelet as at the beginning, using an end clamp. Add a carabiner lock through small connecting rings.

The bracelet is ready!

The creation of leather bracelets is reminiscent of something primitive - of the times when the first people invented jewelry. Nowadays such jewelry is at the peak of popularity, symbolizing freedom and non-recognition of rules.
Try making your own leather bracelets to embrace fashion trends.
Selection of materials
Craftsmen who make their own leather bracelets know that each craft pattern requires a certain type of material.
For example, if you want to create wide symmetrical or asymmetrical bracelets with a minimum of decoration, you will need thick, rough leather - saddle and crust. Most often, men's bracelets are made from saddle cloth.
If you need thin woven bracelets and baubles, choose soft leather ribbons, like suede or yuft - they bend and stitch well.
Make a wide blank, which you will decorate with many ribbons and stones, from leatherette - it is soft and can be easily processed with needles and hole punches. In addition, leatherette is much cheaper than natural material.
Women's bracelets
In the last few years, world-famous designers have introduced the fashion for leather bracelets. People lined up in jewelry stores to buy Chan Lu leather bracelets with natural stones, nuts and rivets.
But handmade jewelry is in no way inferior to the originals! Try it, it's very simple.
Leather bracelet with beads
The jewelry consists of several suede threads, bracelet clasps with flat clips, and beads with holes large enough to fit your laces through.
- Prepare the required number of lace cuts, equal in length to the size of your wrist + reserve for knots.
- Secure one side of the laces with the clasp clip.
- Start stringing beads onto one of the threads with your own hands, securing them on both sides with knots. Do the same with all the other threads.
- Once the process is complete, secure the loose ends of the laces with the clip of another fastener.
Your bracelet is ready! To vary the appearance of your jewelry, use several types of beads, alternating them on a thread or putting each new type on a new cord.
Braided bracelet with chain
These leather bracelets can not only be worn with casual wear but can also be worn at formal events due to their sparkling appearance. Bead bracelets are woven in a similar way, which are also universal to wear.
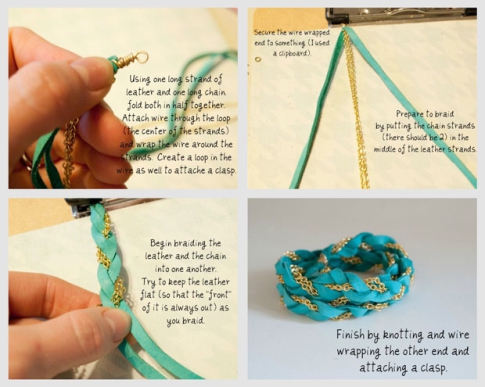
In the process you will need bracelet clasps with ring fasteners, 1 long piece of suede ribbon and 1 thin gold chain.
- Thread the ribbon and chain through the ring of the first part of the clasp. Arrange them so that you have 2 side leather laces and a double chain in the middle.
- Start braiding a regular three-strand braid with your own hands.
- After completing the weaving, secure the bracelet parts in the ring of the second clasp.
Now you can put on your leather bracelet. You can thicken such bracelets by fastening together several similar weaves at once.
To learn how to weave popular Chan Lu leather bracelets with your own hands, check out the following video tutorial.
When creating such bracelets with your own hands, round or faceted natural stones are used. They can easily be replaced with cheaper plastic beads that look similar to turquoise, coral or pearls.
All women's leather bracelets can be worn with sports, casual, safari and marine styles, that is, with clothes for nature, walking and relaxation in neutral tones, similar to the color of the leather on the bracelet.
Bracelets for men
Men's leather bracelets are distinguished by their simplicity and laconicism compared to women's ones. Often the maximum decoration of such jewelry is rivets, spikes or types of weaving.
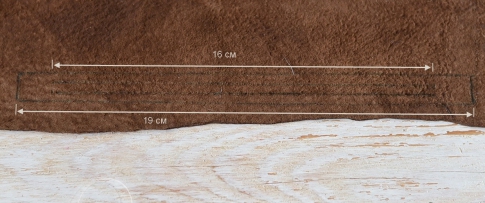
Now you will try to make a woven leather bracelet for men with your own hands. While working, you will need a piece of leather 5 centimeters wide and about 20 centimeters long.
- Draw the pattern of the product on the back of the leather. The length of the bracelet must be at least 19 centimeters. Make 2 cuts in the middle, not reaching the edges by 1.5-2 centimeters.
- Place the workpiece vertically and mentally or using an erasable pencil, number the cords from one to three. Bring the bottom edge of the bracelet between 2 and 3 cords.

- Straighten the cords as you weave. Continue weaving in the following order: the first cord with the second, the third with the first, the second with the third.
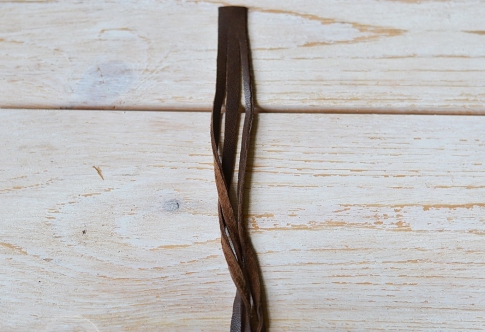
- Bring the bottom of the workpiece forward with your hands between the third and second cords.

- Adjust the cords again so that the lines go down to the bottom of the workpiece in the correct order - first, second, third cord.

- Repeat steps two through four. You should now have a finished braid.
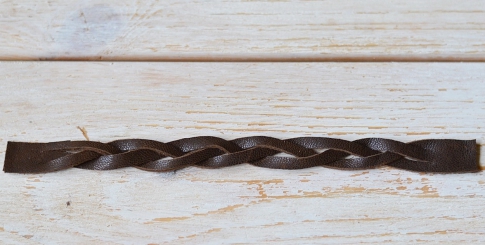
- Give the desired shape to the edges of the bracelet and use an awl to make holes.
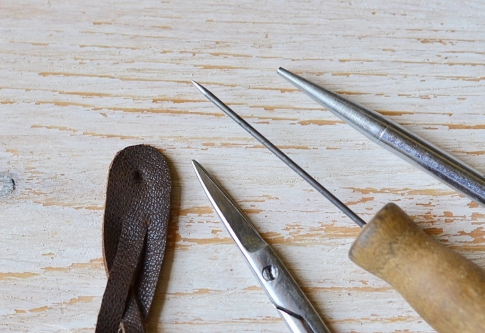
- Set the bracelet aside. To make the fastener, glue several pieces of leather together and leave to dry for a day. When the workpiece is dry, round the edges, make a hole in the middle and smooth out the unevenness with sandpaper.
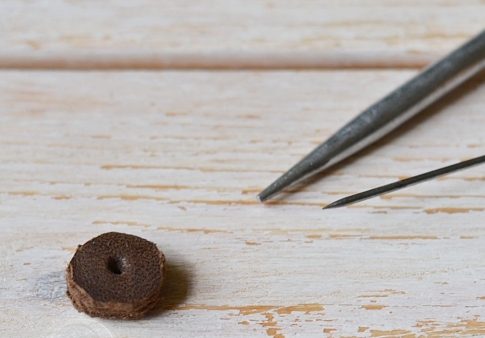
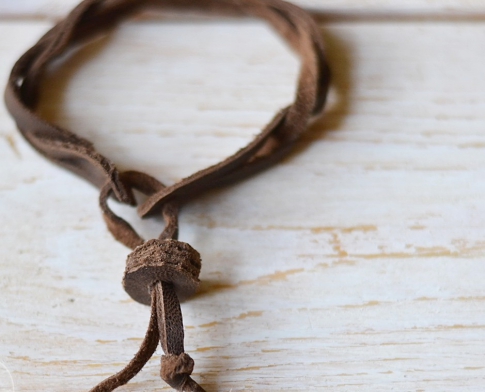
- Thread a thin leather cord through the holes in the bracelet. Pull both of its edges through the resulting leather nut. Tie the edges of the lace with knots.
Weaving is quite simple to perform, so you can master it the first time.
The jewelry will be a welcome gift for your man. These bracelets will fit perfectly into a casual street style. High-quality work will suit even classic-style suits if you are heading to an informal meeting. But at a special event it is better to appear without a bracelet.
Children's bracelets
Children love to imitate adults by decorating themselves and wearing their parents' clothes. Make your own leather bracelets for a little fashionista or fashionista that will attract your child with their bright design. Such bracelets can compete in popularity even with well-known bracelets made of rubber bands.
You will need a long thin leather cord and bright floss threads. This decoration is universal - depending on the colors of thread you choose, it can be given to both girls and boys.
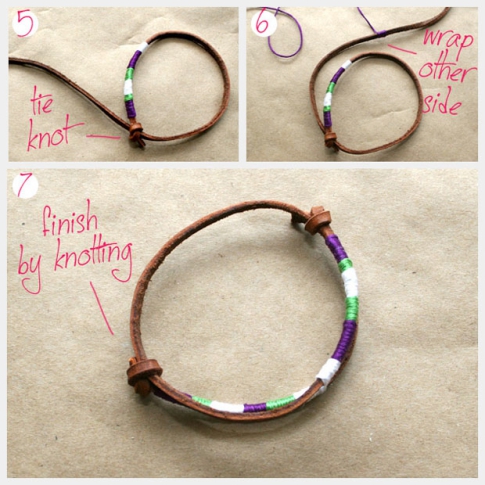
- Wrap the bracelet loosely around your wrist 2 times and add allowance for tying. Cut to the measured length.
- Secure the cord with tape. At a distance of approximately 5 centimeters, drop some glue and attach the first color of floss. Start wrapping the thread tightly around the cord until you reach the distance you need. Place a drop of glue again and secure this thread.
- Start wrapping the bracelet with a thread of a different color. Continue alternating colors until you have braided about 2 inches of the bracelet. Secure the last color of floss using a needle and glue.

- Tie the remaining part of the cord in a knot around the other side. The knot should be strong, but the cord should pass through it freely.
- Repeat the previous steps on the other side of the cord and tie the cord again.
To make it easier for you to make strong knots on a leather thread, wet it with warm water and remember well to soften and give elasticity.
Kids can easily wear such jewelry to kindergarten, school or for a walk. And thanks to the bright design, the bracelets will suit any everyday children's clothing. But it’s better not to wear them with elegant dresses and formal suits.
Do-it-yourself leather weaving as a separate art form dates back to ancient times. It amazes with its sophistication and beauty. Don’t think that weaving leather is difficult. There are many different ways of weaving leather, master classes are held on them, and there are also many different patterns by which you can weave a leather bracelet with your own hands. However, the most popular are the girl's braid, the circular braid and the single puzzle. Each of them is interesting in its own way.
You can make both a female and a male version. In order to start weaving a bracelet with such a mysterious name, you will need strips of leather approximately 4 cm wide. Before preparing the material for processing, you need to think about the length of the bracelet and add another one and a half times the length.
 As you craft, the strip will become smaller (shrink), so a little more leather won't hurt. The best length is a quarter of a meter. To trim, you need to use a sharp knife, razor or scissors.
You need to make a couple of parallel cuts along the length of the strip, however, you should not cut it all the way. You can’t touch it; there should be three centimeters from the edge to the cut. The ribbon will turn into three identical parts - laces. For further work, you should number from left to right: 1, 2, 3. You need to be sure that they end on the same line.
First of all you should prepare your work area. It should be perfectly smooth. As a last resort, you can put a plastic or wooden board on the table. To process leather strips, it is allowed to use a construction knife with a replaceable blade, tailor's scissors or stationery knives.
 Before you start weaving, you need to secure one end of the strip. To do this, you can take a clamp, press the strip with something heavy, or even nail it with a hammer and nail. Now we can begin. It is necessary to pull the bottom of the strip in your direction, and then thread it to the bottom of the future decoration between the second and third stripes and return it to its original state.
For a more comfortable process, it is better to twist the three laces (make bundles), this will be much easier. To make sure that the weaving goes in the right direction, you should pay attention to the middle of the bracelet.
In the middle of a correctly executed decoration there is a knot. However, the resulting braid should not be too tight.
- The first lace is placed under the third.
- Thread the third lace through the first.
- Thread the second lace through the third. There should be a distance between them at the bottom of the bracelet.
- Again you need to pull the solid end of the leather strip in your direction and thread it between the second and third laces. Pull down.
The first stage ends with this loop. In total these stages can be from 4 to 6.
Circular Braid
The braid looks like a braid of 4 cords. First you need to cut four laces from a strip of leather. As in the previous technique, when braiding the laces, the leather also shrinks, so it is recommended to make the blanks for the laces long. The laces should not be too wide, since the braid is already quite large, and with wide blanks it will become even larger.
 Before the weaving procedure, you need to tie the ends of the threads into one knot. In order to make the work as convenient as possible, the workpiece should be attached to the work surface. It could be adhesive tape, electrical tape, or something heavy. However, one of the more comfortable ways would be to fix the ring to the ends tied with thread; this allows you to conveniently fix the structure on the leg of a table or chair.
You can try to braid the most ordinary rope or tie woolen threads to all the laces involved in the work:
- Bring the fourth lace to the left through (from above) the second and third laces.
- Now from left to right the laces should be arranged like this: first, fourth, second, third.
- The second passes through the fourth in the same direction. Lace placement: first, second, fourth, third.
- The first goes through the second and fourth. Position: second, fourth, first, third.

The same manipulations must be done with the fourth and first laces: second, first, fourth, third. If everything went well at the initial stage, then the fourth and first cords should be located in the middle. The second is the last one on the left, the third cord is the last one.

The whole process must be repeated until the desired size is achieved. After finishing the weaving, all ends must be tied and secured with a special ring; it is great for making jewelry.
Maiden braid
This technique differs from others in its sophistication and simplicity. To make such a leather bracelet with your own hands, you need to cut three laces of equal width from a strip of leather. One end of the strip must be left intact (at the other end of the strip the laces will hang freely) or the entire strip must be cut into three equal parts.
 It is worth remembering the properties of the leather (it shrinks during the weaving process) before the workpiece itself. For a large bracelet, the thickness of one cord will be quite large. If you want to weave a necklace, the laces for it should be long. If the braid consists of completely cut strips, then at one end they need to be connected into a knot with a tail of approximately 2.5 cm, and attached with tape or tape to the workplace.
The ends of the strips must be the same length. They should be spaced evenly. Beginning of the process: insert the first strip through the second. They must change; the first one takes the place of the second one.

Varieties of unusual products

The most important thing is to constantly develop in this craft. Some people don't stop at decorations and decorations.
They are interested in how to make a whip, a whip or a crop with their own hands. This requires other techniques that also need to be learned.
Paper is an ideal material for creativity. You can draw on it, make appliqués, and use it to create all kinds of crafts.
Paper bracelets
Jewelry will be no exception. Yes, using just paper, you can easily make a bracelet, necklace, tiara or the whole set at once.
In the 60s, paper decorations were very popular. They were made at home on their own. Below we will look at several examples of how to make a bracelet out of paper.
Different ways
There are many ways to make a paper bracelet.
Idea number 1.
Prepare the following materials:
- thick multi-colored A4 paper;
- fishing line;
- glue;
- Ruler and pencil;
- a thin plastic or wooden stick (as for sushi).
You can start working.
Ready. A simple way to make a paper bracelet with your own hands.
Idea number 2.
Using this method, even a five-year-old child can make a bracelet for himself. Although for the first time it is better to do it with him.
You will need:
- three multi-colored thick sheets of paper;
- scissors;
- glue.
It is necessary to cut three multi-colored strips of the same length. Now carefully braid them into a braid. In this case, it is advisable to glue the strips with each bend. But use a little glue so that the paper doesn't get wet.

This was the second way to make a paper bracelet. As you can see, it turns out to be a very simple but beautiful bracelet.
Idea number 3.

Egyptus Bracelet
You can also make an Egyptian bracelet from the cartoon of the same name.
To do this you will need thick but flexible golden paper, glue, 3 large blue beads, 1 blue bead, and a blue felt-tip pen.
- Cut a sheet of paper crosswise, attach it to your wrist and glue the ends together, cut off the unnecessary part.
- Using a felt-tip pen, draw the eye of Horus.
- Glue a blue bead in the center of the eye, blue beads on the bottom and sides.
The fabulous decoration is ready. Now you know how to make an Egyptus bracelet out of paper. This will be very relevant for little fans of the cartoon or for those interested in Egyptian themes.
Positive aspects of creativity
These are the easiest ways to make paper decorations. Show them to your child and he will be delighted. Girls will especially enjoy this process. After all, in the same way they can make additions to the bracelet - beads or a necklace.
As for boys, the same Egyptian bracelet will suit them perfectly and will give them the opportunity to imagine themselves as the last pharaoh of Egypt.
This will perfectly develop their spatial thinking and creative skills. Weaving bracelets will help little children develop fine motor skills and finger dexterity.
You can also experiment with design and translate all your ideas into creativity. The main thing is not to be afraid to fantasize.