We knit for girls with knitting needles with a description. Children's knitting patterns for girls with descriptions. Knitted overalls for newborns
Dress from OlgaPolga


More detailed explanations
Yarn from here, 80% alpaca, 20% silk, 100m in 25g. It took about 6 skeins of brown and less than 1 skein of white. The knitting density on US 2 needles (2.75 mm) in stocking stitch was 28p x 36p = 10x10 cm.
The main part of the skirt is knitted according to the Clue 5 pattern from the first page. All even rows are knitted purl if knitting on straight needles, or knitted if knitted in the round. Row 169 there is preparatory. Rows 171-176 are the main pattern, rows 177-188 are the transition to the next pattern. I repeated rows 171-176 8 times.
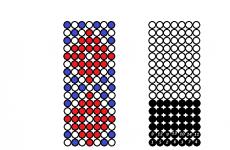
Then I knitted according to pattern 6a and 6b from the second page. It shows row 220, in which the checkboxes indicate “knit behind the front and back walls” or purl or knit, depending on how you knit. Arches are the closing of loops with a crochet hook, as is often done in napkins. The numbers are how many loops to knit together in a half-column, then 5 air loops and loops together again.
I highly recommend knitting a sample. I knitted a large one, washed and stretched it according to all the rules for knitting light openwork (for shawls and the like). Otherwise, it will be very difficult to predict how much the openwork will stretch. Each pattern has its own density. I had it like this: for fishtails, 3 repeats in height - 5 cm, 1 repeat in width - 5 cm; the final part is 10 cm high.
To determine the size of the dress, I took a dress that fit my daughter and measured it. Total came out: chest girth 52.5 cm, length from the beginning of the openwork part to the shoulder 14 cm, length from the openwork part to the back neckline 11.5 cm, length to the front neckline 9 cm, length to the sleeve neckline 2.5 cm, shoulder width 5 cm, neckline width 10 cm, sleeve neckline height 10 cm, skirt length 28 cm.
All sizes are for my one year old daughter. Of course, it is better to choose everything for your girls.
I would also like to note (and this can be seen in the photographs) that the sleeve neckline is very loose. It's hot here in September, and I wanted to lighten the dress. If this does not suit you, or you want to make a regular sleeve, not with wings, like mine, then you need to increase the length to the sleeve neckline and reduce the armhole.
Now about the knitting order. Everything is knitted in a circle and there are no seams anywhere. I recommend knitting this way - nothing pulls anywhere. You just need to take into account that the patterns are given for knitting back and forth and give edge loops and halves of patterns. All this needs to be omitted and only the main pattern should be knitted.
I started with the auxiliary cast-on and knitted the back and front together in the round to the armholes. Then I divided the back and front, made decreases for the armholes and knitted them separately. Then I closed the loops for the necks and decreased the loops to round the necks. The shoulder seams were closed on three needles.
I knitted the back without a fastener and had trouble knitting the border at the neck at the end; it was either tight or too loose. But I didn’t want to bandage it. If I knitted it again, I would make a teardrop fastener on the back and the collar would not be solid, but with a slit at the back.
Once the top was done, I unraveled the cast-on and placed the stitches on the needles. I added stitches to get the right number of stitches for the lace pattern. In total I did 16 repetitions in the circle, 8 in the front and 8 in the back. Next I knitted the fishtail pattern in the round.
Then I switched to the patterns for the last part of the hem, knitted all the rows according to the pattern once and closed off the loops with crochet. The diagram gives an option for the last row if you want to bind off the stitches with knitting needles. Then, after knitting the pattern, you need to knit several rows with garter stitch and bind off the loops.
For the sleeves, I cast on stitches along the edge of the armholes. I started where the curve ends on one side and finished on the other side in the same place. Then I worked in shortened rows: purl the first row up to a few stitches after the shoulder seam, wrap, turn, knit the second row up to a few stitches after the seam, wrap, turn, and so on. At first I “advanced” several rows by 1 loop after the previous turn, and then switched to 2 loops. I knitted the last 4 rows in garter stitch to prevent the edge of the sleeve from curling.
The final part is the neck. Let me remind you that my option, when everything is in a circle, is not very successful. I cast on loops with white thread along the edge of the neckline, added loops in the next row to get 6 repetitions of the pattern and started knitting from row 199 of pattern 6a, only inside the “triangles” I didn’t knit the openwork, but simply with knit stitches. When casting on loops, take into account the direction of knitting so that the front side of the collar faces the desired direction. I closed the loops in the same way as on the hem, using crochet.
The last stage was a small strip on the neckline. I picked up the main thread along the neckline, in the next row I decreased the stitches in the area of the curves so that the placket would fit better, and knitted a few more rows in garter stitch. The hinges must be closed fairly loosely.
After finishing knitting, the dress must be brought into “marketable” condition. I soaked the dress in cold water with a special wool product, wrung it out in a towel, and then in the washing machine (without water, only on spin cycle).
It’s impossible to stretch the entire hem at once, so I laid it out as best I could and pinned the arches along the edge, stretching the very edge of the skirt. Once the hem was dry (it didn't take long), I hung the dress on hangers to dry. When it was dry, I steamed it, just using an iron, without touching the fabric, stretching the fishtails. I steamed the collar separately, pinning each “petal”.
I advise you to practice steaming and pinning on a sample if you have not knitted openwork before.
Knitting for children the second most popular topic in needlework, right after knitting, for women. Mothers, grandmothers, and aunties knit for children. Little girls start knitting by knitting booties for their little brother... And, probably, the first in terms of the number of works you sent.
Children grow up quickly. They quickly outgrow their clothes, so they constantly require new products. Therefore, knitting for children with knitting needles with their own hands is a very practical activity. If you knit for your children, you will save a lot of money, which can be spent much more profitably on growing children.
A dress for a girl, or knitted booties, bright socks for a baby knitted by your hands, with love and from the heart, will warm your children and grandchildren, give them health and warmth. Many things from stores are made from something unknown. Low-quality knitwear, chemicals in materials and dyeing agents. All this spoils the health of children. This is partly why children now get sick so often, due to allergies. But you and I can make our children a little healthier. Knit for the children yourself. Choose your knitting materials carefully. Read the composition. If your child has allergies, choose yarn taking this factor into account.
In chapter Knitting for children collected all possible products that can be knitted for children. Now there are about 500 knitting patterns for children. Most articles contain a knitting pattern and description. These include knitted booties for babies, dresses for girls, hats for boys and much, much more.
Today the site has up to 30,000 visitors per day. And if you knit for children, then you can show your creations to a truly interested audience. Collect responses to your creativity, get motivation for further development.. Send your products knitted for children with knitting patterns and descriptions, we are looking forward to it!
If you decide to knit a sweater for a girl and don’t know which model to choose, you are on the right track. We have selected the most interesting knitted sweaters and patterns for you. Using them you can easily knit a jumper for a girl for two, three, 4 years, as well as for 5-6, 8-10, and 12-14, and 16 years. We knit the first and simplest sweater model using stockinette stitch, the back of the product is 6 cm longer than the front - asymmetrical children's models are now at the peak of popularity. The master classes conclude with a video showing step-by-step knitting of a cardigan for a 1-year-old girl.
This stylish children's sweater, knitted in stockinette stitch, is very easy to knit. It’s enough just to learn two types of loops: knit and purl. The model is well suited for beginners to knit. In the presented model, raglan is knitted on top, but it is much easier to knit in separate parts, and at the end of the work just sew all the parts.
This way we can knit a sweater faster in time, which is important. Any wool or wool blend yarn of medium thickness is suitable for this model. How to knit such a practical thing? We knit the sweater using stockinette stitch (a row of knit stitches, a row of purl stitches), 2/2 rib only at the beginning of the back and front, on the sleeves and on the collar. The collar is voluminous, knits loosely, do not tighten the initial set of loops too much! Product sizes: a) 4 years, b) 6 years, c) 8 years, d) 10 years-12 years, e) 14-16 years. Knitting density: 10 cm. Satin stitch with 5.5 mm knitting needles. — 19 rub./14 p.

To work you will need:
- Wool or wool yarn - gray (100 g/160 m) - 3, 4, 4, 5, 7 skeins.
- Knitting needles 5.5 mm thick, 4.5 mm for elastic.
- The needle is thick.
- Knitting needles 4.5 mm. circular.
Back
Cast on 54-58-62-68-74 sts (see your required size) on 4.5 mm knitting needles and knit 2/2 rib - 16 rows. We switch to 5.5 mm knitting needles.
17th r. - knit stitches, decrease: 3-3-3-1-1 p. Remaining: 51-55-59-65-73 p.
18th r. - purl,
19th r. - persons, and so on.
Then, knitting in centimeters: 21 (40 rubles), 23 (44 rubles), 25 (48 rubles), 29 (56 rubles), 32 (60 rubles), we begin to form the raglan itself, closing it next. p.: 1 time - 2 loops, and then in each. second row:
- Twice 1 p., *once 2 p., two times 1 p.*, repeat from* to* three times, then: twice 1 p.
- Once 1 p., *once 2 p., five times 1 p.*, repeat from* to* two times, then: twice 1 p.
- * once 2 p., and six times 1 p.*, repeat from * to * twice, then: twice 1 p.
- * once 2 p., and seven times 1 p.*, repeat from * to * two times, then: twice 1 p.
- Once 1 p.,* once 2 p., and eight times 1 p.*, repeat from * to * twice, then: twice 1 p.
Let's see - from the elastic we knitted in cm: 36 (68 rubles), 40 (76), 43 (82), 49 (94), 55 (104), and closed the loops that we still have: 15-17- 19-21-23 loops.
The elastic band is knitted at the bottom using 4.5 mm knitting needles. 2/2 only 8 rubles, since the shelf will be shorter than the back! Switch to thicker knitting needles. Next, we repeat everything the same as on the back, only starting not from 17 p., but from 9: decrease in the same way, one to one!
Then, at a distance from the elastic: 32 cm (60 r.), 36 (68), 39 (74), 45 (84), 50 (94) we make a neck, closing it in the center: 5-5-7-7-9 p., then we finish on one side of the throat. in each second row:
- Once 4 p., one r. 3 p.
- Two times 4 p.,
- Two rubles 4 p.,
- Three rubles 3 p.,
- Three rubles 3 p.
Knit the other side of the neckline in mirror image.
We cast on 4.5 mm knitting needles. 29-31-33-35-37 sts, knit with 2/2 rib for a total of 8 r. Continue with stockinette stitch. In the future, on each side you need to add:
- In each eighth row: twice 1 p., each. sixth row: 3 times 1 p.
- In each eighth row: three times 1 p., each. sixth: 3 times 1 p.
- In each eighth row: three times, 1 p., each. sixth: 4 times 1 p.
- In each eighth row: twice 1 p., each. sixth: 7 times 1 p.
- In each sixth row: ten times 1 p., each. fourth: 2 times 1 p.
- Twice 1 p., *one p. 2 p., two r. 1 p.* repeat from* to* three times.
- Once 1 p., * one p. 2 p., five rubles. 1 p.* repetition *twice.
- *one time 2 p., six r. 1 p.* repeat from* to* twice.
- *once 2 p., seven r. 1 p.* repeat from * to* twice.
- Once 1 p., *1 time 2 p., 8 p. 1 p.* repeat from * to* twice.
At a distance from the elastic in cm: 35 (64 rows), 40.5 (76), 45 (84), 53 (98), 60 (112), close on the right in each. second row:
- Once 2 p., one p. 1 p., 1 p. 2 p.
- One r. 3 p., 2 r. 2 p.
- Three rubles 3 p.
- Two rubles four p., one r. 3 p.
- One r. five p., two p. 4 p.
At the same time, close on the left: 1 time 1 p., and after two rows: 1 p. 1 p. We knit the left sleeve in a mirror image.

Gathering and Collar
From the wrong side we sew both sleeves to the back and to the front, the long side of the sleeve goes to the back. We measure the girl's neck, the width of the collar will be: neck circumference plus 10-12 cm. The collar should lie freely. The collar height for each size is individual, approximately 30-40 rows.
We put the required number of loops on the knitting needles and knit with a 2/2 elastic band to the required height. We don't close the loops. Put the knitting needles with the collar aside. Then we sew the side seams. We take our almost finished product and sew the collar to the neck, loop to loop. Then we sew the side part of the collar with a needle and native thread.
Pullover with asymmetrical hem

This lovely pullover for a girl can be knitted from wool and acrylic. This pullover can be worn both to kindergarten and to school - a fashionable, excellent model. The sleeve here is slightly lowered, so knit the back and front first, and then the sleeves. This way you can measure the distance from the child’s neck to the wrist and clearly determine the required sleeve length. The master class presents a pullover for a) 2 years, b) 4 years, c) 6 years, d) 8, e) 10 years.
To work you will need:
- Yarn PARTNER (50 g/100 m), 4-5.5-6-7-8 skeins.
- Knitting needles 3 and 3.5 mm thick.
- Needle, markers or pins.
What kind of knitting will we knit? Rib 1/1, rib 2/2, and the main pattern - purl stitch. Knitting pattern: 30 row/23 stitches equals 10/10 cm.
Back
We cast on needles with a thickness of 3 mm. 81-87-95-99-105 loops. We knit with a 2/2 elastic band. only 16 rows (5 cm). Next, we continue with purl stitch (purl row, knit row) on 3.5 mm needles. On the front side of our product there should be only purl rows.
We knit to a height of 15 cm (46 rubles), 17(50),19(58), 21(64), 24(72) and mark with a pin or marker to mark the armholes of the jumper. We knit another 10 cm. (30 r.), 12 cm. (38), 14 cm. (42), 15 cm. (44), 16 (48) after the marker and continue with the 1/1 rib pattern, start and finish the first row and each more. odd row knit 2 stitches.
- Four times 4 p., two times 5 p.,
- Three times 4 p., three r. 5 p. each
- Six rubles 5 p. each,
- Five times 5 p, 1 r. 6 p. each
- Two rubles 5 p., 4 p. 6 p. each
At the same time, we make the neckline at a distance from the elastic band, in cm: 29 cm (88 r.), 33(100), 37(112), 40(120), 44(132). We close in the middle of the back: 9-11-13-15-15 sts. Then we knit each half separately, removing from the side of the neckline in every second row:
Twice 5 p., b,c,d,e - once 5 p.
Knit the other side in the same way as the previous one.
We cast on the knitting needles 3 mm. 81-87-95-99-105 loops and knit with an elastic band 2/2 12 rows (3.5 cm). Continue with purl stitch on 3.5mm needles. At a distance of 15 cm (46 r), 17 (50), 19 (58), 21 (64), 24 (72) from the elastic band 2/2, mark the place with a pin or marker. There will be an opening here.
Then at a distance of 19 cm. (58 r.), 23(70), 26(78), 29(88), 33(100) from the elastic band 2/2, starting from the center, here is a fantasy triangle elastic band 1/1 . We knit the rest using purl stitch.


Next, at a distance of 2/2 from the elastic band, we make a neckline. Distance in cm: 23 cm. (70 r.), 27(82), 30(90), 33(100), 37(112). We close in the center of the front: 9 cm, 11, 13,15,15 p. Next, we knit each. from the sides of the front separately, removing and closing:
- In each second p..: two times 2 p., four p. 1 p., each. fourth row: twice 1 p.
- In each second row: once 3 p., once 2 p., four p. 1 p. And in each. 4 p.: twice 1 p.
- d), e) in every second row: once for 3 p., once for 2 p., three times for 1 p. And in every fourth: three times for 1 p.
At the same time, at a height of 25 cm (76 rubles), 29 (88 rubles), 33 (100), 36 (108), 40 (120) from the 2/2 elastic band, knit with 1/1 elastic band on the entire shelf. At a distance of 28 cm (84 r.), 32(96), 36 (108), 39(116), 43(128) from the elastic band 2/2, we make a shoulder, closing from the armhole side in every second row:
- Four times 4 p., two r. 5 p. each
- Three times 4 p., three times 5 p.
- Six times 5 p.
- Five times for 5 sts, once for 6 sts.
- Two times 5 p., four r. 6 p. each
Knit and decorate the other side in the same way as the previous one.
Sleeves
We cast on the knitting needles 3 mm. 54-58-60-62-64 loops and knit with an elastic band 2/2, 32 rows (10 cm). Next, knit in purl stitch on 3.5 mm needles.
For 2 loops from the edge we make an increase on both sides:
- In every 10th row: three times 1 p.
- In each 10th row: twice 1 p., each. 8th row: three times 1 p.
- In each 8th row: six times 1 p., in every 6th row: six times 1 p.
- In each 8th row: 6 times, 1 p., each. 6th r.: four r. 1 p. each
- In each 8th row: 6 times, 1 p., each. 6th row: 6 times 1 p.
You should get: 60-68-78-82-88 stitches. We knit to a height of 13-18-22-26-30 cm. This is (40-52-66-78-90) rows. Close the knitting. Knit the second sleeve like the first. The neck strip is knitted separately here. We cast on the knitting needles 3 mm. 86-90-96-100-100 p. We knit 6 rows with an elastic band 1/1, then we make one r. persons Do not close the loops, put them aside for now.
Assembly
Place the back over the front and sew along the shoulder seams. Sew on the sleeves of the pullover, paying attention to the markers. We make the side seams, but do not sew up the elastic at the bottom! Sew the seams of the sleeves. Sew on the neck strip, loop to loop. That's all.
Sweaters, blouses, oversized jackets are always fashionable and practical. Such sweaters can be combined with any clothing. Jacket sizes: a) 2 years, b) 4 years, c) 6 years, d) 8 l., e) 10 l. The simplest knitting is stocking (knit rows). Pattern: 22 r./11 p. in stocking stitch equal to 10/10 cm.

To work you will need:
- Yarn Rapido. (25% wool, 75% acrylic), 50 g./40 m. - 6,7,9,10,12 skeins.
- Knitting needles 7 mm thick.
- 3 large buttons diam. 22 mm.
Back
Cast on 36-39-42-45-47 sts and knit in stocking (garter) stitch. We knit: 19.21.23.25.28 cm and begin to make sleeves, increases on both sides:
- Once for 10 points.
- Once for 13 sts.
- Once 16 p.
- Once for 18 sts.
- Once for 20 p.
We will get: 56-65-74-81-87. Then we continue working directly. At a distance of cm: 30-34-38-41-45 from the initial knitting, make a neckline, close off 4-5-6-7-7 stitches for this, then knit each of the halves separately, closing in every second row: 1 time for 2 p. and 1 r. 1 p. each
At a distance of cm from the beginning of knitting: 32-36-40-43-47 it is necessary to close the rest of the loops: 23,27,31,34,37 sts. Close the other side in the same way.
Right shelf
We cast on the knitting needles 21-22—24-25-26 sts and knit in stockinette stitch (knit). When we reach the height: 19-21-23-25-28 cm, we begin to make a sleeve, followed by an increase on the left:
- Once for 10 points.
- One r. 13 p. each
- One r. 16 p. each
- 1 rub. 18 p. each
- 1 rub. 20 p. each
We reach the height: 28-32-35-38-42 cm, make a neck, closing each one. second row:
- Once for 4 p., once for 2 p., twice for 1 p.
- Once 5 p., one r. 2 p., two r. 1 p. each
- One r. 5 p., one p. 2 p., two r. 1 p. each
Knit to height: 32-36-40-43-47cm. and bind off the remaining 23-27-31-34-37 sts. Knit the left front in a mirror image.
Assembly
Sew the shoulders, side seams and bottom of each sleeve. We make three loops, moving the p. Sew buttons at the same distance.
A good jumper for your princess can be knitted in a few evenings. Such jackets and blouses are essential items in a girl’s wardrobe. To enlarge the image, click on the arrow at the bottom of the picture.


In the video: a knitted cardigan for a girl from 1 to 1.5 years old. For height 80-86 cm.
Beautiful knitted items on small children evoke affection. Tiny blouses, caps, and pants cannot help but delight. But for kids, knitted clothes not only serve an aesthetic function. It is of particular value, since newborns have not yet established independent heat exchange - they really need additional thermal insulation and protection.
Clothes for legs
First of all, the child needs to insulate his legs. Knitted socks and booties do a great job with this. Socks for babies differ from adult models only in size, but booties are the first shoes, they are presented both in the form of shoes, boots, and are a kind of sandals. Booties and booties usually have ties to keep them firmly on the foot; It is not recommended to use Velcro, otherwise it will scratch the skin. Sandals can be worn in the summer, but they act only as decoration and will not protect you from dust and drafts. In summer, socks are safer. Standard sizes of socks and booties range from 8 cm to 13 cm. The size is equal to the length of the baby’s foot. Every 3 months, the leg adds 1 cm, so when calculating, you can also take into account the baby’s age. Foot length is measured from the heel to the tip of the big toe.
Knitted hat - beautiful protection
A child under one year of age has a soft area called the “fontanelle,” and until it heals, it is mandatory to wear a hat, which will protect and insulate the head. Such hats should be seamless and have a minimum of different fasteners - knitted ones are suitable for this role. In our catalog you will find knitting patterns to create beautiful hats of different types:
- classic hats;
- caps;
- hats-helmets.
And perhaps knit something individual for your boy or girl. The size of the cap is determined by the circumference of the head. A small baby’s girth is approximately 35 cm, then every 3 months it increases by an average of 4 cm and by the first year of life it reaches 47 cm. The hat should be knitted so that it can stretch slightly and at the same time not slide down onto the child’s forehead.
Knitted overalls for newborns
Overalls are a practical item in a child's wardrobe; they are easy to put on. There are two main types: overalls-bag and overalls with pants. The first type is convenient for home use, since the lower part can be unfastened and the diaper can be quickly changed, while the second type is mainly relevant for walks.
The size of overalls for newborn girls and boys is calculated based on the circumference of the chest, waist, hips, and height. It should be taken into account that babies grow quickly, and by the time the knitted item is ready, it may be small.
Accessories and decorations for babies
A one-year-old child does not need separate decorations, since knitted clothes are beautiful in themselves. Small details can be dangerous - children at this age love to taste everything. The only thing is that you can safely knit a scarf for your baby in addition to the hat and mittens. There is no need to make the scarf long; it is enough to knit it long enough to last one and a half turns.
If you still need to decorate your clothes, you can improvise with piping, tying things with picots or scallops, or adding lace. Such decorations are not suitable for things for boys up to the first year; in this case, it is better to rely on color and texture. For example, on hats for boys, patterns with braids and arans, alternating stripes of garter and purl stitch, will look great.
Choose the right yarn
The yarn must match the season for which the item is being created. Acrylic is suitable for winter clothes - it is warm, does not prick, and can withstand multiple washes. Despite its synthetic origin, it is hypoallergenic. Cashmere and angora are also suitable. Many manufacturers produce lines specifically for newborns - you can safely buy such yarn. Wool and mohair are not suitable for baby's delicate skin; they cause unbearable itching. Summer clothes are knitted from cotton yarn and bamboo. You should not use threads with the addition of lurex, sequins, etc. The yarn must match the number of knitting needles.
The simpler the clothes, the more comfortable and safe the baby
Avoid buttons - a child may tear them off and swallow them. The same goes for bells, tassels and other elements. There is no need to make applications - a child under one year of age spends most of his time in a lying position, the bulges can get in the way. In addition, overly decorated items are difficult to wash.
Pay attention to the density of the knit and the pattern
Choose simple patterns to knit an item faster. Do not knit the garment too tightly, otherwise it will pinch. Also, if you knit tightly, you risk getting a smaller size.
Knit items according to the current sizes of the baby
Tying for growth doesn’t always mean doing better. You cannot knit hats of a larger size - they will slip off and not protect the head. A child can drown in overalls, and babies react sharply to inconvenience. If the item still turns out bigger, put it aside until the baby grows up and knit something else.