Fabric pear. Apples and pears made of felt. Master class "French apples"
I haven’t shown fabric crafts for a long time, today I’ll tell you and in the master class I’ll show you the correct pattern on how to sew an apple from fabric with your own hands. The homemade product is quite complex and requires some sewing skills. You can decorate any room with it or give it to your child as a toy.
For the fabric apple we need:
— Velvet (velor), base for crafts;
— Artificial velvet;
— Gabardine fabric for sheet;
- Scissors;
— Twisted cord, approximately 7 centimeters;
— Sintepon, padding polyester, holofiber, any filler;
— Extended needle;
- Sewing machine;
— Glue gun;
— Pins;
- Threads.

First you need to make the right pattern. Let's draw two such details on paper. On the edge where it says “fold”, we make a fold so that when the part is cut out, it will be mirrored.


These are the cut fabric pieces we will need.

On velvet, which is artificial, we create many deep cuts.

We make lines along the edges, on the apple itself, and also on the leaf. We don’t sew up 1 centimeter on the sheet; we put the filler through this hole.

We cut off the tip of the sheet, turn it inside out, and fill it just a little with synthetic padding.

We turn the apple blank inside out, fill it, then use a regular seam to make bastings. At the same time, retreating 1 centimeter.

Gently pull the apple and hide the edges inside.

We thread a needle and thread from the side of the stamen, pull it out at the other end, and so on several times. Thus, this will give shape and stretch the end of the apple with a thread of resentment.

We roll the initial piece of artificial velvet into a tube and use a glue gun to attach the stamen to the apple.

We trim off the excess length.

We also glue the tail to the apple.

We also glue the leaf. For reliability, all these things can be additionally sewn.

This is the original fabric apple we managed to make.


Felt products are absolutely unique and charming items that can be used in a variety of ways. For example, a felt apple will be an excellent addition to the interior in the living room or kitchen, will delight your child, because children love to play role-playing games with food, and can also be an excellent decoration for a handbag, cases for gadgets, for a baby stroller and for many other things.
Sewing an apple from felt yourself is not at all difficult. To do this you will need:
Red and green felt.
Threads of matching colors.
Filling for apple (sintepon or holofiber).
Tweezers.
Patterns (as in the photo, the size corresponds to the desired apple size).
Let's start manufacturing.
1.Cut out 5 identical parts of the future apple from red felt using a pattern.
2. Cut out 2 small leaves from green felt (2nd pattern).

3.Sew all five parts of the apple together one by one.

4. As a result, you will get something like a small case, which we will fill.

5. Using tweezers, turn out the case - the base for the apple.

6.Fill it with padding polyester or holofiber.

7.Embroider a pattern similar to a natural leaf pattern on the leaves using green thread.

8. Pull the top of the apple and sew the leaf on top.

9.The finished felt apple can be used for its intended purpose.

Your child will definitely like this original toy. You can also sew a whole “kilogram” of these apples, place them in a basket, decorate them with ribbons and give them to your mother, boss or just a colleague! They will be delighted!

Textile APPLES for memories of summer. Master class from the author Kotova Lyudmyla


Tatyana Bushmanova inspired me to do this work for the nth time (see). I am very, very grateful to Tatyana for her magnificent MKs, thanks to which I had the opportunity to try myself in a new technique.
I really wanted to not just copy someone else’s work (albeit insanely beautiful), but to bring my own notes and my own vision. I'll be honest, it wasn't easy at all. I looked at Tatyana’s work - nothing could be removed and nothing added... I had to do a number of tests to create my own image - a summer meadow with blooming poppies. I really hope that I was able to realize my plans, but doubts still remain... In addition to the apple, I also sewed a pear


These are patterns for an apple and a pear, 4 elements for each product, everything is very approximate, I drew it by hand and did several tests. At first I sewed from ordinary fabric, filled it and looked at where it needed to be sewn in or added, and only then I sewed from stitched fabric that I made according to Tatyana's Mark. But I still corrected some points later. So these patterns are not exact, but as an example I decided to show them anyway.

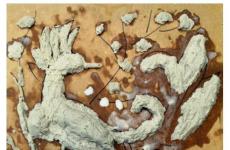
In progress.

This is how I made "weed". I wound DMC threads of different shades of green around the frame, secured the ends with tape and coated it thoroughly with PVA diluted with a little water. You need very little glue and water, a few drops each. Then I dried it all in the sun and then embroidered grass with it. The threads became hard and held the shape I had in mind well.

And today I want to show my discovery. If anyone remembers the last time I sewed an apple and a pear in the summer version, I wrote that I couldn’t find the exact pattern online and struggled with sewing for a long time. The pear was especially hard for me then (it just didn’t work out), and on the first apple I sewed, my son actually said “what a cool pumpkin”...well, in general, there was a lot of trial and error, I already began to think that I would never return to sewing these harmful failed apples and pears. But that was not the case...about two weeks ago I was surfing the net and looking for something, when I accidentally caught my eye on a photo of a car steering wheel all wrapped in tape. I was attracted by this strange photo and I went to the site to see why people wrap the steering wheel with tape (well, not because it broke into two halves and they decided to fasten it that way!). And what was my surprise when I read and looked through everything to the end - it turns out that this is how they remove the exact pattern of the steering wheel for covering it with leather. As a person who is absolutely not interested in any type of transport, except for a time machine, of course, all this information was not at all interested in me, but I was impressed by what I saw. At night, as usual, I often don’t sleep, and for some reason I remembered exactly this very trim... and OH, EUREKA!.. after all, in exactly the same way you can remove a pattern from a pear, and from an apple... and from anything from any fruit! In general, my deepest gratitude to all car enthusiasts, especially those, thanks to whose photos and developments I now have a beautiful autumn apple.


So let's get started. First, you should find a beautiful, appetizing apple in your garden (or maybe not in yours) or in the store, but the most important thing is that it has the ideal shape if possible. Well, if you haven’t found one, then a little crooked will also do. First I wrapped it with cling film, and then with masking tape (regular tape would do, I just didn’t have it). To do this, I cut small strips of tape and carefully smoothed it on all sides of the apple.


When the whole procedure was over (which took 1-2 minutes), I pressed everything well again and stroked it with my palm. I draw a line along the entire apple with a pencil, as if cutting it in half. Then, perpendicular to the previous one, I apply another one, thus dividing the apple into four segments.

Using small nail scissors, I cut along the lines, first in half, and then again in each half.


The most difficult thing is to transfer a rounded print onto a straight sheet... but this can be quickly solved. You should not transfer along the entire length of the segment at once, but in small steps, each time trying to straighten the tape as best as possible.


The pattern is ready. And it is not at all necessary to transfer all four segments one by one; one is enough!

When transferring the pattern onto the fabric, do not forget about the seam allowances. That's the whole problem with the pattern, which was so easily solved.
This designer fabric is made using the same technology as last time, thanks to Tatyana Bushmanova!

I sewed all the segments one by one. At the very end I left a small gap, turned it inside out and filled it tightly with padding polyester. Then the same gap should be sewn up with a hidden seam. And also, in order for the apple to have a concave center, two opposite ends should be fastened with a strong thread. That is, with the largest needle that is in the house, we fasten the thread on one side of the apple, in the place where the spine should be, pierce the apple and bring the thread out from the back side, fastening it.

Each apple has a small black “tail” at the bottom. It's very easy to make. I wrap the black thread around two fingers several times. Then I take it off, fold it in half and tie it at the top, as if making a bubo. I cut the threads from the bottom and attach them with hot glue to the center of the apple. Spine and leaves optional. You can, for example, use a simple stick and a leaf made of felt or very starched fabric so that the edges do not fray.


Look how pretty it is. Regular shape, symmetrical. Well, then decorations as desired. I decided that the autumn apple must have rowan.

In the process... it’s a little crooked, the colors are not very well chosen, and in the end I still didn’t really understand the principle of this embroidery, but it is what it is.