Plasticine dragon. How to make a dragon from plasticine Make a dragon from plasticine step by step
It would seem how much time has passed since the moment when various giant lizards existed, extinct and gone far into the past. In fact, various dragons and dinosaurs occupy a separate role in the modern world: they are not only frequent guests of various horror films, but also favorite heroes of the younger generation of boys and girls. Of course, what could be better than an unknown flying creature that is definitely not afraid of any obstacles?
Breathing flame
Little fans of big dragons are undoubtedly dreaming of a home version that they can put on the shelf and even show off to friends. Then we will tell you how to make a dragon with your own hands without spending much effort. What needs to be said before the creative process is irreversible: there are several materials that can be used. Firstly, this is plasticine - a raw material with which they work even in kindergarten, focusing only on its inedibility.
It's very easy to create with him. And if we talk about the process itself, then it’s pure pleasure, especially when it comes to children and their motor skills. Plasticine is sufficient for the temperature of the hands that it receives during work, and it is very easy to create various small figures with it. But a dragon made of plasticine will not serve you for long. After all, a slight increase in temperature affects its durability and strength.
Modeling from polymer clay for beginners

If we are talking about polymer clay, then you will have to tinker with it a little. The fact is that this material is more capricious and demanding during the modeling process and after it. But we can say with confidence that a clay dragon will definitely serve you for a long time if it is properly processed. This material is usually divided into two categories: self-hardening, which just needs to be left for a whole day in the fresh air, and baked in the oven.
Usually the latter process takes no more than half an hour and is much faster than the first option, but requires preliminary preparation. In addition, when it comes to brightness and color palette, polymer clay is in no way inferior to plasticine: modern product markets present a huge number of colored and white options that can later be painted and varnished.
Available means

In order for sculpting a dragon to bring only positive impressions and emotions, it is necessary to prepare all the materials in advance. In our case, this process will not be complete without additional purchases, but the main part can still be found in every home:
- Stacks. These small sticks are indispensable when working with plasticine, as they ensure that the product is carefully worked out. You can buy them in a store, where their selection is simply huge, or you can find them at home without spending a single extra ruble. For example, an ordinary ballpoint pen that has served on the writing front does an excellent job of removing eye holes and small dents. You can use an old toothbrush or a steel sponge to create texture. Fine lines can be created beautifully using a toothpick or a sharp pencil.
- Plasticine or polymer clay. The choice of these materials is truly huge and has not ended with sets with dull colors of sadness and melancholy. Real sellers provide a huge selection of goods for buyers of different skill levels and wallet thicknesses. So to the question of how to make a dragon, or rather, from what, you can only find the answer from yourself.
- Final coverage. In order for the image of our hero to look bright and rich, you will need to use a coating that gives expressiveness to the toy. Regular base nail polish without glitter or pearls works great for this role. It will make the colors brighter and give durability to your product. But it is important to clarify that a plasticine dragon does not need such an addition.
Preparing for the sculpting process

Few people know how to make a dragon from one material or another. In order to start making this creature, you need to perform some steps in advance, which will now be carefully considered:
- We clear the work surface of foreign objects that may interfere with further work.
- We place all the necessary stacks, sticks and scissors on the table, having previously treated them with cleaning agents.
- For beginners, sculpting with polymer clay is a puzzling process. Therefore, beginners should stock up on a pair of medical gloves. This step will protect your product from greasy stains and unnecessary fingerprints.
Modeling
It's time to start the process of creating a dragon from clay. The description for different materials will be the same, but additional comments related to a particular product will be added throughout the entire period. For greater convenience, all actions will be described step by step:

At least on the shelf
Now we know how to make a dragon and have fun. And the result of all the work is a craft that can become a wonderful toy, figurine, or just a gift for loved ones.
All children love to sculpt various figures from plasticine, and in the process of work they develop fine motor skills and attentiveness. You can sculpt any cartoon character, including a dragon, which is quite popular among children. The material you can use is not only plasticine, but also polymer clay, plastic or mastic. And improvised tools are suitable for the job.
Dragon made of polymer clay
It's not easy to make a toy like this., it will take time and perseverance, as well as:
- polymer clay,
- foil,
- wire,
- improvised tools.
Using wire and foil, you should make a dragon frame to your taste. Next, you need to coat the workpiece with a thin layer of clay. When the entire frame is covered, the future dragon should be sent to the oven to dry. After about 15 minutes it is removed. You can paint the dragon's eyes with paints and make it any color you want. It would also be useful to decorate it with individual details, such as growths and antennae. This is as far as your imagination goes.
How to make a figurine from plasticine
To work you will need:
- plasticine,
- small board,
- toothpick,
- shoulder blades.
Now let's move on to the stages of sculpting:

Plasticine Dragon Night Fury
First you need to prepare the necessary materials for work:
- black, white, gray and orange plasticine,
- toothpicks,
- stacks.
 First you need to form the body in the shape of a cone and legs. Now the ball rolls down, which will be the head. On it you should make two depressions for the eyes, which are formed from yellow plasticine. The head is attached to the body using a toothpick.
Spikes and antennae are molded from black plasticine, which are attached to the head, and paws, on which depressions are made with a toothpick, where claws from white plasticine are then attached.
Tail: a long sausage is formed, with a plasticine triangle attached to the end. And the wings are made in the shape of triangles. In addition, you can make pupils from black plasticine and glue them to yellow eyes.
Toothless made of polymer clay
Toothless is the favorite cartoon character of many children. Therefore, the process of sculpting it will bring pleasure and arouse interest.
For work you should prepare the material and tools:
- black, white, yellow and gray polymer clay,
- 3 toothpicks,
- metal stack with ball,
- stack puncher,
- a plastic stack that looks like a knife.
Manufacturing process
When all the necessary tools are prepared, you can proceed to the process of creating a toy.

How to make Toothless from plasticine
Necessary materials:
- wire,
- plasticine (black, yellow and gray),
- toothpick,
- spatula,
- tablet.
 Now you can move on to the sculpting process. The head is made of black plasticine. A triangle is molded, its corners should be rounded.
Now an oblong body is created, which should narrow at one end so that there is a transition to the tail. Using a toothpick, the head and body are connected.
The paws are made in the shape of tubes and are attached to Toothless’s body with the help of toothpicks.
The next step will be sculpting the tail. A thin cake is made from black plasticine with notches on it and attached to the tail of the toy.
As additional elements, you can mold scales from gray plasticine onto the back of the dragon. The eyes can be made yellow and the pupils black. You can also make pointed ears.
Toothless's wings are triangular in shape, molded from black plasticine and attached to the body with wire.
Mastic dragon step by step
You can make any edible figurine from mastic, including a baby dragon.

Making a figurine from plastic
To work you will need:
- plastic,
- brushes and stacks,
- foil,
- wire.
 The main shape should be formed from foil, and the frame for the paws from wire, these will be the dragon’s fingers. Now you should cover the mold with a thin layer of plastic. You can choose the color at your discretion.
The wings are also made from wire, onto which a piece of plastic is molded. Now we need to trim the corners and cut off the excess. Using wire you can make veins. And using a brush to draw patterns on the wings, that’s up to your imagination.
The stack can be used to make indentations for the eyes and nostrils. Small beads are inserted into the eye sockets. Also, using a brush and a stack, you can make patterns all over the dragon's body.
Now you should sculpt the fingers and attach them to the wire blank. Wings are also attached to the body. The dragon is ready. Finally, you can paint it with paints in different colors.
Attention, TODAY only!
This article will present master classes in which the processes of sculpting models of dragons from famous fairy tales and children’s favorite cartoons will be described step by step.


Here is a selection of videos that show how you can sculpt a colorful dragon, and will also present several author’s options for making the Night Fury from the famous cartoon.
How to make a dragon from plasticine: sculpt Toothless
In the first master class, the process of sculpting Toothless from the cartoon “How to Train Your Dragon” will be described in detail. To work you will need plasticine in black, white, red, green, a sheet of cardboard, a pencil and scissors.
First, you need to form an oval-shaped part from a piece of black plasticine, then this part should be given the shape of a cone to create the neck and tail of the future dragon. Then you need to form a ball from the same color and make indentations, because these are the head and eyes. Next you need to make eight small horns that need to be attached to the head. Then the head should be attached to the body with the tail, carefully smoothing out the seam. The eyes must be made from pieces of green plasticine, from which thin circles must be made, supplemented with black dots and attached to the head. To make paws, you need to make four identical oval-shaped elements, bend them slightly and attach them to the body. It is necessary to attach two parts to the edge of the tail, one black and the other red, of the same size. After this, you need to draw the outlines of the wings on a sheet of cardboard, cut them out, cover them with plasticine and attach them to the body. All stages of work are shown in the photo.


Fairytale snake
The second master class describes how to make a colorful fairy-tale dragon step by step. To work you will need green, yellow, red plasticine and a knife.
First of all, you need to form the body of a dragon from green, it is advisable to make the abdomen more dense in order for the figure to be stable. Then horns should be made from pieces of green plasticine and attached to the dragon’s head. In order for the animal to have paws, the following details must be sculpted: two diamonds and six sausages made of red plasticine, then three sausages must be placed on each diamond and the structures must be attached to the body. To make spines, you need to roll out a red layer and use a knife to cut out triangles of the same shape and size, then attach them along the entire length of the body; it is better to attach smaller triangles to the tail. You should also cut out wings from red plasticine and attach them to the body on both sides. At the final stage, you need to make eyes out of yellow, and the figurine is ready.


How to make a dragon from plasticine from children's fairy tales
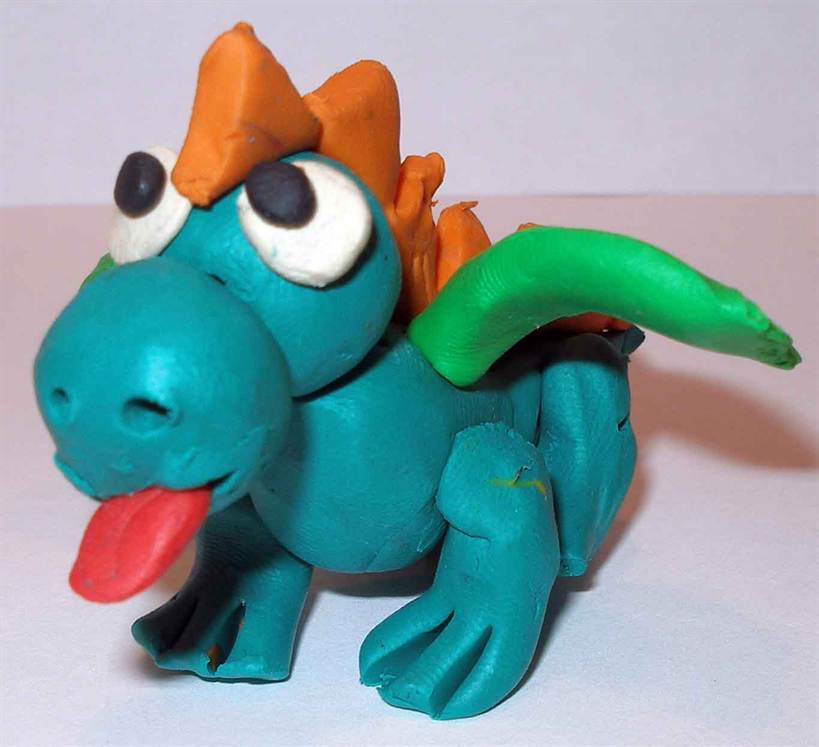
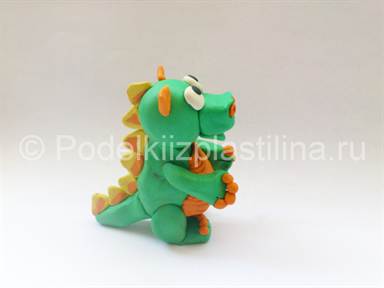
In the third master class, instructions on sculpting a dragon, which is a character from famous children's fairy tales, will be presented. To work, you will need plasticine in orange, yellow, green, black and white, as well as a toothpick and a spatula.
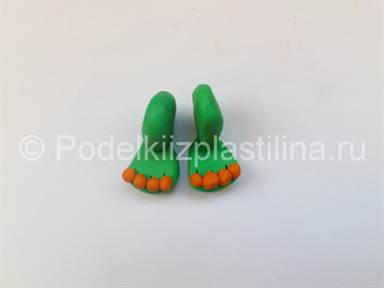
First, you need to form a ball out of green and attach a tubercle to it. Then you should make two indentations for the nostrils and use a spatula to make a mouth. In place of the nostrils, you need to attach two orange rings and attach the eyes above them. To get the body, you need to form a teardrop-shaped part. Then you need to make a sausage from orange plasticine, cut it into short segments and attach them to the body close to each other. The head and body should be connected using a toothpick.
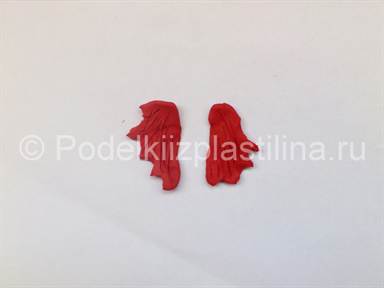
In order to make paws, you need to form four identical green triangles, use a spatula to make cuts on the wide parts of the triangles and attach orange balls. Next, you need to combine yellow and orange plasticine, cut circles from it, from which you should form triangles, and attach the resulting scales along the entire length of the dragon’s body. You also need to remember to make a tail and ears. At the final stage, you need to cut out the wings from red plasticine, attach them to the body, and the dragon figurine is ready.


Dragons don't really exist, and therefore no one knows how best to depict them. Most often we see in science fiction films huge gray creatures reminiscent of ancient dinosaurs, large in size, with wings and a row of large teeth. Chinese mythology illustrates to us unusual dragons with a large head and a long snake-like tail and the same awkward body. If we are faced with the task of sculpting a dragon figurine from plasticine, most likely, children will do this, because they are the ones who love to tinker with the soft sticky mass. Let's make a bright cartoon dragon that will be non-scary, bright and cheerful.
Take for sculpting a dragon:
- plasticine – bright colors are suitable: green, blue, orange (red) and purple;
- stack.

How to make a dragon:
To make the creature's body resemble a reptile, you can choose green as the main color. Different shades will do. A dragon should have the following body parts: a head and an oblong body, a long (sharp at the end) tail, wings and limbs.
Draw out the plasticine body of the dragon in the form of a green sausage. On one side, extend and sharpen the long tail. Bend the piece at a right angle.
 To decorate the abdomen, prepare small yellow (or any other bright color) sausages. And also form a small ball that will replace the head. Glue an arrow from a purple triangle piece to the tip of the tail.
 Connect the head and body, smoothing out the plasticine tubercles at the junction. Place the yellow sausages side by side on the belly.
 Make green blanks for the legs. Make two balls, two spatulas with red or orange fingers on the ends.
 Glue the balls to the bottom of the curved sausage-body, press with your fingers on both sides. Add feet to the bottom. Place the dragon figurine on its paws.
 Stick white cakes on the muzzle - eyes. Make oblong upper paws - hands with ball fingers. Prepare the purple horns.
 Glue the arms and the horns on the head. Make the front part of the muzzle elongated, stick on nostril rings.
 Make shaped wings out of flat red cakes by cutting them in stacks and adding purple membranes.
 Glue the wings to the back (you don't have to make them big). Starting from the head, through the back and up to the tail, apply a row of triangular purple bone comb scales to complete the dragon figure.

How to make a dragon from plasticine will interest both children and adults. The dragon is a fantastic fire-breathing creature, the hero of many myths, tales and legends. In many films and cartoons there is this winged serpent, terrifying and arousing admiration. Therefore, many are interested in making it with their own hands.
A plasticine dragon model is not the easiest craft to make. As a rule, it contains a lot of small and precise details (spikes, a narrow tail, scales, etc.), so for those beginning to master sculpting, and even more so for young children with poorly developed motor skills, it is better to sculpt ordinary animals or choose simple, uncomplicated models of dragons .

Let's sculpt a dragon
Below is a master class on how to make different models of dragons step by step.
Simple, stylistic models that do not require precise detailing and perfect resemblance to winged monsters are suitable for beginners and children.


To work you will need:
- plasticine in blue, green, orange, white, black and red;
- stacks;
- toothpicks;
- modeling board.
The instructions are very simple: you need to make each part of the dragon's body separately, and then connect everything together. All elements are made from balls and sausages.
What elements need to be done:
- Head - two blue balls - large and small;
- Body - draw out the ball, make a cone;
- Paws - four identical balls are pulled out, bent and processed with a stack (toes are made);
- Dorsal Spikes - An orange sausage is flattened and stacked in a zigzag motion;
- Wings - droplets are made from green balls, the edges are trimmed to form triangles, and processed with a stack;
- The tongue and eyes are red, black and white balls from which cakes are made.
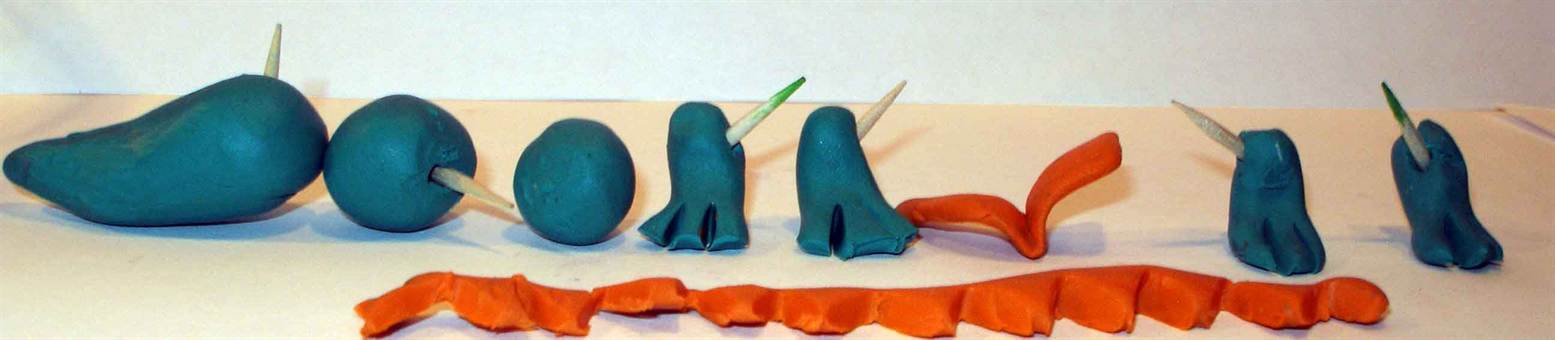
All parts of the body are connected to each other with toothpicks, the spines and wings are smoothed out on the back, the eyes are assembled, and the tongue is glued.


The next model requires more time and patience.
To do this you will need plasticine (green, black, white, yellow, orange and red), stacks, toothpicks, and a modeling board.

How to sculpt:
- Roll a small green ball (head blank);

- Roll a smaller ball and give it a rectangular shape, attach it to the ball (head), make two notches - the nostrils, and a cut at the bottom - the mouth (you should get a muzzle);

- Make two rings from thin orange sausages and place them in the nostrils, make eyes from white and black plasticine cakes;

- Roll green plasticine into a large cone or drop;

- Roll a sausage out of orange plasticine and cut it into pieces of different sizes;

- Attach the sausages to the cone as shown in the photo (you should get a grooved belly);

- Connect the head to the body using a toothpick;

- Roll two identical green balls and eight small orange ones;
- Pull the green balls into drops, crush them and process them with a stack to make fingers, glue the orange balls (claws);

- Attach the legs to the body, smooth them out;

- Make the hind legs from flattened balls and droplets and attach them to the body;

- Roll up an orange sausage, cover it with yellow plasticine and cut into small pieces in stacks;

- Form triangles from the pieces (spikes on the back), and roll a cone-shaped sausage (tail) from green plasticine;
- Attach the tail and decorate the dragon with spikes from head to tail, attach triangular orange ears;
- To make the wings: roll out two pieces of red plasticine and cut a zigzag on one side of each piece, stack it, and then attach the wings to the back of the dragon.

To make a dragon “like a real one”, with big wings and fire, you will need the following materials:
- green, yellow and red plasticine;
- toothpicks;
- stacks.
Progress:
- roll two balls from green plasticine - small and large;
- We form a body from a large ball - stretch the large tail and small neck upward;
- we process the back with a stack so that we get spikes;
- roll out the red ball and form it into triangular wings extended upward;
- roll a thin sausage out of yellow plasticine and make membranes on the wings;
- from a small ball we make an oblong head, glue on narrow red eyes;
- roll up green sausages, bend them and glue them to the head in the form of horns;
- We form “ears” from two red droplets, process them with a stack and glue them to the head;
- roll out four green balls, press, stretch and bend them so that you get legs (the front ones are longer than the back ones);
- attach the head using a toothpick, smooth the paws, make a flame from red and yellow plasticine, attach to the head using a toothpick;
- We process the body with a ballpoint pen or a stack to create scales.
Many people are probably interested in how to make Toothless from the cartoon How to Train Your Dragon. This is a black dragon loved by many children and adults - a kind cartoon character who eats fish.

A simple model can be made using black, yellow, white and gray plasticine, toothpicks and stacks.
Progress:
- Roll black plasticine into a large cone for the body and two small ones for the hind legs;
- Roll out an oval, stretch it out a little at the bottom to form a muzzle, make a stack of two notches for the eyes;
- Connect the head to the body using a toothpick, glue the cone legs on the sides, slightly bending them;
- Make two cakes from yellow plasticine and fill the recesses with them;