A summer card that you can make with your children. How to decorate a card with your own hands: original ideas Beautiful voluminous birthday cards
Gifts are an integral part of any holiday or memorable event; they help to express your feelings and make a magnificent, unforgettable surprise for the hero of the occasion, giving memorable memories and a great mood. Gifts are complemented by bouquets of flowers and cards with congratulations; instead, you can use bright and original greeting cards, offered in a wide variety by manufacturers on the market and produced in huge quantities.
The individuality of each person is emphasized by creative skills; looking at a variety of photos of hand-made postcards, you often want to make a hand-made masterpiece yourself and congratulate a close friend or family member.

To do this, just choose an original sketch, turn on your imagination, and use various materials to realize any ideas, creating a thematic greeting card dedicated to any holiday or special event.


Types and thematic styles of design
Conventionally, all greeting cards can be divided into several categories, choosing from them you can begin the creative process, the most numerous are:
- postcard in collage style. On a decorated base with a congratulatory or ceremonial inscription, you can apply images, flowers and figures of dear people cut out from photos and old postcards;
- voluminous, stylish cards. Inside a pre-prepared card, flowers connected and cut out of paper or soft cardboard are glued in a special way, creating a volume effect when opened;
- craft style postcards. The craft trend of decorating confectionery products, gifts and cards is gaining popularity due to its simplicity and presentable appearance, ease of implementation;
- decorated envelopes for money. Envelopes for money are a special type of greeting cards; they are used as an independent gift and are decorated with pleasant inscriptions or poems.

There are many master classes on how to make a postcard with your own hands, but first you need to decide on the design of this obligatory holiday attribute, which will help you decide on the further manufacturing process and selection of materials.

What you need to make an original postcard
An original and exclusive postcard will be created when you add a bit of imagination to ordinary cardboard or colored paper. The creative process of creation begins with choosing an idea and selecting materials for its implementation:
- It is better to choose thick and high-quality cardboard used as the basis for a postcard;
- basic decorations, strips of paper, cut out flowers or bright pictures, colored foil;
- additional decorations, which can be beads or seed beads, paper flowers and ribbons;
- paints and colored pencils, felt-tip pens and other coloring agents used for paper.

Having studied in detail the step-by-step instructions on how to make any postcard, it will become clear that for creativity you will need a set of simple tools, which include a needle and thread, scissors and a simple pencil, glue or a glue gun.

Step-by-step process for creating a greeting card
Self-made beautiful cards will delight adults and children and will be a wonderful addition to a pre-selected gift. Having picked up an idea for creating a masterpiece, you can start making it at home:
- preparing the base. To do this, use light cardboard or craft paper, which must be bent into two even halves;
- creating a composition. You can place decorations on the prepared base, creating an elegant and stylish composition according to the idea;
- securing decorations. After adjustment and arrangement, you can begin to attach the selected decorations to the cardboard base.


In the process of making a postcard, you can also decorate the inner surface of the greeting attribute; for this it is better to use elements of the main decorations, in accordance with the overall design idea.

After this, it is worth applying a memorial inscription, selected poems and congratulations that correspond to the theme of the holiday or upcoming celebration, a memorable date to which the presentation of a holiday card can be timed.

When planning to make a postcard at home, you need to carefully prepare, then the exciting creative process will become simple and easy, does not take much time, but will bring a lot of pleasure to everyone who participates in it.

Children of all ages can be involved in this activity; they will enjoy this pastime, and family and friends will be especially pleased with the masterpieces created by the whole family, under the guidance of adults.

Photos of postcards with your own hands


A voluminous postcard, which is made by hand, will be an unexpected and very pleasant surprise for a loved one. There are a huge number of beautiful cards for any event, so you can easily find the right holiday gift.
This is an original postcard, despite its apparent intricacy.
It is wonderful for every person close to you. The occasion could be Women's Day, New Year, or even Valentine's Day.
To make a postcard you will need:
- cardboard or paper thick enough
- knife
- First of all, you need to make a printout of the postcard template located here. There are several copies there.
You can try to sketch a drawing with a heart yourself. For this you need a ruler and a simple pencil. - Take a knife and use it to make special cuts on the resulting template.
- Try to fold the card as carefully as possible so as not to wrinkle it. First of all, you need to make the folds; in the picture they are drawn with a yellow pencil. Then slowly fold the card where you want it.
The remaining parts will form themselves. Iron each curve on the card well to ensure each individual element works smoothly.
To make it more convenient, you can attach the card with tape to the table. - Now it's time to decorate the card. Cover the edges with colored paper.
Almost everything is ready, you just need to add pleasant and good words.


Volumetric postcard Volcano of Hearts
This postcard consists of several parts that need to be connected using glue.

To create a postcard you will need:
- cardboard and colored paper
- scissors
- white glue.
- Download the template in a suitable format.
Templates for a three-dimensional postcard, which is made with your own hands.
Knowing some rules, you can draw hearts yourself. You will find the rules below. - Take out a huge heart from the middle. It is located on the fold.
- When cutting out the hearts, try not to touch the places where they bend (see picture).
- On the hearts shown in this figure, you need to make cuts to connect them together.
In order for the three-dimensional card to be closed as tightly as possible, you need to cut the paper on the middle fold to glue individual hearts to the base in the form of red cardboard. This cardboard is the background of the postcard. - After you have glued the halves to the base, you need to fasten the hearts using the cuts previously made on them.
The size of the hearts should be the same on all sides.
The line on the diagram, which is drawn in blue, indicates the same distance that there is from the center fold to the beginning of the cut, and the lines in red indicate that there is exactly the same distance between the hearts that are located closer to the middle of the card.


Ideas to note


A pleasant and very sincere gift for a themed celebration can be postcards made of bright, unusual colored paper, which were created manually.
This option is the easiest way to please a person and express your warmest feelings. Often a card complements the main gift.

You can learn how to make a postcard with your own hands from paper on the Internet, because there are a huge number of master classes and templates for various postcards that describe the process of creating such crafts. The cards turn out bright and beautiful, unique and inimitable.
Paper Product Base
Numerous photos of homemade paper cards show that the main thing in the product is not only the congratulatory speech and decorations, but also the base. Either thick scrap paper or a thin sheet of cardboard is suitable for it.

As for color preference, you should choose a neutral, light color palette so that all other elements are bright and stand out against its background.
A cardboard sheet with embossing and textured patterns looks very original as a base.

To make a beautiful card more solemn and unusual, you should round off the rectangular ends, or use curly scissors to give the edges a carved outline.
Card with colorful balls
To create a cute and romantic card that can be presented for a celebration on any occasion, you should take thin beige cardboard and fold it in half, rounding the corners. To decorate the outside of the product, you need to prepare multi-colored paper balls of different shapes: oval and round.

If the card is intended to be given to a girl, then the color of the balloons can be chosen predominantly pink, if for a boy it is blue, neutral shades are suitable for congratulating an adult.

You will need about 15 blanks for future balls. They will be placed both on the front side and inside the product.

Since the shape and size of the elements are different, it is better to prepare cardboard templates in advance and cut them out. After the templates are prepared, you can select the appropriate scrap sheets and cut out the balls.

When the ball blanks are cut out, a piece of thick thread is glued to each of them on the back side. Now you can start decorating the front side of the card. To do this, start gluing balls on top, then subsequent lower layers until the desired result is achieved.

To create voluminous non-standard paper postcards, you can glue the elements onto double-sided tape.

We attach a small piece of tape to the back of the ball, and then to the front base. The result will be a magnificent ornament.

When the balls are glued, you should tie all the threads, tie them with a beautiful ribbon and secure them at the bottom of the balls. Then the edges need to be trimmed.

Several elements are also glued inside the product, leaving space for writing congratulatory words.

Homemade New Year cards
To congratulate the New Year holidays, as a rule, they choose more thematic decorations in the form of Christmas trees, garlands, snowflakes and other paraphernalia. An excellent gift would be a hand-made postcard with a voluminous pine beauty using origami technique.
Note!

To make origami blanks, it is better to choose thin paper sheets so that they can be easily crumpled. You should also give preference to materials with an interesting pattern, then the Christmas tree will turn out colorful.

To create a Christmas tree you need to prepare 5 square blanks from the selected paper. The dimensions of the sides of the squares are as follows: 10; 9; 7.5; 6.5; and 5.5 centimeters, respectively. All squares are added according to the same principle.

First, the square is folded diagonally, then it returns to its original shape and folds diagonally on the other side. The result will be a workpiece with two diagonal fold lines.


Now the first origami blank is ready. There should be 5 of them in total. The Christmas tree is assembled from the top smallest element.

Note!

Quilling cards
A greeting card made using the quilling technique will be simple to make, but very attractive and original.
To create an owl that will be placed on the front side of the product, you need to twist several tight spirals from paper of the color you like.

For the owl's body, a spiral is selected, which will consist of three different shades in the form of orange, brown and beige shades. The width of the paper strip to create the body is 5 mm. Each subsequent strip should be glued to the previous one, and the tip should be glued to the spiral itself.

For the eyes and wings of the owl you need to take thinner paper strips. Each bird wing consists of three twisted spirals that are glued together. The paws are also represented by three spirals.

When all the elements are twisted, they can be glued to the base, decorating the composition with leaves and tree branches, which are also cut out of paper.

A card with flowers made using the quilling technique looks very beautiful.
Note!


Photos of DIY paper postcards


Guys, we put our soul into the site. Thank you for that
that you are discovering this beauty. Thanks for the inspiration and goosebumps.
Join us on Facebook And In contact with
In stores today you can find New Year's cards for every taste. But the editors website believes that homemade ones are much warmer. After all, when we make something for someone with our own hands, we put our love into it.
Below we have collected ideas for beautiful, original and, most importantly, “quick” New Year’s cards, the creation of which does not require any rare materials - beautiful paper, cardboard, and colorful ribbons and buttons lying around the house.
Volumetric Christmas trees
Volumetric Christmas trees made of white and colored paper are so simple to make that you can make them at the last moment. Read more on the Bog&ide blog.
Making 3D Christmas trees even faster. All you need is a ruler, sharp scissors and cardboard. This blog shows you how to cut them.
Penguin
We really liked this penguin, well thought out. You will need black and white cardstock (or white paper), an orange paper triangle, and 2 miniature snowflakes, which we all know how to cut out. The eyes are, of course, the highlight of the postcard, and you will have to look for them at a hobby store (or tear them off from an unnecessary children's toy, with the consent of the children, of course).
Gifts
This cute and simple card requires 2 sheets of cardstock, a ruler, scissors and glue. And also pieces of wrapping paper that you have left over from gift wrapping, ribbon and ribbon. The manufacturing principle is very simple, but for those who want more details, we recommend taking a look at this blog.
Santa Claus
A friendly Father Frost (or Santa Claus) can be made in just half an hour. The red hat and pink face are strips of paper pasted onto a card or gift bag. The fur of the hat and the beard are obtained like this: you need to take drawing paper and simply tear off strips of the desired shape to get uneven edges. Place on the card over the red and pink stripes. And then draw two squiggles - a mouth and a nose - and two dots - eyes.
Simple drawings
An irresistible idea in its elegance is to draw Christmas balls with patterns with a black gel pen. The main thing here is to draw the correct circles and mark the lines for the patterns. Everything else won't be difficult - stripes and squiggles that you draw when you're bored.
The same principle that underlies the postcard with black and white balloons. Simple silhouettes, painted with simple patterns, this time in color - best done with felt-tip pens. Warm and very cute.
Many, many different Christmas trees
A couple more ideas from the Bog&ide blog. For the first, you will need decorative tape or colored cardboard (with or without glitter - now you can easily buy these at an office supply store or in hobby stores). For the second - elegant straws for drinks and good glue.
This is where patterned paper or cardboard left over from children's crafts or wrapping paper for gifts will come in handy. The Christmas trees are sewn in the center - this is not at all necessary, you can glue them on. But if you really want to, you first need to make holes with a thick needle along a ruler, and then sew with thread in 2 rows - up and down, so that there are no gaps left. Draw a snowball with white gouache.
A laconic and stylish idea is a grove of Christmas trees, one of which is glued to foam double-sided tape (and therefore rises above the rest) and decorated with a star.
This card requires 4 or 3 layers of cardboard (you can do without the red one). You can use paper rather than cardboard as a color layer. In the top, white one, cut out a Christmas tree (a stationery knife will do this well) and glue it with double-sided tape for volume.
A round dance of Christmas trees made from various leftover cardboard, scrapbooking paper, and wrapping paper, tied with a simple ribbon and decorated with a button. Try playing with colors and textures - here you can find an incredible number of options using different colored ribbons, paper and even fabric.
Wonderful watercolor so in the spirit of New Year and Christmas! A simple watercolor sketch can be done by anyone, even those who last painted in school. First, you need to outline the patterns with a pencil, color them, and when dry, carefully erase the pencil sketches and complete the patterns with a felt-tip pen.
Winter landscape
For this postcard, it is better to use structured cardboard, but you can get by with regular, smooth cardboard - it will still turn out impressive. Using sharp scissors, cut out the snowy landscape and moon and paste it onto a black or dark blue background.
Another, white-green, option for a winter landscape that will take a little more time. If you find velvety cardboard (remember, back in school they made crafts out of this), it will be great; if not, you can simply color the Christmas trees with a felt-tip pen. Snow - polystyrene foam disassembled into peas. You can also use a hole punch to make circles out of cardboard and glue them to the card.
Hugging snowman
The author of the blog My kid craft made this snowman with her children. The snowman throws his arms up in joy when the card is opened. You can write your wishes inside. Children will be interested in making an applique (and painting their hands and hat), but for those who want everything to be done quickly, the blog has ready-made parts that can be printed on a color printer and simply glued together.
More snowmen
Snowmen peering inquisitively into the starry sky will look better if you can find a bright ribbon for a scarf.
For that postcard on the left, You need unpainted cardboard, white drawing paper and foam tape to glue the snowman with. Drifts are made simply: you need to tear off the drawing paper so that you get a ragged wavy edge. Fill it in with a blue pencil and blend it with anything, even with your finger or a piece of paper. Also tint the edges of the snowman for volume. For the second You will need buttons, a piece of fabric, eyes, glue and colored markers.
You will want to keep this card for a long time. All you need are circles made of cardboard, a nose and twigs made of colored paper. All this must be assembled using double-sided bulk tape. Draw eyes and buttons with black paint, and a snowball with white gouache or watercolor.
Balloons
Balls are one of the main symbols of the New Year and Christmas. These are made from velvety colored paper and ribbon. But balls are such a win-win option that you can allow yourself to fantasize: make balls from patterned paper, wrapping paper, fabric, lace, cut out from a newspaper or a glossy magazine. And you can simply draw the strings.
Another option is to stick paper with a pattern on the inside of the card, and cut out circles on the outside with a sharp stationery knife.
Volumetric balls
For each of these balls you will need 3-4 identical circles of different colors. Fold each one in half and glue the halves to each other, and the two outer halves to the paper. Another option is colored stars or Christmas trees.
Multi-colored balls
Wonderful translucent balls are obtained using a regular eraser on a pencil. It’s worth starting with a pencil to outline the outline of the ball. Then dip the eraser into the paint and leave marks on the paper. Fun and beautiful.
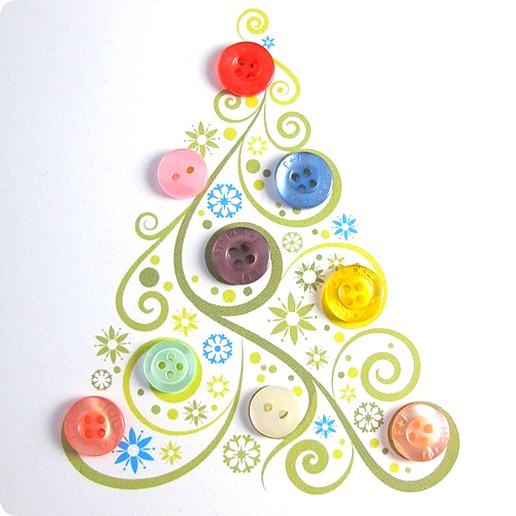
Cards with buttons
Bright buttons will add volume to the cards, and will also evoke subtle associations with childhood.
website – Navigator in the world of gifts and souvenirs
A three-dimensional postcard is a real three-dimensional composition, which is much more interesting than “flat” options. We invite you to make a funny “Balloon Card” with a bright balloon.
For the base of the card, we chose thick blue cardboard, and also glued paper with embossing resembling raindrops to the inside. Creating such a card is not difficult at all! We will tell you how to make “legs” that can hold any figures of your choice.

We will need:
Sheet of thick cardboard
- Multi-colored sheets of less dense cardboard for figures
- Plain, dim cardboard for the legs
- Scissors, glue
- Ruler
- Pencil
- Thread
Step 1
Take a piece of cardboard of the desired size, for example, to get a postcard 10 by 15 cm when folded, you will need a piece of 20 by 15 cm. Fold the sheet in the center, as shown in the picture. Keep in mind that several elements will be glued to our card, so take thicker cardboard so that it does not deform from glue and pressure.

Step 2
Cut out shapes for your card. You can choose absolutely any images, but to demonstrate the principle, we just took the red rectangle. You can make as many figures as you want. The only thing, keep in mind that the width and length of the pictures should not be larger than the postcard itself, otherwise the edges of the figures will peek out from the folded postcard. For example, for our 20 cm postcard we took a rectangle with a side of 10 cm.

Step 3
Now we need to make a “leg” for the figure. To do this, cut 2 long strips of cardboard. We made strips 3 cm wide and 20 cm long.

Step 4
Line the two “legs” as shown in the picture. The principle is simple: the sum of sides A+B should be less than the width of the card when folded (in our case 10 cm)

Step 5
Fold the strips along the drawn lines as shown in the figure.

Step 6
Apply glue to the smallest piece of the strip and glue it to the opposite end to make a square. Repeat the same operation with the second strip.

Step 7
Now glue the squares together.

Step 8
You've got this flexible polygon.

Step 9
“Straighten” our “leg” as shown in the figure.

Step 10
Apply glue to one of the edges of the “leg” and glue it to the back of your figure in the middle. In order to better understand the process, look at the figure for step 12 to see what you should end up with.

Step 11
Cover the “leg”, previously greased with glue, with the half of the figure. Press the figure harder, hold it there for several minutes so that the glue dries and your design does not fall apart.

Step 12
This is the kind of structure you should end up with.

Step 13
Unfold your figurine and see what happens.

Step 14
Apply glue to one of the bottom edges of the “leg” and glue it to the center of the card. When the glue dries, turn the figure over and do the same on the other side.

Step 15
Close the card and squeeze tightly so that the glue dries and securely holds all the elements together.

Step 16
Your three-dimensional postcard is ready!


Note that the legs should not be too noticeable, so to make them it is better to take paper of one not very bright color, but it is advisable to make the figures brighter.


