How to make an unfolded cube. Volumetric paper cubes without glue or scissors. Paper crafts - a lifelong passion
Additional materials
Dear users, do not forget to leave your comments, reviews, wishes. All materials have been checked by an anti-virus program.
Teaching aids and simulators in the Integral online store for 1st grade
Simulator for the textbook Moro M.I. Electronic manual for the textbook Moro M.I.
Geometry and cube
A cube is a figure that we meet not only in geometry and fine arts lessons, but also in our everyday life. Another name for a cube is a regular hexahedron. A cube is a regular polyhedron, each face of which is a square. A cube can be called three-dimensional, three-dimensional or even a 3D square. The cube has 8 vertices, 6 faces, 12 edges. A cube is an amazing geometric figure into which you can hide or fit other figures, for example: octahedron, tetrahedron, icosahedron and others.
Amazing cube figure
The cube or hexahedron is also called the Necker cube, named after the Swiss crystallographer Louis Albert Necker. In 1832, Necker proposed an illusion whereby peering into a cube with edges, one can notice that a small black dot appears either in the foreground or in the background, or in the corner or in the center. She moves from one place to another, as if moving. Another feature of the Necker cube is that its parallel side edges appear to diverge. You can repaint one of the edges a different color, and watch how this colored edge moves in a fantastic way.
Another unusual cube is the cube of the artist Maurits Escher. This is a cube that is impossible.
Another interesting discovery related to the cube was made in 1966 thanks to photographer Charles F. Cochran. He took a photograph that was dubbed the "crazy box." What is “crazy language”? This is the frame of a hexahedron (cube) figure turned inside out. "Crazy Box" is based on incorrect connections made when drawing a figure.
| Necker cube | "Crazy Box" |
The list of the most amazing and strange figures includes: integral cube, expanding cube (can also be called an infinite cube), repeating cubes, cubic snowflake, floating cubes, two-story cube and many, many others. All these figures are fascinating, it is impossible to take your eyes off them. Everyone who sees them wants to understand how they work.
The cube has always been fraught with many mysteries - a surprisingly complex and at the same time surprisingly simple geometric figure that helps to look into the depths of consciousness. Even in ancient times, Plato called it a sacred figure and attributed it to the Earth sign, because it is the most stable figure of all others. The cube is a figure of sacred geometry. Back in the 16th century, the German mathematician and astronomer Johannes Kepler compiled a model of the solar system, into which he inscribed a cube.
Where can you find a cube? Buildings most often have a cubic shape, so you can just look out the window and you will immediately see a cube. The most famous puzzle toy, which every child held in his hands at least once in his life, and some even managed to solve it, is the Rubik's cube. The name speaks for itself. In 1975, Hungarian architect Erné Rubik created a puzzle toy that became popular throughout the world. A Rubik's cube is a cube made of plastic, which in turn consists of 26 cubes. And when the Rubik's Cube is completed, each of its faces is painted one specific color.

Various substances crystallize in the form of a cube, for example table salt, the mineral fluorite and others.
Tools and materials to make a paper cube
To comfortably and conveniently work with paper or cardboard, in our case, cut and glue geometric shapes, you will need the following tools:
- scissors (or a stationery knife with an iron ruler and a hard surface that you don’t mind ruining);
- thick paper or cardboard (white or colored), A4 format;
- glue.
You also need a computer with a printer, preferably a color one, to print out the diagram you like for further gluing of the figure.
Paper crafts - a lifelong passion
Doing something with your hands is always interesting and useful, especially if it turns out beautifully. Simple manual work helps calm the nerves after a hard day at work and develops imagination (especially in children). In China, this type of creativity is known as origami, and has long been successfully helping to treat mentally ill people and children suffering from nervous diseases. Such activities are widely used in labor lessons in schools or in older groups in kindergartens, which allows them to develop perseverance, imagination and fine motor skills, which in turn develops mental activity. Children's magazines often offer diagrams of various animals and figures for adults and children to work together. We offer diagrams of cubes made of paper or cardboard with various options for pictures. Such crafts will be of interest to both kids and schoolchildren; they can be presented as a handmade gift. Adults can also use cubes made according to our designs, for example a calendar cube.
Step-by-step instructions: how to make a cube from cardboard
1. Print the required number of templates, for example, for a calendar cube - you need both options, and for alphabet cubes - print as many as you need to add words.
2. Carefully cut out the outline of the cube. It is more convenient to cut with scissors, but you can also use a stationery knife.
3. Bend the cut out cube template along the lines; the more accurately you bend the cube diagram, the better your product will look.
4. Apply glue to the darkened areas and assemble the entire cube side by side.
| Scan simple cube (edge 5 cm) |
Unfolding a cube with Arabic numerals 1,2,3,4,5,6 (edge - 5 cm) |
Unfolding a cube with Arabic numerals 7,8,9,0,1,2 (edge - 5 cm) |
 |
 |
|
| JPG | JPG | JPG |
| I, X, L, C, V, D (edge - 5 cm) |
Scan of a cube with Roman numerals I, M, V, X, ↁ, ↂ (edge - 5 cm) |
Cube with formulas (edge - 5 cm) |
 |
 |
 |
| JPG | JPG | JPG |
| A, B, C, D, E, F (edge 6.5 cm) |
Diagram of a cube with the English alphabet G, H, I, J, K, L (edge 6.5 cm) |
Diagram of a cube with the English alphabet M, N, O, P, R, Q (edge 6.5 cm) |
 |
 |
 |
| JPG | JPG | JPG |
| Diagram of a cube with the English alphabet S, T, U, R, V, W (edge 6.5 cm) |
Diagram of a cube with the English alphabet X, Y, Z, A, B, C (6.5 cm edge) |
Diagram of a cube with the Russian alphabet A, B, C, D, D, E (edge 6.5 cm) |
 |
 |
 |
| JPG | JPG | JPG |
| Diagram of a cube with the Russian alphabet Zh, Z, I, Y, K, L (face 6.5 cm) | Scheme of a cube with the Russian alphabet M, N, O, P, R, S (face 6.5 cm) | Scheme of a cube with the Russian alphabet U, F, X, C, Ch, T (face 6.5 cm) |
 |
 |
 |
| JPG | JPG | JPG |
| Diagram of a cube with the Russian alphabet Sh, E, Ъ, И, ь, Ш (side 6.5 cm) | Scheme of a cube with the Russian alphabet U, Z, A, B, V, D (face 6.5 cm) | Diagram of a cube with continents (face 6.5 cm) |
 |
 |
 |
| JPG | JPG | JPG |
And a little more about paper cubes
Now children's stores are overflowing with all sorts of toys, including educational ones. You can find almost everything for any age and budget. But sometimes it can be difficult to find the cubes that are familiar to us from childhood. Cubes are a kind of construction sets that children enjoy playing with.
According to the recommendations of teachers, psychologists and pediatricians, children under 1 year old can already be given cube toys. They perfectly develop not only coordination and imagination, but at the same time they use almost all the muscles of the hands, which perfectly develops the baby’s fine motor skills. Whatever material cubes are made from - plastic, wood, glass, we suggest you make cubes from paper.
Cubes with pictures depicting numbers or letters will be a great help for parents and educators in the process of preparing their child for school. Moreover, playing with a cube will give the child an idea of geometric shapes, in particular the cube, and its properties. If you print other three-dimensional geometric shapes (pyramids, tetrahedron, etc.), this will significantly expand the child’s horizons and help in the learning process at school. Joint activities between adults and children greatly bring together and strengthen the family.
Nowadays, almost every home has a computer and a printer, i.e. your costs are the cost of paper, A4 format. The cube templates provided on this page can be edited, i.e. Having taken a blank scan of the cube, you can safely insert your pictures and print a new version. As pictures you can take drawings or photographs of animals, animals, cars, as well as photographs of celebrities or your relatives, the flight of imagination is limitless. Good luck to you in your creativity and education!
Development and diagram of a cube made of paper
| Multi-colored cube 1 (side 6.5 cm) | Multi-colored cube 2 (side 6.5 cm) | Dice cube (side 5 cm) |
 |
 |
JPG |
Grigory Andreev
All children, without exception, love to play with blocks. Cubes with letters and animals are especially popular. The most interesting thing is that you can make such a useful toy yourself and attract a child. How to make a paper cube? Read on and you will find simple and complex schemes for creating it.
Content:
Simple origami paper cube
Method 1
In order to fold a three-dimensional cube with six sides, you will need a square-shaped sheet of paper and that’s it. The work takes place without glue. And you can use scissors once, when you need to cut off the material protruding beyond the edge. In addition, when the manufacturing process comes to an end, it will take a lot of air from your lungs to inflate. But everything is in order.
Progress:
- Take a sheet of A4 paper, fold it diagonally and cut off the excess. It turns out to be a square. Next, we fold this square again diagonally, and then in half. With these movements we outline the fold lines;
- According to the diagram, taking into account the diagonal lines, we make a triangular figure, turning both edges inward on the left and right. We bend the corners that are free near the base of the geometric figure towards the top. We do this on all sides of the triangle;
- We bend the opposite corners from the side into the center. You need to focus on a vertical line. We do the same with the second side. We also bend the free corners twice where there is a conical protrusion, and then carefully insert them into the pocket corners;
- Repeat the same steps with bending and tucking the corners into pockets on the other side;
- The result is a cube when folded. To give it a 3D shape, we look for an open corner and blow air into it.
Method 2
Before starting work, find thick paper, a ruler, a simple pencil, glue, and scissors.
You can use a ready-made template, or you can draw such a template yourself, observing the dimensions. All you have to do is take a pencil and draw 4 squares one after the other vertically, and then 2 more squares on both sides. Don't forget to leave some space for gluing.

Now cut everything along the lines and carefully bend the marked lines to form edges. Lubricate with glue and connect the walls of the cube together.


Modular prefabricated cube of 6 colors

Before starting work, prepare 6 sheets of paper of different colors (you can take 2 sheets of one color, 2 sheets of another, 2 sheets of a third color). There is no need to use cardboard here, because the reusable connection of the modules will result in a rather dense structure. You should be prepared to spend a lot of time, but the results are worth it. You just have to strictly follow the scheme and follow all the steps one by one.

How to do?
- On a square sheet of paper, fold the fold lines: first in half, and then divide each plane into two more. Next you should fold the lower right corner and the upper left.
- Fold the bottom to the center and then the top. The reference point is the horizontal line in the middle. Fold inward those corners that we did not touch at the previous stage on one side and on the other. You should get a figure similar to a parallelogram.
- Place the workpiece face down on the surface and bend the corners towards you. You will see a small square with bent corners. Repeat the design of the modules 5 more times.
- Connect all the elements into a single structure. To do this, tuck the corners of each module into the niche plane in the middle, located on the elements nearby.
Don’t forget to use the diagram, which clearly and clearly describes everything step by step.
Advice! To ensure that the cube lasts a long time, is strong, and the elements do not fall out and the corners do not stick out, fix everything with glue. You just need to use it in moderation and at the stage of assembling the craft.

Schemes and templates for printing


Video instructions
Of course, video tutorials are always a lifesaver when it comes to something you decide to do for the first time. We offer you the following visual instructions that will help you make original paper cubes yourself.
Modular origami cube
Moving paper cubes
A cube is a multifaceted figure whose sides are represented by a square. If you or your child loves riddles, then after reading the article, you will learn how to make a cube out of paper. You will also learn about the various options for cubes and the detailed manufacturing process of each type.
Paper cube scan diagram
Preparing a template for a cube Knowledge of how to make a cube from paper will help you design a gift box or a box for sweets. More details in one of the previous articles. The process of making a cube using a blank begins with constructing a development. A development is a diagram that is intended for the manufacture of a three-dimensional cube from cardboard or paper.
For work on the production of a development (circuit) we will need:
- paper;
- simple pencil;
- ruler and scissors.
How to make a paper cube according to the diagram:
- Draw a square. We monitor the indicators: the sides must be equal, and the angles must correspond to the ninety-degree mark. Now we remember the school curriculum and find out that the cube has 6 faces. This means that there should be six squares on the paper.
- Draw identical squares with a pencil near the cube. Many will think that there is one extra left and it is not needed, but this is not so. It must be drawn next to any of the squares.
- So, it seems like 6 squares have been drawn, now to connect them, you need small allowances. They are drawn on the sides of 3 squares. In this case, their width should be up to one centimeter. Cut out the diagram and start gluing the craft. It is important not to forget to trim the corners of the allowances, as it will make the work better and more convenient.
After carrying out such manipulations, you will get a three-dimensional cube on which you can write letters and draw animals. A similar design can be made without the help of drawing. How to make a paper cube with 12 sides can be done according to the following scheme:
Easy production using a ready-made template
This method of making a cube is easier and does not require knowledge of the school curriculum. To organize, you need to find a ready-made cube template on the Internet, print it out and cut it out, then bend the paper along the marked dotted lines and glue it into a finished craft. All this way, you get a wonderful cube that your child will love to play with.
Origami cubes
For this paper cube, the origami technique is used. You only need to have a landscape sheet. There is no need for glue here, and scissors will only be used once and only when it is necessary to cut off the protruding edge. But upon completion of construction, you will need a lot of air, since the craft will have to be inflated.
Making a simple origami cube:
 Simple cube (Step 1)
So, we get a ready-made cube, we need to give it volume. You need to find an open corner and blow air into it.
Modular cube
Having knowledge of how to make a cube out of paper using the origami technique and having made the craft several times, you can try to construct a cube from modules. You will need six sheets of colored paper, preferably 2 sheets of the same color. As for colored cardboard, it is better not to use it for this craft.
You also need to understand that such work requires a lot of time, but in the end you will get a wonderful craft. When manufacturing, you must follow the exact sequence.
Making modular crafts involves combining individual elements into a whole structure. We carried out similar actions when
The process of making a cube from modules:
 Modular Cube (Step 1)
After spending some time, you learned how to make a modular paper cube. And we were probably convinced that the final manufacturing result has an excellent appearance.
If you want the craft not to fall apart, then during construction it is better to use glue. It will ensure reliable fastening of parts.
Puzzle cube
To help your child develop, you can construct a puzzle cube from paper. It consists of eight small cubes, which are made according to a cut out template. The large puzzle cube has 6 sides, so 3 of them must be black and 3 must be white.
Having made the blank, we begin to construct the puzzle:
- take 3 white cubes and 3 black cubes;
- We connect them using double-sided tape.
The puzzle cube is ready, you can give it to your child.
Many people are delighted with the Yoshimoto cube. It turns over and spins on all sides without falling apart. It is made in the same way as the previous version from eight small cubes.
The main difference between this design is that it can become a strip of cubes. Many people will think that making such a toy on their own is difficult, but in reality it is not so.
For production you will need:
- sheets (the number varies depending on how many shapes you want);
- Ruler and pencil;
- scissors.
Having collected the entire list, we begin to construct the cube.
How to make a Yoshimoto cube from paper:
- We copy the attached drawing onto the prepared material and indicate the dimensions on it. You can change the specified parameters.
- We transfer the drawing to the selected material. A total of eight templates are needed.
- We cut out the blank and glue it into a finished small cube. We also make 7 more blanks of the same size.
- Now we take adhesive tape, put a thread under it and use the thread to fasten 8 cubes into a solid structure. The cube is ready.
If you use plain paper to make the cubes, regular tape and thread will do, but if the cubes are made from a denser material, it is better to use tape and glue. This kind of craft is very attractive to kids. They not only play with the cube, but also develop in every possible way. After all, you can draw images of animals and write letters on the cubes.
Large selection of developments of simple geometric shapes.
Children's first introduction to paper modeling always begins with simple geometric shapes such as cubes and pyramids. Not many people succeed in gluing a cube together the first time; sometimes it takes several days to make a truly even and flawless cube. More complex shapes (cylinder and cone) require several times more effort than a simple cube. If you don’t know how to carefully glue geometric shapes, then it’s too early for you to take on complex models. Do it yourself and teach your children how to do these “basics” of modeling using ready-made patterns.
To begin with, I, of course, suggest learning how to glue a regular cube. Developments are made for two cubes, large and small. A small cube is a more complex figure because it is more difficult to glue than a large one.

So, let's begin! Download the developments of all the figures on five sheets and print them on thick paper. Before printing and gluing geometric shapes, be sure to read the article on how to choose paper and how to properly cut, bend and glue paper.
For better quality printing, I advise you to use the AutoCAD program, and I’m giving you scans for this program, and also read how to print from AutoCAD. Cut out the development of the cubes from the first sheet; be sure to draw a compass needle under the iron ruler along the fold lines so that the paper bends well. Now you can start gluing the cubes.

To save paper and just in case, I made several unfolds of a small cube, you never want to glue more than one cube together or something won’t work out the first time. Another simple figure is a pyramid, its development can be found on the second sheet. The ancient Egyptians built similar pyramids, though not made of paper and not so small in size :)

And this is also a pyramid, but unlike the previous one, it has not four, but three sides.
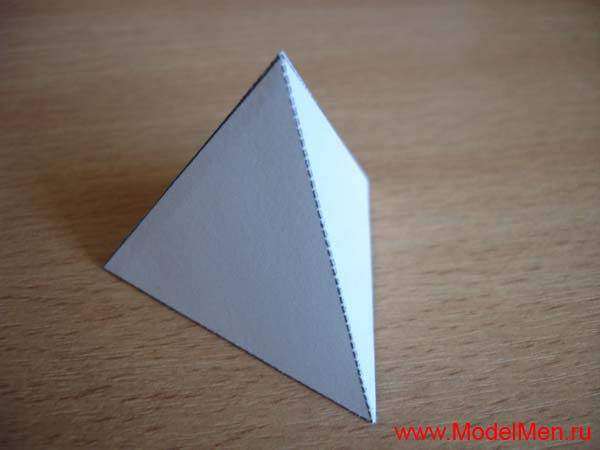
Development of a trihedral pyramid on the first sheet for printing.

And another funny pyramid of five sides, its development on the 4th sheet in the form of an asterisk in two copies.


A more complex figure is a pentahedron, although a pentahedron is more difficult to draw than to glue.

Development of a pentahedron on the second sheet.

Now we get to complex figures. Now you have to work harder, gluing such shapes together is not easy! To begin with, an ordinary cylinder, its development on the second sheet.

And this is a more complex figure compared to a cylinder, because at its base is not a circle, but an oval.

The development of this figure is on the second sheet; two spare parts were made for the oval base.

To accurately assemble the cylinder, its parts need to be glued end-to-end. On one side, the bottom can be glued without problems, just place the pre-glued tube on the table, place a circle on the bottom and fill it with glue from the inside. Make sure that the diameter of the pipe and the round bottom fit tightly together, without gaps, otherwise the glue will leak and everything will stick to the table. It will be more difficult to glue the second circle, so glue auxiliary rectangles inside at a distance of paper thickness from the edge of the pipe. These rectangles will prevent the base from falling inward, now you can easily glue the circle on top.

A cylinder with an oval base can be glued in the same way as a regular cylinder, but it has a smaller height, so it’s easier to insert a paper accordion inside, and put a second base on top and glue it along the edge with glue.

Now a very complex figure - a cone. Its details are on the third sheet, a spare circle for the bottom is on the 4th sheet. The whole difficulty of gluing a cone is in its sharp top, and then it will be very difficult to glue the bottom.

A complex and at the same time simple figure is a ball. The ball consists of 12 pentahedrons, the development of the ball on the 4th sheet. First, two halves of the ball are glued, and then both are glued together.

Quite an interesting figure - a rhombus, its details are on the third sheet.

And now two very similar, but completely different figures, their difference is only in the base.

When you glue these two figures together, you won’t immediately understand what they are, they turned out to be completely unresponsive.

Another interesting figure is a torus, but we have it very simplified, its details are on the 5th sheet.

And finally, the last figure of equilateral triangles, I don’t even know what to call it, but the figure looks like a star. The development of this figure is on the fifth sheet.

That's all for today! I wish you success in this difficult work!
Origami cube is one of the most popular paper origami. If you don't know how to make an origami cube, then on this page you will find everything you need to assemble this simple paper figure.
In the first photo you can see what you will get if you follow the assembly diagram below. The second photo of the origami cube was taken by one of our site users. His cube looks more like a water bomb. If you have photos of origami you have collected, send them to: This email address is being protected from spambots. You must have JavaScript enabled to view it.

Assembly diagram
Below is a diagram of assembling an origami cube from the famous Japanese origami master Fumiaki Shingu. If you strictly follow the instructions, assembling the origami cube will not take much time, and the result will be the same as in the picture. After doing what is described in the diagram several times, you will understand how to make an origami cube quickly and without looking at the diagram.

Video master class
Assembling an origami cube may seem like a daunting task for beginners. Therefore, we advise you to enter the query “origami cube video” on the largest video hosting site on the Internet, YouTube. There you will find many different videos about the origami cube, which clearly show the steps to assemble the cube. We hope that after watching the assembly master class video, you will have no more questions about how to make an origami cube.
Here is another video in which a master assembles a simple paper cube:
And here is a video tutorial teaching how to assemble a rather original origami cube:
Symbolism
The symbolic meaning of the cube is taken from architecture. Cubes are usually laid in the foundations of buildings, so the cube symbolizes stability and undeniable truth. For the Chinese, the cube represents the deity of the Earth. In Israel, the cube is considered the Holy of All Saints.